WL76* Digital Series YL76* Digital Series - Toshiba-OM.net
WL76* Digital Series YL76* Digital Series - Toshiba-OM.net
WL76* Digital Series YL76* Digital Series - Toshiba-OM.net

You also want an ePaper? Increase the reach of your titles
YUMPU automatically turns print PDFs into web optimized ePapers that Google loves.
INSTALLING YOUR TV<br />
Installation and important information<br />
English<br />
Locate the television away from direct sunlight and strong<br />
lights. Soft, indirect lighting is recommended for<br />
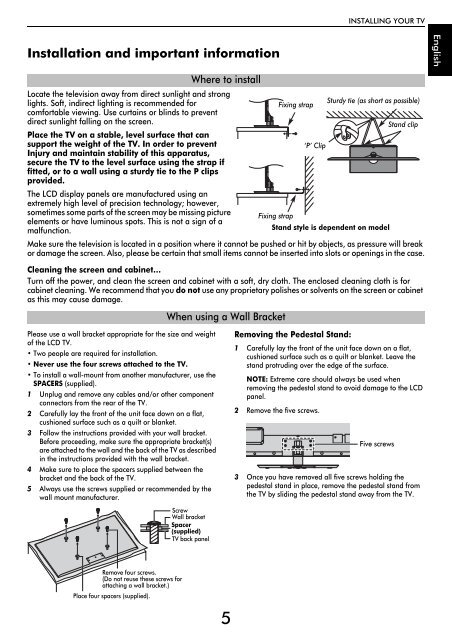
Sturdy tie (as short as possible)<br />
Fixing strap<br />
comfortable viewing. Use curtains or blinds to prevent<br />
direct sunlight falling on the screen.<br />
Stand clip<br />
Place the TV on a stable, level surface that can<br />
support the weight of the TV. In order to prevent<br />
‘P’ Clip<br />
Injury and maintain stability of this apparatus,<br />
secure the TV to the level surface using the strap if<br />
fitted, or to a wall using a sturdy tie to the P clips<br />
provided.<br />
The LCD display panels are manufactured using an<br />
extremely high level of precision technology; however,<br />
sometimes some parts of the screen may be missing picture Fixing strap<br />
elements or have luminous spots. This is not a sign of a<br />
malfunction.<br />
Stand style is dependent on model<br />
Make sure the television is located in a position where it cannot be pushed or hit by objects, as pressure will break<br />
or damage the screen. Also, please be certain that small items cannot be inserted into slots or openings in the case.<br />
Cleaning the screen and cabi<strong>net</strong>…<br />
Turn off the power, and clean the screen and cabi<strong>net</strong> with a soft, dry cloth. The enclosed cleaning cloth is for<br />
cabi<strong>net</strong> cleaning. We recommend that you do not use any proprietary polishes or solvents on the screen or cabi<strong>net</strong><br />
as this may cause damage.<br />
Please use a wall bracket appropriate for the size and weight<br />
of the LCD TV.<br />
• Two people are required for installation.<br />
• Never use the four screws attached to the TV.<br />
• To install a wall-mount from another manufacturer, use the<br />
SPACERS (supplied).<br />
1 Unplug and remove any cables and/or other component<br />
connectors from the rear of the TV.<br />
2 Carefully lay the front of the unit face down on a flat,<br />
cushioned surface such as a quilt or blanket.<br />
3 Follow the instructions provided with your wall bracket.<br />
Before proceeding, make sure the appropriate bracket(s)<br />
are attached to the wall and the back of the TV as described<br />
in the instructions provided with the wall bracket.<br />
4 Make sure to place the spacers supplied between the<br />
bracket and the back of the TV.<br />
5 Always use the screws supplied or recommended by the<br />
wall mount manufacturer.<br />
Where to install<br />
When using a Wall Bracket<br />
Screw<br />
Wall bracket<br />
Spacer<br />
(supplied)<br />
TV back panel<br />
Removing the Pedestal Stand:<br />
1 Carefully lay the front of the unit face down on a flat,<br />
cushioned surface such as a quilt or blanket. Leave the<br />
stand protruding over the edge of the surface.<br />
NOTE: Extreme care should always be used when<br />
removing the pedestal stand to avoid damage to the LCD<br />
panel.<br />
2 Remove the five screws.<br />
Five screws<br />
3 Once you have removed all five screws holding the<br />
pedestal stand in place, remove the pedestal stand from<br />
the TV by sliding the pedestal stand away from the TV.<br />
Remove four screws.<br />
(Do not reuse these screws for<br />
attaching a wall bracket.)<br />
Place four spacers (supplied).<br />
5