WL76* Digital Series YL76* Digital Series - Toshiba-OM.net
WL76* Digital Series YL76* Digital Series - Toshiba-OM.net
WL76* Digital Series YL76* Digital Series - Toshiba-OM.net
You also want an ePaper? Increase the reach of your titles
YUMPU automatically turns print PDFs into web optimized ePapers that Google loves.
CONTROLS AND FEATURES<br />
English<br />
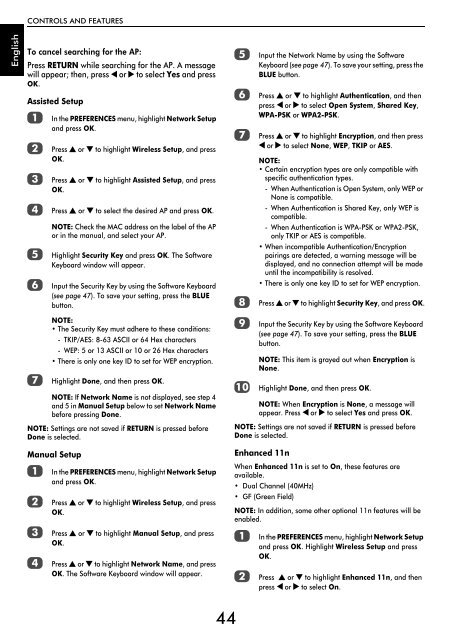
To cancel searching for the AP:<br />
Press RETURN while searching for the AP. A message<br />
will appear; then, press C or c to select Yes and press<br />
OK.<br />
Assisted Setup<br />
a<br />
b<br />
c<br />
d<br />
e<br />
f<br />
g<br />
In the PREFERENCES menu, highlight Network Setup<br />
and press OK.<br />
Press B or b to highlight Wireless Setup, and press<br />
OK.<br />
Press B or b to highlight Assisted Setup, and press<br />
OK.<br />
Press B or b to select the desired AP and press OK.<br />
NOTE: Check the MAC address on the label of the AP<br />
or in the manual, and select your AP.<br />
Highlight Security Key and press OK. The Software<br />
Keyboard window will appear.<br />
Input the Security Key by using the Software Keyboard<br />
(see page 47). To save your setting, press the BLUE<br />
button.<br />
NOTE:<br />
• The Security Key must adhere to these conditions:<br />
- TKIP/AES: 8-63 ASCII or 64 Hex characters<br />
- WEP: 5 or 13 ASCII or 10 or 26 Hex characters<br />
• There is only one key ID to set for WEP encryption.<br />
Highlight Done, and then press OK.<br />
NOTE: If Network Name is not displayed, see step 4<br />
and 5 in Manual Setup below to set Network Name<br />
before pressing Done.<br />
NOTE: Settings are not saved if RETURN is pressed before<br />
Done is selected.<br />
e<br />
f<br />
g<br />
h<br />
i<br />
j<br />
Input the Network Name by using the Software<br />
Keyboard (see page 47). To save your setting, press the<br />
BLUE button.<br />
Press B or b to highlight Authentication, and then<br />
press C or c to select Open System, Shared Key,<br />
WPA-PSK or WPA2-PSK.<br />
Press B or b to highlight Encryption, and then press<br />
C or c to select None, WEP, TKIP or AES.<br />
NOTE:<br />
• Certain encryption types are only compatible with<br />
specific authentication types.<br />
- When Authentication is Open System, only WEP or<br />
None is compatible.<br />
- When Authentication is Shared Key, only WEP is<br />
compatible.<br />
- When Authentication is WPA-PSK or WPA2-PSK,<br />
only TKIP or AES is compatible.<br />
• When incompatible Authentication/Encryption<br />
pairings are detected, a warning message will be<br />
displayed, and no connection attempt will be made<br />
until the incompatibility is resolved.<br />
• There is only one key ID to set for WEP encryption.<br />
Press B or b to highlight Security Key, and press OK.<br />
Input the Security Key by using the Software Keyboard<br />
(see page 47). To save your setting, press the BLUE<br />
button.<br />
NOTE: This item is grayed out when Encryption is<br />
None.<br />
Highlight Done, and then press OK.<br />
NOTE: When Encryption is None, a message will<br />
appear. Press C or c to select Yes and press OK.<br />
NOTE: Settings are not saved if RETURN is pressed before<br />
Done is selected.<br />
Manual Setup<br />
a<br />
b<br />
c<br />
d<br />
In the PREFERENCES menu, highlight Network Setup<br />
and press OK.<br />
Press B or b to highlight Wireless Setup, and press<br />
OK.<br />
Press B or b to highlight Manual Setup, and press<br />
OK.<br />
Press B or b to highlight Network Name, and press<br />
OK. The Software Keyboard window will appear.<br />
Enhanced 11n<br />
When Enhanced 11n is set to On, these features are<br />
available.<br />
• Dual Channel (40MHz)<br />
• GF (Green Field)<br />
NOTE: In addition, some other optional 11n features will be<br />
enabled.<br />
a<br />
b<br />
In the PREFERENCES menu, highlight Network Setup<br />
and press OK. Highlight Wireless Setup and press<br />
OK.<br />
Press B or b to highlight Enhanced 11n, and then<br />
press C or c to select On.<br />
44


