Owner's Manual SSP-600 Surround Processor - Classé Audio
Owner's Manual SSP-600 Surround Processor - Classé Audio
Owner's Manual SSP-600 Surround Processor - Classé Audio

You also want an ePaper? Increase the reach of your titles
YUMPU automatically turns print PDFs into web optimized ePapers that Google loves.
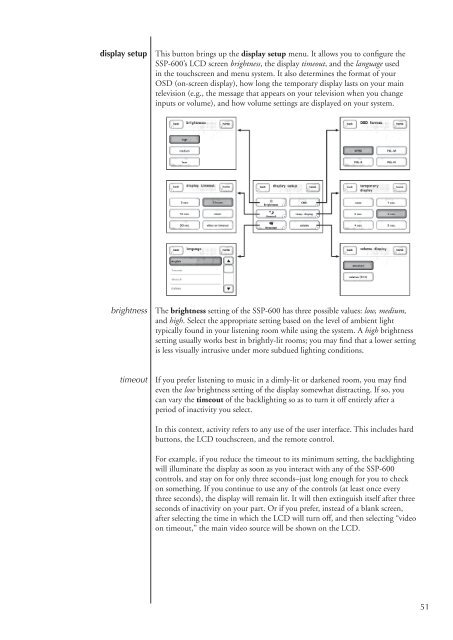
display setup<br />
This button brings up the display setup menu. It allows you to configure the<br />
<strong>SSP</strong>-<strong>600</strong>’s LCD screen brightness, the display timeout, and the language used<br />
in the touchscreen and menu system. It also determines the format of your<br />
OSD (on-screen display), how long the temporary display lasts on your main<br />
television (e.g., the message that appears on your television when you change<br />
inputs or volume), and how volume settings are displayed on your system.<br />
brightness<br />
The brightness setting of the <strong>SSP</strong>-<strong>600</strong> has three possible values: low, medium,<br />
and high. Select the appropriate setting based on the level of ambient light<br />
typically found in your listening room while using the system. A high brightness<br />
setting usually works best in brightly-lit rooms; you may find that a lower setting<br />
is less visually intrusive under more subdued lighting conditions.<br />
timeout<br />
If you prefer listening to music in a dimly-lit or darkened room, you may find<br />
even the low brightness setting of the display somewhat distracting. If so, you<br />
can vary the timeout of the backlighting so as to turn it off entirely after a<br />
period of inactivity you select.<br />
In this context, activity refers to any use of the user interface. This includes hard<br />
buttons, the LCD touchscreen, and the remote control.<br />
For example, if you reduce the timeout to its minimum setting, the backlighting<br />
will illuminate the display as soon as you interact with any of the <strong>SSP</strong>-<strong>600</strong><br />
controls, and stay on for only three seconds–just long enough for you to check<br />
on something. If you continue to use any of the controls (at least once every<br />
three seconds), the display will remain lit. It will then extinguish itself after three<br />
seconds of inactivity on your part. Or if you prefer, instead of a blank screen,<br />
after selecting the time in which the LCD will turn off, and then selecting “video<br />
on timeout,” the main video source will be shown on the LCD.<br />
51