

Alesis DM10 Manual - American Musical Supply
Alesis DM10 Manual - American Musical Supply
Alesis DM10 Manual - American Musical Supply

Create successful ePaper yourself
Turn your PDF publications into a flip-book with our unique Google optimized e-Paper software.
KITS, VOICES, ACCOMPANIMENT & INSTRUMENTS<br />
The <strong>DM10</strong> Module has 100 Preset Kits and 100 User Kits, which you can select from the Main Screen. Each<br />
Kit is a collection of Voices – or drum sounds – that are assigned to each TRIGGER INPUT on the <strong>DM10</strong><br />
module's rear panel. When a trigger connected to that input is struck, that Voice will sound.<br />
Each Voice consists of two Layers, each with its own Instrument. Both Layers sound together, helping to<br />
create powerful composite and layered sounds and timbres for a more dynamic performance.<br />
You can change the sound of your performance by selecting different Kits or by editing the Kits by changing<br />
the Instruments that make up each Voice. You can also edit various parameters of each Instrument<br />
themselves (e.g., level, panning, decay, reverb, etc.) in each Kit.<br />
IMPORTANT: At any given time, the <strong>DM10</strong> module has a Kit selected and a Sequence selected. If you<br />
change the Sequence, this will change your current Kit to the one that is associated with that Sequence. If<br />
you change the Kit, this will NOT change the current Sequence. However, if you then play the current<br />
Sequence, the chords or "hit groups" may sound unusual. In this case, we recommend muting Layer B of<br />
that Kit's Accompaniment (see EDITING VOICE & ACCOMPANIMENT PARAMETERS for more information)<br />
or muting the Accompaniment altogether by pressing MUTE ACCOMP.<br />
SELECTING A KIT<br />
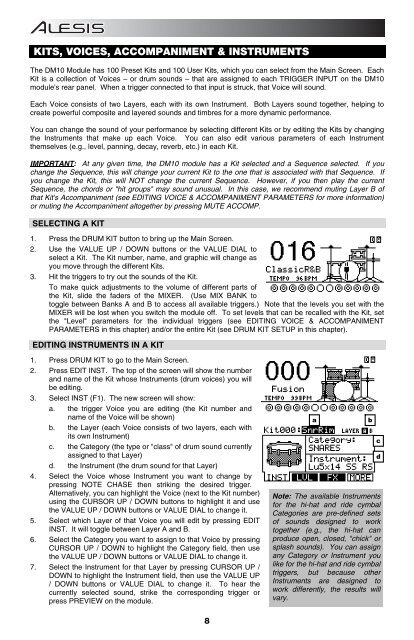
1. Press the DRUM KIT button to bring up the Main Screen.<br />
2. Use the VALUE UP / DOWN buttons or the VALUE DIAL to<br />
select a Kit. The Kit number, name, and graphic will change as<br />
you move through the different Kits.<br />
3. Hit the triggers to try out the sounds of the Kit.<br />
To make quick adjustments to the volume of different parts of<br />
the Kit, slide the faders of the MIXER. (Use MIX BANK to<br />
toggle between Banks A and B to access all available triggers.) Note that the levels you set with the<br />
MIXER will be lost when you switch the module off. To set levels that can be recalled with the Kit, set<br />
the "Level" parameters for the individual triggers (see EDITING VOICE & ACCOMPANIMENT<br />
PARAMETERS in this chapter) and/or the entire Kit (see DRUM KIT SETUP in this chapter).<br />
EDITING INSTRUMENTS IN A KIT<br />
1. Press DRUM KIT to go to the Main Screen.<br />
2. Press EDIT INST. The top of the screen will show the number<br />
and name of the Kit whose Instruments (drum voices) you will<br />
be editing.<br />
3. Select INST (F1). The new screen will show:<br />
a. the trigger Voice you are editing (the Kit number and<br />
name of the Voice will be shown)<br />
b. the Layer (each Voice consists of two layers, each with<br />
its own Instrument)<br />
c. the Category (the type or "class" of drum sound currently<br />
assigned to that Layer)<br />
d. the Instrument (the drum sound for that Layer)<br />
4. Select the Voice whose Instrument you want to change by<br />
pressing NOTE CHASE then striking the desired trigger.<br />
Alternatively, you can highlight the Voice (next to the Kit number)<br />
using the CURSOR UP / DOWN buttons to highlight it and use<br />
the VALUE UP / DOWN buttons or VALUE DIAL to change it.<br />
5. Select which Layer of that Voice you will edit by pressing EDIT<br />
INST. It will toggle between Layer A and B.<br />
6. Select the Category you want to assign to that Voice by pressing<br />
CURSOR UP / DOWN to highlight the Category field, then use<br />
the VALUE UP / DOWN buttons or VALUE DIAL to change it.<br />
7. Select the Instrument for that Layer by pressing CURSOR UP /<br />
DOWN to highlight the Instrument field, then use the VALUE UP<br />
/ DOWN buttons or VALUE DIAL to change it. To hear the<br />
currently selected sound, strike the corresponding trigger or<br />
press PREVIEW on the module.<br />
a<br />
Note: The available Instruments<br />
for the hi-hat and ride cymbal<br />
Categories are pre-defined sets<br />
of sounds designed to work<br />
together (e.g., the hi-hat can<br />
produce open, closed, "chick" or<br />
splash sounds). You can assign<br />
any Category or Instrument you<br />
like for the hi-hat and ride cymbal<br />
triggers, but because other<br />
Instruments are designed to<br />
work differently, the results will<br />
vary.<br />
b<br />
c<br />
d<br />
8


