

Alesis DM10 Manual - American Musical Supply
Alesis DM10 Manual - American Musical Supply
Alesis DM10 Manual - American Musical Supply

You also want an ePaper? Increase the reach of your titles
YUMPU automatically turns print PDFs into web optimized ePapers that Google loves.
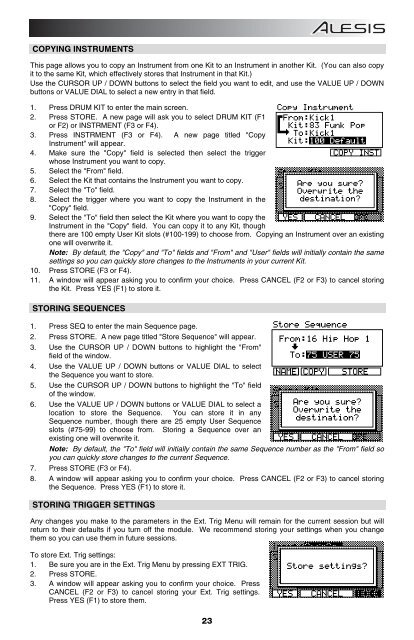
COPYING INSTRUMENTS<br />
This page allows you to copy an Instrument from one Kit to an Instrument in another Kit. (You can also copy<br />
it to the same Kit, which effectively stores that Instrument in that Kit.)<br />
Use the CURSOR UP / DOWN buttons to select the field you want to edit, and use the VALUE UP / DOWN<br />
buttons or VALUE DIAL to select a new entry in that field.<br />
1. Press DRUM KIT to enter the main screen.<br />
2. Press STORE. A new page will ask you to select DRUM KIT (F1<br />
or F2) or INSTRMENT (F3 or F4).<br />
3. Press INSTRMENT (F3 or F4). A new page titled "Copy<br />
Instrument" will appear.<br />
4. Make sure the "Copy" field is selected then select the trigger<br />
whose Instrument you want to copy.<br />
5. Select the "From" field.<br />
6. Select the Kit that contains the Instrument you want to copy.<br />
7. Select the "To" field.<br />
8. Select the trigger where you want to copy the Instrument in the<br />
"Copy" field.<br />
9. Select the "To" field then select the Kit where you want to copy the<br />
Instrument in the "Copy" field. You can copy it to any Kit, though<br />
there are 100 empty User Kit slots (#100-199) to choose from. Copying an Instrument over an existing<br />
one will overwrite it.<br />
Note: By default, the "Copy" and "To" fields and "From" and "User" fields will initially contain the same<br />
settings so you can quickly store changes to the Instruments in your current Kit.<br />
10. Press STORE (F3 or F4).<br />
11. A window will appear asking you to confirm your choice. Press CANCEL (F2 or F3) to cancel storing<br />
the Kit. Press YES (F1) to store it.<br />
STORING SEQUENCES<br />
1. Press SEQ to enter the main Sequence page.<br />
2. Press STORE. A new page titled "Store Sequence" will appear.<br />
3. Use the CURSOR UP / DOWN buttons to highlight the "From"<br />
field of the window.<br />
4. Use the VALUE UP / DOWN buttons or VALUE DIAL to select<br />
the Sequence you want to store.<br />
5. Use the CURSOR UP / DOWN buttons to highlight the "To" field<br />
of the window.<br />
6. Use the VALUE UP / DOWN buttons or VALUE DIAL to select a<br />
location to store the Sequence. You can store it in any<br />
Sequence number, though there are 25 empty User Sequence<br />
slots (#75-99) to choose from. Storing a Sequence over an<br />
existing one will overwrite it.<br />
Note: By default, the "To" field will initially contain the same Sequence number as the "From" field so<br />
you can quickly store changes to the current Sequence.<br />
7. Press STORE (F3 or F4).<br />
8. A window will appear asking you to confirm your choice. Press CANCEL (F2 or F3) to cancel storing<br />
the Sequence. Press YES (F1) to store it.<br />
STORING TRIGGER SETTINGS<br />
Any changes you make to the parameters in the Ext. Trig Menu will remain for the current session but will<br />
return to their defaults if you turn off the module. We recommend storing your settings when you change<br />
them so you can use them in future sessions.<br />
To store Ext. Trig settings:<br />
1. Be sure you are in the Ext. Trig Menu by pressing EXT TRIG.<br />
2. Press STORE.<br />
3. A window will appear asking you to confirm your choice. Press<br />
CANCEL (F2 or F3) to cancel storing your Ext. Trig settings.<br />
Press YES (F1) to store them.<br />
23


