

Alesis DM10 Manual - American Musical Supply
Alesis DM10 Manual - American Musical Supply
Alesis DM10 Manual - American Musical Supply

You also want an ePaper? Increase the reach of your titles
YUMPU automatically turns print PDFs into web optimized ePapers that Google loves.
GETTING STARTED<br />
Please read the following instructions to set up your <strong>DM10</strong> module for its first use!<br />
RESETTING THE MODULE TO FACTORY DEFAULTS<br />
If you ever need to return the module to its original default factory settings, press and hold the EXIT and<br />
STORE buttons simultaneously while turning it on.<br />
CHECK FOR UPDATES<br />
Since the initial release of this module, we may have released new firmware or sound ROM files. To ensure<br />
your <strong>DM10</strong> module has the latest sounds and software features, we recommend checking the "Docs &<br />
Downloads" tab of www.alesis.com/dm10prokit for available updates. See the UPDATING THE MODULE<br />
chapter for more information.<br />
CALIBRATE YOUR HI-HAT PEDAL<br />
The first time you connect a hi-hat pedal to the <strong>DM10</strong> module, we<br />
recommend calibrating it so the module can "read" the pedal's<br />
movement optimally.<br />
If you use the same hi-hat each session (even if you have disconnected<br />
and reconnected it), then you shouldn't need to calibrate each time as long as you store your trigger settings<br />
after calibrating (see STORING TRIGGER SETTINGS in the STORING & COPYING chapter for more<br />
information). However, anytime you connect a different hi-hat from the previously connected one, you should<br />
calibrate it.<br />
To calibrate the hi-hat pedal:<br />
1. Connect the hi-hat pedal to the module but do not press it down.<br />
2. On the module, press EXT TRIG.<br />
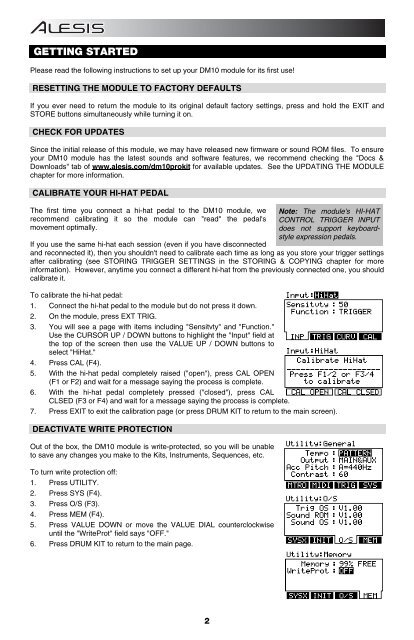
3. You will see a page with items including "Sensitvty" and "Function."<br />
Use the CURSOR UP / DOWN buttons to highlight the "Input" field at<br />
the top of the screen then use the VALUE UP / DOWN buttons to<br />
select "HiHat."<br />
4. Press CAL (F4).<br />
5. With the hi-hat pedal completely raised ("open"), press CAL OPEN<br />
(F1 or F2) and wait for a message saying the process is complete.<br />
6. With the hi-hat pedal completely pressed ("closed"), press CAL<br />
CLSED (F3 or F4) and wait for a message saying the process is complete.<br />
7. Press EXIT to exit the calibration page (or press DRUM KIT to return to the main screen).<br />
DEACTIVATE WRITE PROTECTION<br />
Out of the box, the <strong>DM10</strong> module is write-protected, so you will be unable<br />
to save any changes you make to the Kits, Instruments, Sequences, etc.<br />
To turn write protection off:<br />
1. Press UTILITY.<br />
2. Press SYS (F4).<br />
3. Press O/S (F3).<br />
4. Press MEM (F4).<br />
5. Press VALUE DOWN or move the VALUE DIAL counterclockwise<br />
until the "WriteProt" field says "OFF."<br />
6. Press DRUM KIT to return to the main page.<br />
Note: The module's HI-HAT<br />
CONTROL TRIGGER INPUT<br />
does not support keyboardstyle<br />
expression pedals.<br />
2


