

Alesis DM10 Manual - American Musical Supply
Alesis DM10 Manual - American Musical Supply
Alesis DM10 Manual - American Musical Supply

Create successful ePaper yourself
Turn your PDF publications into a flip-book with our unique Google optimized e-Paper software.
EXT. TRIG MENU<br />
The <strong>DM10</strong>'s Ext. Trig Menu contains several pages of parameters related to triggering (striking pads,<br />
cymbals, etc.). The settings in these pages affect ALL Kits.<br />
TRIGGER INPUT PARAMETERS<br />
The INP page of the Ext. Trig Menu contains some parameters that affect the triggers' sensivity and function<br />
within the module.<br />
1. Press EXT TRIG to enter the main Ext. Trig Menu page.<br />
The first page shown should be INP (F1).<br />
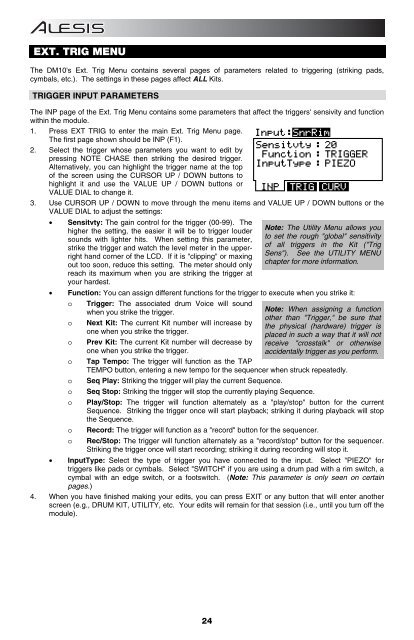
2. Select the trigger whose parameters you want to edit by<br />
pressing NOTE CHASE then striking the desired trigger.<br />
Alternatively, you can highlight the trigger name at the top<br />
of the screen using the CURSOR UP / DOWN buttons to<br />
highlight it and use the VALUE UP / DOWN buttons or<br />
VALUE DIAL to change it.<br />
3. Use CURSOR UP / DOWN to move through the menu items and VALUE UP / DOWN buttons or the<br />
VALUE DIAL to adjust the settings:<br />
• Sensitvty: The gain control for the trigger (00-99). The<br />
higher the setting, the easier it will be to trigger louder<br />
sounds with lighter hits. When setting this parameter,<br />
strike the trigger and watch the level meter in the upperright<br />
hand corner of the LCD. If it is "clipping" or maxing<br />
out too soon, reduce this setting. The meter should only<br />
reach its maximum when you are striking the trigger at<br />
your hardest.<br />
• Function: You can assign different functions for the trigger to execute when you strike it:<br />
o Trigger: The associated drum Voice will sound<br />
when you strike the trigger.<br />
o<br />
o<br />
Next Kit: The current Kit number will increase by<br />
one when you strike the trigger.<br />
Prev Kit: The current Kit number will decrease by<br />
one when you strike the trigger.<br />
Note: The Utility Menu allows you<br />
to set the rough "global" sensitivity<br />
of all triggers in the Kit ("Trig<br />
Sens"). See the UTILITY MENU<br />
chapter for more information.<br />
Note: When assigning a function<br />
other than "Trigger," be sure that<br />
the physical (hardware) trigger is<br />
placed in such a way that it will not<br />
receive "crosstalk" or otherwise<br />
accidentally trigger as you perform.<br />
o Tap Tempo: The trigger will function as the TAP<br />
TEMPO button, entering a new tempo for the sequencer when struck repeatedly.<br />
o Seq Play: Striking the trigger will play the current Sequence.<br />
o Seq Stop: Striking the trigger will stop the currently playing Sequence.<br />
o Play/Stop: The trigger will function alternately as a "play/stop" button for the current<br />
Sequence. Striking the trigger once will start playback; striking it during playback will stop<br />
the Sequence.<br />
o Record: The trigger will function as a "record" button for the sequencer.<br />
o Rec/Stop: The trigger will function alternately as a "record/stop" button for the sequencer.<br />
Striking the trigger once will start recording; striking it during recording will stop it.<br />
• InputType: Select the type of trigger you have connected to the input. Select "PIEZO" for<br />
triggers like pads or cymbals. Select "SWITCH" if you are using a drum pad with a rim switch, a<br />
cymbal with an edge switch, or a footswitch. (Note: This parameter is only seen on certain<br />
pages.)<br />
4. When you have finished making your edits, you can press EXIT or any button that will enter another<br />
screen (e.g., DRUM KIT, UTILITY, etc. Your edits will remain for that session (i.e., until you turn off the<br />
module).<br />
24


