

Alesis DM10 Manual - American Musical Supply
Alesis DM10 Manual - American Musical Supply
Alesis DM10 Manual - American Musical Supply

You also want an ePaper? Increase the reach of your titles
YUMPU automatically turns print PDFs into web optimized ePapers that Google loves.
EDITING VOICE & ACCOMPANIMENT PARAMETERS<br />
While editing your Kits by changing the Instruments in a Note: The <strong>DM10</strong> will retain any changes<br />
drum Voice or the Accompaniment, you can also edit you make to the Instruments or parameters<br />
various parameters that affect each Layer and, therefore,<br />
as you move between the various Kits.<br />
the Instrument on that Layer. You can do this for the drum<br />
Voices or the Accompaniment, though some parameters below may only be editable for one of these.<br />
1. Press DRUM KIT to go to the Main Screen.<br />
2. Press EDIT INST to edit drum Voice parameters or EDIT<br />
ACCOMP to edit Accompaniment parameters. The top of<br />
the screen will show the number and name of the Kit<br />
whose Instruments (drum Voices or Accompaniment) you<br />
will be editing.<br />
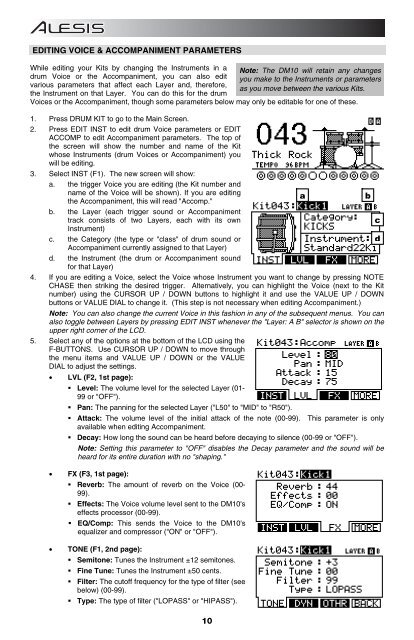
3. Select INST (F1). The new screen will show:<br />
a. the trigger Voice you are editing (the Kit number and<br />
name of the Voice will be shown). If you are editing<br />
the Accompaniment, this will read "Accomp."<br />
a<br />
b<br />
b. the Layer (each trigger sound or Accompaniment<br />
track consists of two Layers, each with its own<br />
c<br />
Instrument)<br />
c. the Category (the type or "class" of drum sound or<br />
Accompaniment currently assigned to that Layer)<br />
d<br />
d. the Instrument (the drum or Accompaniment sound<br />
for that Layer)<br />
4. If you are editing a Voice, select the Voice whose Instrument you want to change by pressing NOTE<br />
CHASE then striking the desired trigger. Alternatively, you can highlight the Voice (next to the Kit<br />
number) using the CURSOR UP / DOWN buttons to highlight it and use the VALUE UP / DOWN<br />
buttons or VALUE DIAL to change it. (This step is not necessary when editing Accompaniment.)<br />
Note: You can also change the current Voice in this fashion in any of the subsequent menus. You can<br />
also toggle between Layers by pressing EDIT INST whenever the "Layer: A B" selector is shown on the<br />
upper right corner of the LCD.<br />
5. Select any of the options at the bottom of the LCD using the<br />
F-BUTTONS. Use CURSOR UP / DOWN to move through<br />
the menu items and VALUE UP / DOWN or the VALUE<br />
DIAL to adjust the settings.<br />
• LVL (F2, 1st page):<br />
• Level: The volume level for the selected Layer (01-<br />
99 or "OFF").<br />
• Pan: The panning for the selected Layer ("L50" to "MID" to "R50").<br />
• Attack: The volume level of the initial attack of the note (00-99). This parameter is only<br />
available when editing Accompaniment.<br />
• Decay: How long the sound can be heard before decaying to silence (00-99 or "OFF").<br />
Note: Setting this parameter to "OFF" disables the Decay parameter and the sound will be<br />
heard for its entire duration with no "shaping."<br />
• FX (F3, 1st page):<br />
• Reverb: The amount of reverb on the Voice (00-<br />
99).<br />
• Effects: The Voice volume level sent to the <strong>DM10</strong>'s<br />
effects processor (00-99).<br />
• EQ/Comp: This sends the Voice to the <strong>DM10</strong>'s<br />
equalizer and compressor ("ON" or "OFF").<br />
• TONE (F1, 2nd page):<br />
• Semitone: Tunes the Instrument ±12 semitones.<br />
• Fine Tune: Tunes the Instrument ±50 cents.<br />
• Filter: The cutoff frequency for the type of filter (see<br />
below) (00-99).<br />
• Type: The type of filter ("LOPASS" or "HIPASS").<br />
10


