

Alesis DM10 Manual - American Musical Supply
Alesis DM10 Manual - American Musical Supply
Alesis DM10 Manual - American Musical Supply

Create successful ePaper yourself
Turn your PDF publications into a flip-book with our unique Google optimized e-Paper software.
HI-HAT CALIBRATION<br />
The first time you connect a hi-hat pedal to the <strong>DM10</strong> module, we<br />
recommend calibrating it so the module can "read" the pedal's<br />
movement optimally. If you use the same hi-hat each session (even if<br />
you have disconnected and reconnected it), then you shouldn't need to<br />
calibrate each time as long as you store your trigger settings after<br />
calibrating (see STORING TRIGGER SETTINGS in the STORING &<br />
COPYING chapter for more information). However, anytime you connect a different hi-hat from the<br />
previously connected one, you should calibrate it.<br />
To calibrate the hi-hat pedal:<br />
1. Connect the hi-hat pedal to the module but do not press it down.<br />
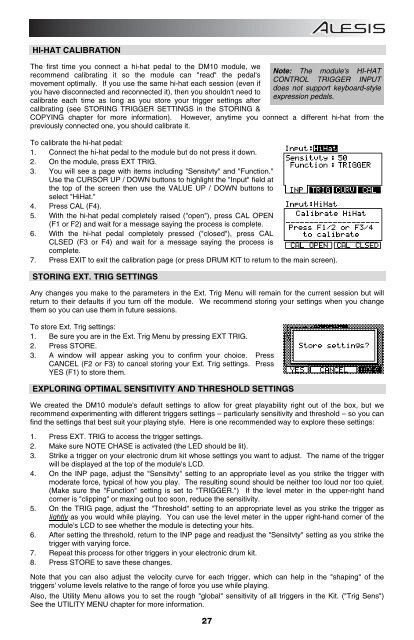
2. On the module, press EXT TRIG.<br />
3. You will see a page with items including "Sensitvty" and "Function."<br />
Use the CURSOR UP / DOWN buttons to highlight the "Input" field at<br />
the top of the screen then use the VALUE UP / DOWN buttons to<br />
select "HiHat."<br />
4. Press CAL (F4).<br />
5. With the hi-hat pedal completely raised ("open"), press CAL OPEN<br />
(F1 or F2) and wait for a message saying the process is complete.<br />
6. With the hi-hat pedal completely pressed ("closed"), press CAL<br />
CLSED (F3 or F4) and wait for a message saying the process is<br />
complete.<br />
7. Press EXIT to exit the calibration page (or press DRUM KIT to return to the main screen).<br />
STORING EXT. TRIG SETTINGS<br />
Any changes you make to the parameters in the Ext. Trig Menu will remain for the current session but will<br />
return to their defaults if you turn off the module. We recommend storing your settings when you change<br />
them so you can use them in future sessions.<br />
To store Ext. Trig settings:<br />
1. Be sure you are in the Ext. Trig Menu by pressing EXT TRIG.<br />
2. Press STORE.<br />
3. A window will appear asking you to confirm your choice. Press<br />
CANCEL (F2 or F3) to cancel storing your Ext. Trig settings. Press<br />
YES (F1) to store them.<br />
EXPLORING OPTIMAL SENSITIVITY AND THRESHOLD SETTINGS<br />
We created the <strong>DM10</strong> module's default settings to allow for great playability right out of the box, but we<br />
recommend experimenting with different triggers settings – particularly sensitivity and threshold – so you can<br />
find the settings that best suit your playing style. Here is one recommended way to explore these settings:<br />
1. Press EXT. TRIG to access the trigger settings.<br />
2. Make sure NOTE CHASE is activated (the LED should be lit).<br />
3. Strike a trigger on your electronic drum kit whose settings you want to adjust. The name of the trigger<br />
will be displayed at the top of the module's LCD.<br />
4. On the INP page, adjust the "Sensitvty" setting to an appropriate level as you strike the trigger with<br />
moderate force, typical of how you play. The resulting sound should be neither too loud nor too quiet.<br />
(Make sure the "Function" setting is set to "TRIGGER.") If the level meter in the upper-right hand<br />
corner is "clipping" or maxing out too soon, reduce the sensitivity.<br />
5. On the TRIG page, adjust the "Threshold" setting to an appropriate level as you strike the trigger as<br />
lightly as you would while playing. You can use the level meter in the upper right-hand corner of the<br />
module's LCD to see whether the module is detecting your hits.<br />
6. After setting the threshold, return to the INP page and readjust the "Sensitvty" setting as you strike the<br />
trigger with varying force.<br />
7. Repeat this process for other triggers in your electronic drum kit.<br />
8. Press STORE to save these changes.<br />
Note that you can also adjust the velocity curve for each trigger, which can help in the "shaping" of the<br />
triggers' volume levels relative to the range of force you use while playing.<br />
Also, the Utility Menu allows you to set the rough "global" sensitivity of all triggers in the Kit. ("Trig Sens")<br />
See the UTILITY MENU chapter for more information.<br />
27<br />
Note: The module's HI-HAT<br />
CONTROL TRIGGER INPUT<br />
does not support keyboard-style<br />
expression pedals.


