C:\Documents and Settings\Allen - MSAWorld.com
C:\Documents and Settings\Allen - MSAWorld.com
C:\Documents and Settings\Allen - MSAWorld.com

You also want an ePaper? Increase the reach of your titles
YUMPU automatically turns print PDFs into web optimized ePapers that Google loves.
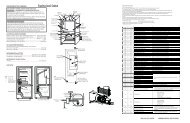
5. Attach the green power cord ground wire to the<br />
cabinet with the green ground screw.<br />
6. Attach the white (neutral) power cord conductor from<br />
the power cord <strong>and</strong> the neutral ground wire from the<br />
dryer harness (removed from the ground screw in step<br />
3) to the silver-colored center terminal on the terminal<br />
block. Tighten the screw securely.<br />
7. Attach the red <strong>and</strong> black power cord conductors to<br />
the outer brass-colored terminals on the terminal<br />
block.<br />
Do not make a sharp bend or crimp<br />
wiring/conductor at the connections.<br />
8. Tighten the screws securing the cord restraint firmly<br />
against the power cord.<br />
9. Tighten the strain relief nut securely so the strain<br />
relief does not turn.<br />
10.Reinstall the terminal block access cover.<br />
INSTALLATION<br />
1. GAS CONNECTION (Gas dryers only)<br />
a. Remove the shipping cap from gas pipe at the<br />
rear of the dryer.<br />
NOTE: DO NOT connect the dryer to L.P. gas service<br />
without converting the gas valve. An L.P.<br />
conversion kit must be installed by a qualified<br />
gas technician.<br />
b. Connect a 1/2 inch (1.27 cm) I.D. semi-rigid or<br />
approved pipe from gas supply line to the 3/8<br />
inch (0.96 cm) pipe located on the back of the<br />
dryer. Use a 1/2 inch to 3/8 inch (1.27 cm to<br />
0.96 cm) reducer for a connection. Apply an<br />
approved thread sealer that is resistant to the<br />
corrosive action of liquefied gases on all pipe<br />
connections.<br />
c. Open the shutoff valve in the gas supply line.<br />
d. Test all connections by brushing on a soapy<br />
watersolution.<br />
NEVER TEST FOR GAS LEAKS WITH AND OPEN<br />
FLAME.<br />
2. Connect the exhaust duct to outside exhaust system.<br />
Use duct tape to seal all joints.<br />
3. With the dryer in its final position, adjust one or more<br />
19<br />
of the legs until the dryer is resting solid on all four<br />
legs. Place a level on top of the dryer. THE DRYER<br />
MUST BE LEVEL AND RESTING SOLID ON ALL<br />
FOUR LEGS.<br />
4. Plug the power cord into a grounded outlet.<br />
NOTE: Check to ensure the power is off at circuit<br />
breaker/fuse box before plugging the power cord<br />
into the outlet.<br />
5. Turn on the power at the circuit breaker/fuse box.<br />
Before operating the dryer, make sure<br />
the dryer area is clear <strong>and</strong> free from <strong>com</strong>bustible materials,<br />
gasoline, <strong>and</strong> other flammable vapors. Also see that<br />
nothing (such as boxes, clothing,etc.) obstructs the flow<br />
of <strong>com</strong>bustion <strong>and</strong> ventilation air.<br />
6. Run the dryer through a cycle check for proper<br />
operation.<br />
NOTE: On gas dryers, before the burner will light, it is<br />
necessary for the gas line to be bled of air. If the<br />
burner does not light within 45 seconds the first<br />
time the dryer is turned on, the safety switch<br />
will shut the burner off. If this happens, turn the<br />
timer to “OFF” <strong>and</strong> wait 5 minutes before making<br />
another attempt to light.<br />
7. Place these instructions in a location near the dryer<br />
for future reference.<br />
NOTE: A wiring diagram is located inside the dryer.<br />
REPLACEMENT PARTS<br />
If replacements parts are needed for your dryer, contact<br />
the source where you purchased your dryer, call 1-800-<br />
944-9044, or visit our website, www.frigidaire.<strong>com</strong>, for<br />
the Frigidaire Company Authorized Parts Distributor<br />
nearest you.<br />
Label all wires prior to disconnection<br />
when servicing controls. Wiring errors can cause<br />
improper <strong>and</strong> dangerous operation. Verify proper<br />
operation after servicing.<br />
Destroy the carton <strong>and</strong> plastic bags<br />
after the dryer is unpacked. Children might use them for<br />
play. Cartons covered with rugs, bedspreads, or plastic<br />
sheets can be<strong>com</strong>e airtight chambers causing<br />
suffocation. Place all materials in a garbage container<br />
or make materials inaccessible to children.<br />
The instructions in this manual <strong>and</strong> all<br />
other literature included with this dryer are not meant to