C:\Documents and Settings\Allen - MSAWorld.com
C:\Documents and Settings\Allen - MSAWorld.com
C:\Documents and Settings\Allen - MSAWorld.com

Create successful ePaper yourself
Turn your PDF publications into a flip-book with our unique Google optimized e-Paper software.
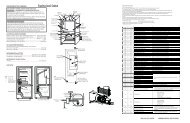
Removing the gas valve coils: (Gas dryers)<br />
1. Disconnect the dryer from electrical supply <strong>and</strong><br />
remove the front panel.<br />
2. Disconnect the wires from the coils, remove the (2)<br />
screws holding the coil bracket to the valve base <strong>and</strong><br />
lift off the coils.<br />
Removing the <strong>com</strong>bustion chamber: (Gas<br />
dryers)<br />
1. Disconnect the dryer from electrical supply <strong>and</strong><br />
remove the sensor <strong>and</strong> gas valve assembly.<br />
2. Remove the (2) screws holding the <strong>com</strong>bustion<br />
chamber to the base, raise the end <strong>and</strong> pull the<br />
chamber out the duct.<br />
.<br />
Removing the sensor: (Gas dryers)<br />
1. Disconnect the dryer from electrical supply <strong>and</strong><br />
remove the front panel.<br />
2. Disconnect the (2) wires from the sensor.<br />
3. Remove the (1) screw holding the sensor to the<br />
<strong>com</strong>bustion chamber.<br />
Removing the duct <strong>and</strong> heat shield: (Gas<br />
dryers)<br />
1. Disconnect the dryer from electrical supply <strong>and</strong><br />
remove the drum.<br />
2. Remove (4) screws securing the heat shield to the<br />
rear panel.<br />
68