C:\Documents and Settings\Allen - MSAWorld.com
C:\Documents and Settings\Allen - MSAWorld.com
C:\Documents and Settings\Allen - MSAWorld.com

You also want an ePaper? Increase the reach of your titles
YUMPU automatically turns print PDFs into web optimized ePapers that Google loves.
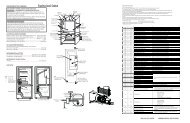
3. Remove the hot melt glue <strong>and</strong> pull air duct down <strong>and</strong><br />
lift off.<br />
2. The foam seal, glued to front panel duct, provides a<br />
seal between the front panel duct <strong>and</strong> the blower.<br />
3. To replace the seal, pull the old seal off, clean the<br />
duct <strong>and</strong> glue the replacement to the duct.<br />
Replacing the felt seal:<br />
1. Disconnect the dryer from electrical supply.<br />
2. Remove the front panel.<br />
3. The felt seal is a (2) piece seal that is glued to the<br />
rimof the door opening <strong>and</strong>is whatthe drum rides on.<br />
Removing the rear access panel:<br />
1. Remove the (2) screws holding the access panel to<br />
the rear panel, swing the left side of the panel out to<br />
disengage the tabs <strong>and</strong> remove.<br />
4. To replace the seal, pull the old seal off , clean the<br />
rim <strong>and</strong> glue the replacement to the rim.<br />
Releasing the dryer belt:<br />
1. Remove the access panel.<br />
Replacing the foam seal:<br />
1. Disconnect the dryer from electrical supply <strong>and</strong><br />
remove the front panel.<br />
61