C:\Documents and Settings\Allen - MSAWorld.com
C:\Documents and Settings\Allen - MSAWorld.com
C:\Documents and Settings\Allen - MSAWorld.com

Create successful ePaper yourself
Turn your PDF publications into a flip-book with our unique Google optimized e-Paper software.
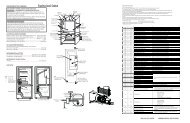
Removing the ball hitch from the drum:<br />
1. Disconnect the dryer from electrical supply <strong>and</strong><br />
remove the drum.<br />
2. Remove the (3) screws from inside the drum<br />
securing the ball hitch to the drum.<br />
Removing the ball hitch support:<br />
1. Disconnect the dryer from electrical supply <strong>and</strong><br />
remove the drum.<br />
Removing the teflon glides:<br />
1. Disconnect the dryer from electrical supply <strong>and</strong><br />
remove the front panel.<br />
2. Using a 5/16” nut driver, remove the (2) screws<br />
holding the ball hitch support to the rear panel while<br />
holding the large tinnerman clip from the rear of the<br />
dryer.<br />
2. To release the glides, squeeze the tabs which hold<br />
the glides to the rim of the drum <strong>and</strong> push out.<br />
Removing the drum heat shield: (Electric<br />
dryers)<br />
1. Disconnect the dryer from electrical supply <strong>and</strong><br />
remove the drum.<br />
2. Remove the (3) screws from inside of the drum<br />
securing the shield to the rear of the drum.<br />
Note:<br />
Do not lose the grounding ball or the tinnerman<br />
mounting clip from the rear of the dryer.<br />
63