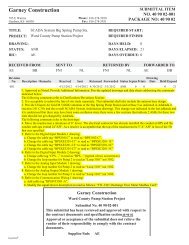
33 12 16.26 - 001-A - Butterfly Valves - Garney Construction
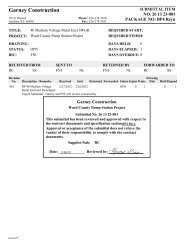
33 12 16.26 - 001-A - Butterfly Valves - Garney Construction
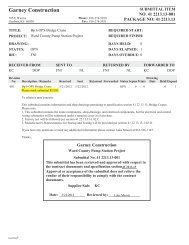
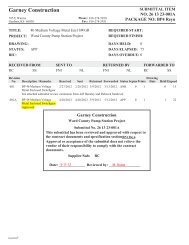
33 12 16.26 - 001-A - Butterfly Valves - Garney Construction

You also want an ePaper? Increase the reach of your titles
YUMPU automatically turns print PDFs into web optimized ePapers that Google loves.
Worm gearboxes GS 50.3 – GS 250.3<br />
Operation instructions<br />
<strong>12</strong>.2 Grease change for worm gearboxes GS 50.3 – GS <strong>12</strong>5.3 and primary reduction gearing VZ 2.3 – VZ 4.3<br />
.<br />
For gearboxes with multi-turn actuator: Remove multi-turn actuator.<br />
Remove gearbox from the valve:<br />
During this time, the valve/pipeline must not be under pressure!<br />
<strong>12</strong>.2.1 Worm gearboxes Refer to spare parts list GS 50.3 – GS <strong>12</strong>5.3, page 24.<br />
Grease type, see name plate; grease quantities, see page 19, table 4.<br />
Mark position of the gearbox on the valve, loosen connecting bolts to the valve<br />
and remove the worm gearbox.<br />
Remove fastening bolts with lock washers from the housing cover (518.0) and<br />
take off housing cover.<br />
. Remove bolts with lock washers from the bearing cover (522.0). Lift worm wheel<br />
carefully from the housing. For this, the worm shaft must be pulled from the<br />
bearings and tilted slightly in the worm channel.<br />
Remove old grease completely from the housing and the individual parts and<br />
clean gear housing. For this purpose, a suitable cleaning agent should be used.<br />
Clean mounting faces at housing and housing cover (518.0). Replace O-rings at<br />
the worm wheel (010, 011) by new ones.<br />
Re-insert worm wheel carefully and bring worm shaft into correct position, fasten<br />
bearing cover (522.0) at housing with bolts and lock washers.<br />
.<br />
Fill with new grease.<br />
Place housing cover (518.0) on housing, while ensuring the proper position of<br />
the O-rings (010, 011) at the worm wheel. Place bolts with lock washers and<br />
fasten them evenly crosswise.<br />
– Thoroughly degrease mounting faces at mounting flange.<br />
– Apply non-acidic grease at splines of coupling<br />
– Mount worm gearbox to valve, ensure correct position,<br />
observe mark made in previous step<br />
– Fasten with bolts of minimum quality 8.8 using lock washers, fasten bolts<br />
crosswise to the appropriate torque according to table 2, page 11.<br />
Gearbox without primary reduction gearing: Continue with section “After<br />
maintenance”.<br />
. Gearbox with reduction gearings VZ 2.3 – VZ 4.3: Perform grease change at the<br />
reduction gearing according to the following subsection.<br />
<strong>12</strong>.2.2 Primary reduction gearing Refer to spare parts list VZ 2.3 – VZ 4.3., page 24.<br />
Grease type, see name plate; grease quantities, see page 19, table 4.<br />
Remove bolts with lock washers from housing cover (020.0) and pull off housing<br />
cover (020.0) with the complete input drive shaft (021.0).<br />
Take off plate with internal teeth (045.0) and planet carrier (022.0) with the<br />
planet wheels.<br />
Remove old grease completely from the housing and the individual parts and<br />
clean them. For this purpose, a suitable cleaning agent should be used.<br />
Clean mounting faces at housing (019.0), housing cover (020.0) and plate with<br />
internal teeth (045.0). Replace O-rings by new ones.<br />
Insert planet carrier (022.0) with planet wheels.<br />
.<br />
Fill with new grease.<br />
Place plate with internal teeth (045.0) and insert the input drive shaft (021.0)<br />
completely. Screw in bolts with lock washers and fasten them evenly crosswise to<br />
the appropriate torque according to table 2, page 11.<br />
. Continue with section “After maintenance”, page 22.<br />
20