19†HD Ready Digital LCD TV with DVD Player - KnowHow
19†HD Ready Digital LCD TV with DVD Player - KnowHow
19†HD Ready Digital LCD TV with DVD Player - KnowHow

You also want an ePaper? Increase the reach of your titles
YUMPU automatically turns print PDFs into web optimized ePapers that Google loves.
Preparation Connections Initial Setup Using the Features Using the Features DVR (<strong>Digital</strong><br />
via USB port Video Recorder)<br />
Using the <strong>DVD</strong><br />
Features<br />
Hints and Tips, Specification<br />
and Safety Warnings<br />
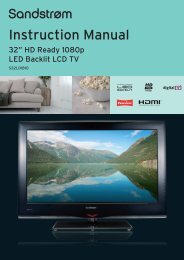
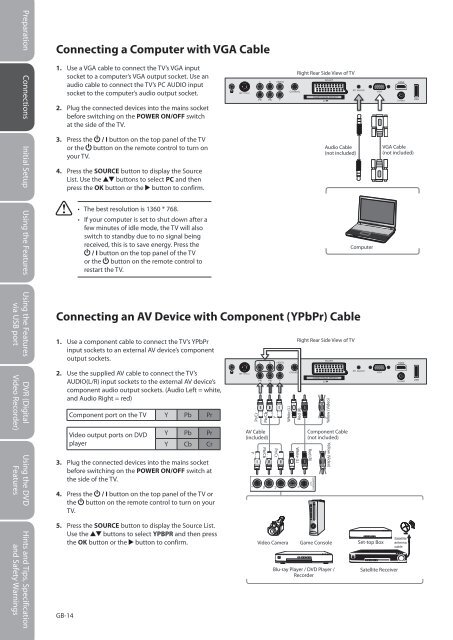
Connecting a Computer <strong>with</strong> VGA Cable<br />
1. Use a VGA cable to connect the <strong>TV</strong>’s VGA input<br />
socket to a computer’s VGA output socket. Use an<br />
audio cable to connect the <strong>TV</strong>’s PC AUDIO input<br />
socket to the computer’s audio output socket.<br />
2. Plug the connected devices into the mains socket<br />
before switching on the POWER ON/OFF switch<br />
at the side of the <strong>TV</strong>.<br />
3. Press the / I button on the top panel of the <strong>TV</strong><br />
or the button on the remote control to turn on<br />
your <strong>TV</strong>.<br />
4. Press the SOURCE button to display the Source<br />
List. Use the buttons to select PC and then<br />
press the OK button or the button to confirm.<br />
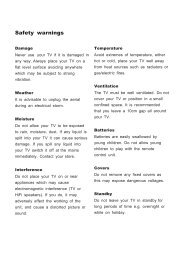
Connecting an AV Device <strong>with</strong> Component (YPbPr) Cable<br />
1. Use a component cable to connect the <strong>TV</strong>’s YPbPr<br />
input sockets to an external AV device’s component<br />
output sockets.<br />
2. Use the supplied AV cable to connect the <strong>TV</strong>’s<br />
AUDIO(L/R) input sockets to the external AV device’s<br />
component audio output sockets. (Audio Left = white,<br />
and Audio Right = red)<br />
GB-14<br />
• The best resolution is 1360 * 768.<br />
• If your computer is set to shut down after a<br />
few minutes of idle mode, the <strong>TV</strong> will also<br />
switch to standby due to no signal being<br />
received, this is to save energy. Press the<br />
/ I button on the top panel of the <strong>TV</strong><br />
or the button on the remote control to<br />
restart the <strong>TV</strong>.<br />
Component port on the <strong>TV</strong> Y Pb Pr<br />
Video output ports on <strong>DVD</strong><br />
player<br />
Y Pb Pr<br />
Y Cb Cr<br />
3. Plug the connected devices into the mains socket<br />
before switching on the POWER ON/OFF switch at<br />
the side of the <strong>TV</strong>.<br />
4. Press the / I button on the top panel of the <strong>TV</strong> or<br />
the button on the remote control to turn on your<br />
<strong>TV</strong>.<br />
5. Press the SOURCE button to display the Source List.<br />
Use the buttons to select YPBPR and then press<br />
the OK button or the button to confirm.<br />
Y<br />
Pr/Cr<br />
AV Cable<br />
(included)<br />
Y<br />
Pb/Cb<br />
Pb/Cb<br />
Pb<br />
Y<br />
Pr/Cr<br />
Pr<br />
White (L)<br />
L<br />
Video Camera<br />
Right Rear Side View of <strong>TV</strong><br />
Right Rear Side View of <strong>TV</strong><br />
Red (R)<br />
White (L)<br />
R<br />
CARD FACE FRONT<br />
Component Cable<br />
(not included)<br />
Red (R)<br />
CARD FACE FRONT<br />
COMPONENT<br />
OUT<br />
Yellow (Video)<br />
Yellow (Video)<br />
Game Console<br />
Blu-ray <strong>Player</strong> / <strong>DVD</strong> <strong>Player</strong> /<br />
Recorder<br />
Audio Cable<br />
(not included)<br />
Computer<br />
Set-top Box<br />
Satellite Receiver<br />
VGA Cable<br />
(not included)<br />
Logik L19<strong>DVD</strong>P10_B20_IB_100914_Zell.indd 14 14/09/2010 3:02 PM