BZ-33, 44 Series - Waltco
BZ-33, 44 Series - Waltco
BZ-33, 44 Series - Waltco

You also want an ePaper? Increase the reach of your titles
YUMPU automatically turns print PDFs into web optimized ePapers that Google loves.
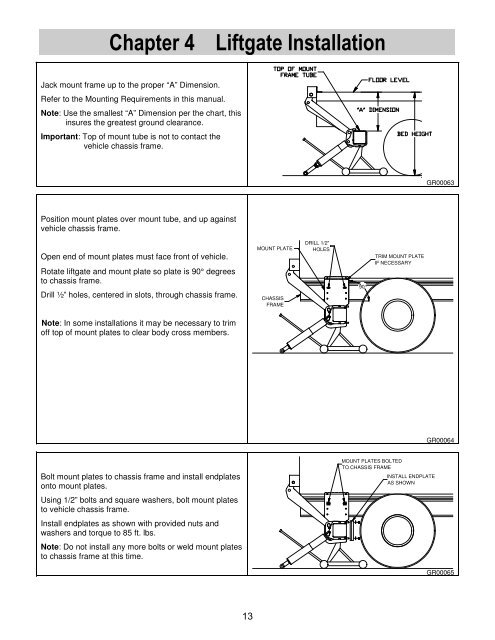
Chapter 4<br />
Liftgate Installation<br />
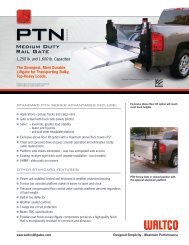
Jack mount frame up to the proper “A” Dimension.<br />
Refer to the Mounting Requirements in this manual.<br />
Note: Use the smallest “A” Dimension per the chart, this<br />
insures the greatest ground clearance.<br />
Important: Top of mount tube is not to contact the<br />
vehicle chassis frame.<br />
GR00063<br />
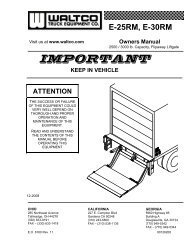
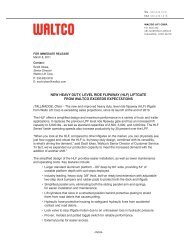
Position mount plates over mount tube, and up against<br />
vehicle chassis frame.<br />
Open end of mount plates must face front of vehicle.<br />
Rotate liftgate and mount plate so plate is 90° degrees<br />
to chassis frame.<br />
Drill ½” holes, centered in slots, through chassis frame.<br />
MOUNT PLATE<br />
CHASSIS<br />
FRAME<br />
DRILL 1/2"<br />
HOLES<br />
90°<br />
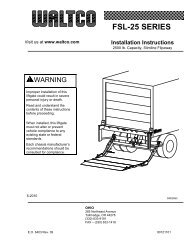
TRIM MOUNT PLATE<br />
IF NECESSARY<br />
Note: In some installations it may be necessary to trim<br />
off top of mount plates to clear body cross members.<br />
GR00064<br />
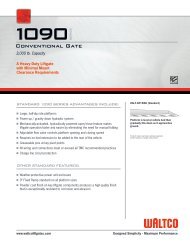
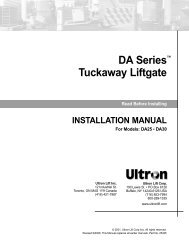
Bolt mount plates to chassis frame and install endplates<br />
onto mount plates.<br />
Using 1/2” bolts and square washers, bolt mount plates<br />
to vehicle chassis frame.<br />
Install endplates as shown with provided nuts and<br />
washers and torque to 85 ft. lbs.<br />
Note: Do not install any more bolts or weld mount plates<br />
to chassis frame at this time.<br />
MOUNT PLATES BOLTED<br />
TO CHASSIS FRAME<br />
INSTALL ENDPLATE<br />
AS SHOWN<br />
GR00065<br />
13