BZ-33, 44 Series - Waltco
BZ-33, 44 Series - Waltco
BZ-33, 44 Series - Waltco

You also want an ePaper? Increase the reach of your titles
YUMPU automatically turns print PDFs into web optimized ePapers that Google loves.
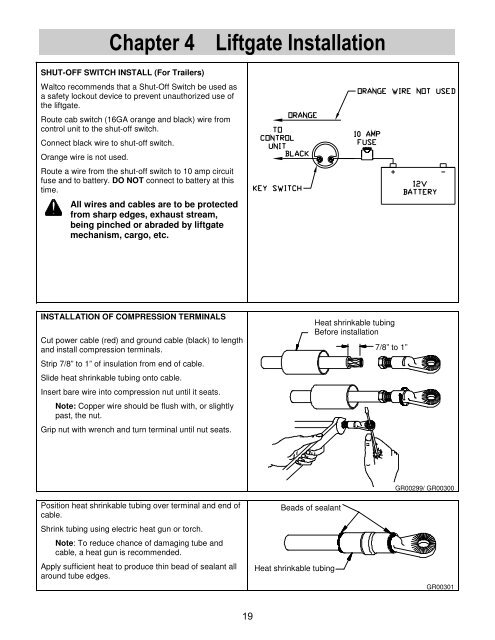
Chapter 4<br />
Liftgate Installation<br />
SHUT-OFF SWITCH INSTALL (For Trailers)<br />
<strong>Waltco</strong> recommends that a Shut-Off Switch be used as<br />
a safety lockout device to prevent unauthorized use of<br />
the liftgate.<br />
Route cab switch (16GA orange and black) wire from<br />
control unit to the shut-off switch.<br />
Connect black wire to shut-off switch.<br />
Orange wire is not used.<br />
Route a wire from the shut-off switch to 10 amp circuit<br />
fuse and to battery. DO NOT connect to battery at this<br />
time.<br />
All wires and cables are to be protected<br />
from sharp edges, exhaust stream,<br />
being pinched or abraded by liftgate<br />
mechanism, cargo, etc.<br />
INSTALLATION OF COMPRESSION TERMINALS<br />
Cut power cable (red) and ground cable (black) to length<br />
and install compression terminals.<br />
Strip 7/8” to 1” of insulation from end of cable.<br />
Slide heat shrinkable tubing onto cable.<br />
Insert bare wire into compression nut until it seats.<br />
Note: Copper wire should be flush with, or slightly<br />
past, the nut.<br />
Grip nut with wrench and turn terminal until nut seats.<br />
Heat shrinkable tubing<br />
Before installation<br />
7/8” to 1”<br />
Position heat shrinkable tubing over terminal and end of<br />
cable.<br />
Shrink tubing using electric heat gun or torch.<br />
Note: To reduce chance of damaging tube and<br />
cable, a heat gun is recommended.<br />
Apply sufficient heat to produce thin bead of sealant all<br />
around tube edges.<br />
Beads of sealant<br />
Heat shrinkable tubing<br />
GR00299/ GR00300<br />
GR00301<br />
19