ToneLab SE Owner's manual - Vox
ToneLab SE Owner's manual - Vox
ToneLab SE Owner's manual - Vox
You also want an ePaper? Increase the reach of your titles
YUMPU automatically turns print PDFs into web optimized ePapers that Google loves.
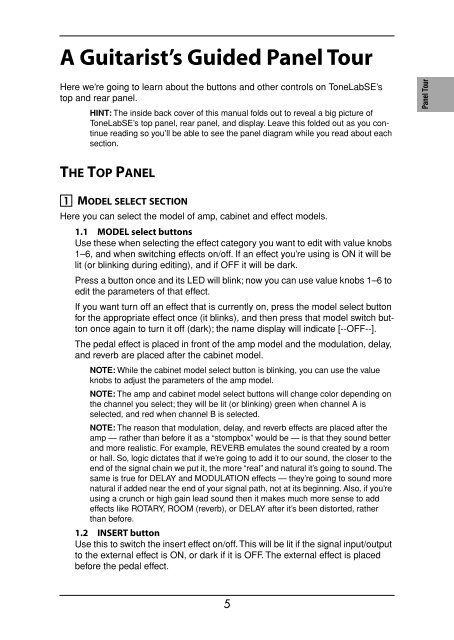
A Guitarist’s Guided Panel Tour<br />
Here we’re going to learn about the buttons and other controls on <strong>ToneLab</strong><strong>SE</strong>’s<br />
top and rear panel.<br />
HINT: The inside back cover of this <strong>manual</strong> folds out to reveal a big picture of<br />
<strong>ToneLab</strong><strong>SE</strong>’s top panel, rear panel, and display. Leave this folded out as you continue<br />
reading so you’ll be able to see the panel diagram while you read about each<br />
section.<br />
Introduction<br />
Panel Tour<br />
Setup<br />
THE TOP PANEL<br />
1 MODEL <strong>SE</strong>LECT <strong>SE</strong>CTION<br />
Here you can select the model of amp, cabinet and effect models.<br />
1.1 MODEL select buttons<br />
Use these when selecting the effect category you want to edit with value knobs<br />
1–6, and when switching effects on/off. If an effect you’re using is ON it will be<br />
lit (or blinking during editing), and if OFF it will be dark.<br />
Press a button once and its LED will blink; now you can use value knobs 1–6 to<br />
edit the parameters of that effect.<br />
If you want turn off an effect that is currently on, press the model select button<br />
for the appropriate effect once (it blinks), and then press that model switch button<br />
once again to turn it off (dark); the name display will indicate [--OFF--].<br />
The pedal effect is placed in front of the amp model and the modulation, delay,<br />
and reverb are placed after the cabinet model.<br />
NOTE: While the cabinet model select button is blinking, you can use the value<br />
knobs to adjust the parameters of the amp model.<br />
NOTE: The amp and cabinet model select buttons will change color depending on<br />
the channel you select; they will be lit (or blinking) green when channel A is<br />
selected, and red when channel B is selected.<br />
NOTE: The reason that modulation, delay, and reverb effects are placed after the<br />
amp — rather than before it as a “stompbox” would be — is that they sound better<br />
and more realistic. For example, REVERB emulates the sound created by a room<br />
or hall. So, logic dictates that if we’re going to add it to our sound, the closer to the<br />
end of the signal chain we put it, the more “real” and natural it’s going to sound. The<br />
same is true for DELAY and MODULATION effects — they’re going to sound more<br />
natural if added near the end of your signal path, not at its beginning. Also, if you’re<br />
using a crunch or high gain lead sound then it makes much more sense to add<br />
effects like ROTARY, ROOM (reverb), or DELAY after it’s been distorted, rather<br />
than before.<br />
1.2 IN<strong>SE</strong>RT button<br />
Use this to switch the insert effect on/off. This will be lit if the signal input/output<br />
to the external effect is ON, or dark if it is OFF. The external effect is placed<br />
before the pedal effect.<br />
Playing<br />
Creating<br />
and Storing<br />
5


