- Page 1:
Front cover IBM WebSphere V5.0 Secu
- Page 4 and 5:
Take Note! Before using this inform
- Page 6 and 7:
4.2.1 Configuring Web module securi
- Page 8 and 9:
10.6 LTPA . . . . . . . . . . . . .
- Page 10 and 11:
Lotus Domino . . . . . . . . . . .
- Page 12 and 13:
Trademarks The following terms are
- Page 14 and 15:
The team that wrote this redbook Th
- Page 16 and 17:
Stephen Pipes is a WebSphere consul
- Page 18 and 19:
xvi IBM WebSphere V5.0 Security Han
- Page 20 and 21:
1.1 How to read this book There are
- Page 22 and 23:
4 IBM WebSphere V5.0 Security Handb
- Page 24 and 25:
2.1 Security As new business practi
- Page 26 and 27:
2.2 Security fundamentals 2.2.1 Aut
- Page 28 and 29:
For example, in a distributed objec
- Page 30 and 31:
► ► ► Users are mapped direct
- Page 32 and 33:
If Bob wants to answer, he should u
- Page 34 and 35:
identifies the client before issuin
- Page 36 and 37:
2.3 Security in use Since security
- Page 38 and 39:
20 IBM WebSphere V5.0 Security Hand
- Page 40 and 41:
3.1 J2EE application The Java 2 Ent
- Page 42 and 43:
Principals and Groups Security Role
- Page 44 and 45:
3.4 Application deployment descript
- Page 46 and 47:
3.5 J2EE application security
- Page 48 and 49:
Figure 3-4 Application-level Securi
- Page 50 and 51:
Security role mapping in the Admini
- Page 52 and 53:
Figure 3-7 Searching for the manage
- Page 54 and 55:
36 IBM WebSphere V5.0 Security Hand
- Page 56 and 57:
4.1 Static components WebSphere App
- Page 58 and 59:
1. ldap.prop is an LDAP configurati
- Page 60 and 61:
Figure 4-2 Defining authentication
- Page 62 and 63:
A .htaccess file placed in one dire
- Page 64 and 65:
4.2 Web module security In a J2EE a
- Page 66 and 67:
Figure 4-4 Login Method Configurati
- Page 68 and 69:
higher level of protection. User Da
- Page 70 and 71:
8. Next to HTTP Methods click Add.
- Page 72 and 73:
8. Add the GET and POST HTTP method
- Page 74 and 75:
4.4 Security role reference During
- Page 76 and 77:
7. Save and close the web.xml file.
- Page 78 and 79:
Form login configuration The follow
- Page 80 and 81:
4.5.2 Custom login There are situat
- Page 82 and 83:
employeeType will be stored as a se
- Page 84 and 85:
3. From the Filter Type Selection w
- Page 86 and 87:
As a next step, you have to make su
- Page 88 and 89:
If the user in role 'A' accesses /h
- Page 90 and 91:
As a universal solution for the pro
- Page 92 and 93:
5.1 Securing EJBs EJBs, or Enterpri
- Page 94 and 95:
5.3 Assigning EJB method permission
- Page 96 and 97:
defined in the EJB module. For info
- Page 98 and 99:
These unprotected methods can have
- Page 100 and 101:
Figure 5-6 New Security Role Refere
- Page 102 and 103:
Important: Although this feature is
- Page 104 and 105:
4. The Role Name option menu will c
- Page 106 and 107:
5.5.2 Method level delegation In ad
- Page 108 and 109:
Figure 5-11 Method-level Run-as rol
- Page 110 and 111:
Figure 5-13 Selecting methods for t
- Page 112 and 113:
If one or more method-level delegat
- Page 114 and 115:
96 IBM WebSphere V5.0 Security Hand
- Page 116 and 117:
6.1 Java clients A client is a gene
- Page 118 and 119:
Available functions ActiveX client
- Page 120 and 121:
Upon receiving the message, the ser
- Page 122 and 123:
The sas.client.props file The CORBA
- Page 124 and 125:
The CSIv2 configuration properties
- Page 126 and 127:
server. For example, if the client
- Page 128 and 129:
Client01 Java client J Server01 EJB
- Page 130 and 131:
2. Configure Server01 for outgoing
- Page 132 and 133:
Configuring Client02 Client02 requi
- Page 134 and 135:
3. Enable SSL for the connection, i
- Page 136 and 137:
Configuring Client01 Client01 requi
- Page 138 and 139:
WebSphere V4 SAS only WebSphere V5
- Page 140 and 141:
The ITSOBank application provided w
- Page 142 and 143:
► ► ► sas.jar ecutils.jar dir
- Page 144 and 145:
7.1 Web Services security Web Servi
- Page 146 and 147:
Figure 7-2 Creating a new Web Servi
- Page 148 and 149:
Figure 7-4 Web Service Deployment S
- Page 150 and 151:
Figure 7-7 Web Service Java Bean Me
- Page 152 and 153:
12.As shown in Figure 7-10 on page
- Page 154 and 155:
Follow the steps below to use the g
- Page 156 and 157:
Using the ITSOBank Web Service clie
- Page 158 and 159:
Example 7-1 SOAP request with certi
- Page 160 and 161:
oVD/QxRYXFg02v6rK53DZKntq
- Page 162 and 163:
3. In that window, under Security -
- Page 164 and 165:
Example 7-4 Secured and non-secured
- Page 166 and 167:
WS-Policy will be fully extensible
- Page 168 and 169:
Policy Requester Security Token Ser
- Page 170 and 171:
Direct Trust using Security Tokens
- Page 172 and 173:
6. The service fetches the certific
- Page 174 and 175:
Security can be applied at two leve
- Page 176 and 177:
ii. Browse to select the file /scri
- Page 178 and 179:
► Messages sent and received can
- Page 180 and 181:
Important: Message Driven Bean is a
- Page 182 and 183:
quser01 read write
- Page 184 and 185:
- Container-managed Authentication
- Page 186 and 187:
The authority service component pro
- Page 188 and 189:
J2EE Connector architecture establi
- Page 190 and 191:
As a next step, the following list
- Page 192 and 193:
CMP EJB 2.0 Persistence Manager Dat
- Page 194 and 195:
J2EE 1.3 Application EJB Container
- Page 196 and 197:
2. Configure each resource adapter
- Page 198 and 199:
8.1 Programmatic security J2EE secu
- Page 200 and 201:
8.2.2 Servlet security methods The
- Page 202 and 203:
There is one point worth noting in
- Page 204 and 205:
Figure 8-3 Custom Registry properti
- Page 206 and 207:
Method signature String getUserSecu
- Page 208 and 209:
also ask for a X.509 certificate fi
- Page 210 and 211:
Required libraries from WebSphere f
- Page 212 and 213:
Testing the custom Trust Associatio
- Page 214 and 215:
local or remote code (signed or not
- Page 216 and 217:
To call a piece of trusted code to
- Page 218 and 219:
► ► ► ► ► java.net.NetPer
- Page 220 and 221:
► It is also possible to specify
- Page 222 and 223:
Java 2 security can be enabled on t
- Page 224 and 225:
► The following callbacks are pro
- Page 226 and 227:
application LoginContext LoginModul
- Page 228 and 229:
lc=new LoginContext("ClientContaine
- Page 230 and 231:
Note: Without initializing the ORB,
- Page 232 and 233:
8.8 Where to find more information
- Page 234 and 235:
9.1 WebSphere security model The IB
- Page 236 and 237:
Deployment Manager Cell-wide config
- Page 238 and 239:
From a security point of view, each
- Page 240 and 241:
► Application Security determines
- Page 242 and 243:
9.2.2 WebSphere Application Server
- Page 244 and 245:
LTPA requires that the configured U
- Page 246 and 247:
HTTP / HTTPS HTTP Server WebSphere
- Page 248 and 249:
9.3 Performance considerations From
- Page 250 and 251:
232 IBM WebSphere V5.0 Security Han
- Page 252 and 253: 10.1 Administration tools WebSphere
- Page 254 and 255: A Web browser, for instance, must b
- Page 256 and 257: the two types of registry provided
- Page 258 and 259: Role configurator operator administ
- Page 260 and 261: Figure 10-4 Mapping a group to an A
- Page 262 and 263: Mapping a group to a CosNaming role
- Page 264 and 265: 1. In the Admin Console, select Sec
- Page 266 and 267: 6. In the Configuration tab provide
- Page 268 and 269: 8. The changes will need to be save
- Page 270 and 271: In a scenario presented in this cha
- Page 272 and 273: 2. Save the configuration for WebSp
- Page 274 and 275: Figure 10-16 Application Login Conf
- Page 276 and 277: Figure 10-18 J2C Authentication ent
- Page 278 and 279: Figure 10-19 An SSL configuration w
- Page 280 and 281: WebSphere supports the concept of t
- Page 282 and 283: The file used by a Java client to r
- Page 284 and 285: Figure 10-22 Saving the new key sto
- Page 286 and 287: Figure 10-25 Provide details for th
- Page 288 and 289: 24.From the menu bar, select Key Da
- Page 290 and 291: 10.Enter a Key Label which will ide
- Page 292 and 293: Figure 10-30 A personal certificate
- Page 294 and 295: 10.9.3 Using the Java keytool Anoth
- Page 296 and 297: SSL connection #1 SSL connection #2
- Page 298 and 299: Figure 10-33 The IBM HTTP Server ik
- Page 300 and 301: The IBM HTTP Server Administration
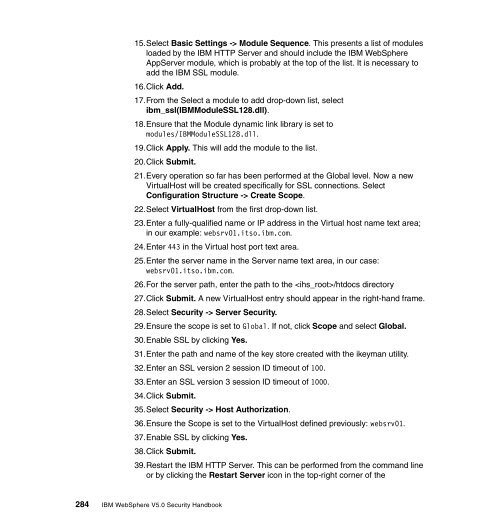
- Page 304 and 305: In the case of a self-signed certif
- Page 306 and 307: Note: If the Cipher Specification l
- Page 308 and 309: Make sure that the certificate is i
- Page 310 and 311: Figure 10-41 Certificate details Th
- Page 312 and 313: Configuring WebSphere to use certif
- Page 314 and 315: 3. If you decide the use the IBM HT
- Page 316 and 317: Example 10-5 trace.log ... [10/14/0
- Page 318 and 319: Configuring WebSphere to use exact
- Page 320 and 321: [10/14/02 19:39:38:358 EDT] 7a37602
- Page 322 and 323: publicly circulating root certifica
- Page 324 and 325: Exchanging public certificates The
- Page 326 and 327: Modifying the Web Container to supp
- Page 328 and 329: The new certificate should appear u
- Page 330 and 331: 3. Client Certificate Authenticatio
- Page 332 and 333: Figure 10-47 CSIv2 transport config
- Page 334 and 335: Table 10-5 sas.client.props configu
- Page 336 and 337: 10.13.1 IBM SecureWay Directory Ser
- Page 338 and 339: 2. Click the Add Server button. The
- Page 340 and 341: 8. Click OK; a new window appears f
- Page 342 and 343: Figure 10-56 LDAP directory with us
- Page 344 and 345: Figure 10-57 WebSphere LDAP Configu
- Page 346 and 347: Configuring the secure LDAP (LDAPS)
- Page 348 and 349: Figure 10-59 Configuring SSL for Se
- Page 350 and 351: Figure 10-60 SSL encryption setting
- Page 352 and 353:
choose not to differentiate between
- Page 354 and 355:
- Port: specify 636 which correspon
- Page 356 and 357:
A sample scenario is depicted next.
- Page 358 and 359:
Item Cell Node Server Appl. CosNami
- Page 360 and 361:
JAAS configuration The JAAS configu
- Page 362 and 363:
Individual CSI and SAS settings The
- Page 364 and 365:
The server security settings availa
- Page 366 and 367:
348 IBM WebSphere V5.0 Security Han
- Page 368 and 369:
11.1 Patterns for e-business Patter
- Page 370 and 371:
► ► ► Buy-Side Hub Sell-Side
- Page 372 and 373:
Client Tier Synchronous Application
- Page 374 and 375:
► Application tier: may represent
- Page 376 and 377:
► certificates, access groups, et
- Page 378 and 379:
Figure 11-6 presents the Runtime pa
- Page 380 and 381:
11.4 Product mappings This section
- Page 382 and 383:
- Authorization Server The Authoriz
- Page 384 and 385:
The following secure communications
- Page 386 and 387:
368 IBM WebSphere V5.0 Security Han
- Page 388 and 389:
This chapter covers four different
- Page 390 and 391:
andwidth to and from the server unt
- Page 392 and 393:
All of these benefits contribute to
- Page 394 and 395:
The Policy Server replicates this d
- Page 396 and 397:
Server Tivoli Access Manager WebSEA
- Page 398 and 399:
Server Name appsrv01, appsrv02 Appl
- Page 400 and 401:
1. First, log in with your favorite
- Page 402 and 403:
1. In the Administrative Console, n
- Page 404 and 405:
12.4.1 Single Sign-On with WebSEAL
- Page 406 and 407:
correct. Then it trusts that the id
- Page 408 and 409:
8. In the Single Sign-On (SSO) pane
- Page 410 and 411:
User Registry Client 1. Request 2.
- Page 412 and 413:
Property key com.ibm.Websphere.secu
- Page 414 and 415:
Figure 12-8 Trust Association Panel
- Page 416 and 417:
2. We will first configure LTPA aut
- Page 418 and 419:
e prompted for the keyfile password
- Page 420 and 421:
Example 12-2 WebSphere Security ini
- Page 422 and 423:
[8/22/02 7:42:44:163 CDT] 277a2e5c
- Page 424 and 425:
[8/22/02 7:42:47:449 CDT] 277a2e5c
- Page 426 and 427:
[8/22/02 7:42:51:655 CDT] 277a2e5c
- Page 428 and 429:
In this example, we have configured
- Page 430 and 431:
► ► ► WebSEAL can forward mod
- Page 432 and 433:
LDAP Server Policy/Authorization Se
- Page 434 and 435:
of inetOrg.Person as each junction
- Page 436 and 437:
Figure 12-13 Web Portal Manager Men
- Page 438 and 439:
Select the boxes Is Account Valid,
- Page 440 and 441:
Creating Access Manager Junctions A
- Page 442 and 443:
Figure 12-18 Protected Object Prope
- Page 444 and 445:
Figure 12-20 Create an ACL Entry 4.
- Page 446 and 447:
Testing the junctions The following
- Page 448 and 449:
Figure 12-22 Successful access to i
- Page 450 and 451:
WebSEAL Authenticated Users before
- Page 452 and 453:
At the same time, the tool creates
- Page 454 and 455:
- pdacld_port: the port number of t
- Page 456 and 457:
8. The next application migrated wa
- Page 458 and 459:
Do not make changes to the deployme
- Page 460 and 461:
442 IBM WebSphere V5.0 Security Han
- Page 462 and 463:
444 IBM WebSphere V5.0 Security Han
- Page 464 and 465:
Sample application The purpose of t
- Page 466 and 467:
5. The Transfer EJB uses two entity
- Page 468 and 469:
The process flows as described belo
- Page 470 and 471:
You can download the clients from h
- Page 472 and 473:
Configuring WebSphere Application S
- Page 474 and 475:
Use this DataSource in container ma
- Page 476 and 477:
e. On the Map RunAs roles to users
- Page 478 and 479:
460 IBM WebSphere V5.0 Security Han
- Page 480 and 481:
SecureWay Directory Server The conf
- Page 482 and 483:
Ensure that Domino is using the LDA
- Page 484 and 485:
Figure B-3 Domino LDAP settings in
- Page 486 and 487:
Figure B-4 Domino CA application 2.
- Page 488 and 489:
Enable SSL on Domino Server Enable
- Page 490 and 491:
1. Open the ikeyman tool that comes
- Page 492 and 493:
3. WebSphere will validate your ent
- Page 494 and 495:
Figure B-9 iPlanet Directory Server
- Page 496 and 497:
Figure B-13 iPlanet Certificate Req
- Page 498 and 499:
Figure B-16 Certificate Install Wiz
- Page 500 and 501:
Figure B-19 iPlanet Encryption sett
- Page 502 and 503:
Tip from a battle scarred veteran p
- Page 504 and 505:
Figure B-21 Active Directory Users
- Page 506 and 507:
Figure B-24 New User password panel
- Page 508 and 509:
group membership, and other group a
- Page 510 and 511:
WebSphere-Domino SSO scenarios In t
- Page 512 and 513:
7. Once the user is authenticated a
- Page 514 and 515:
6. Click OK to create a database. 7
- Page 516 and 517:
- On the Rules tab, specify the fol
- Page 518 and 519:
3. A new Document will be displayed
- Page 520 and 521:
Figure C-7 TCP/IP port status setti
- Page 522 and 523:
1. To add new user names or groups
- Page 524 and 525:
Figure C-10 Default Domino server l
- Page 526 and 527:
Figure C-13 Successful submission o
- Page 528 and 529:
Using Domino LDAP for user registry
- Page 530 and 531:
Enabling Single Sign-On for WebSphe
- Page 532 and 533:
wsadmin scripting WebSphere Applica
- Page 534 and 535:
3. In the line com.ibm.SOAP.loginUs
- Page 536 and 537:
You can also set the user registry
- Page 538 and 539:
520 IBM WebSphere V5.0 Security Han
- Page 540 and 541:
Using the Web material The addition
- Page 542 and 543:
SPI SSL SSO SWAM UDDI URI URL VPN W
- Page 544 and 545:
Referenced Web sites These Web site
- Page 546 and 547:
528 IBM WebSphere V5.0 Security Han
- Page 548 and 549:
Application pattern Directly Integr
- Page 550 and 551:
EJB permissions Exclude 80 Role 80
- Page 552 and 553:
L launchclient 122 LDAP Advanced se
- Page 554 and 555:
ORB 102 System 366 Unprotected meth
- Page 556 and 557:
Gateway Security 155 Gateway-level
- Page 558 and 559:
540 IBM WebSphere V5.0 Security Han
- Page 562:
Back cover IBM WebSphere V5.0 Secur


