AZ-225 Install Manual
AZ-225 Install Manual
AZ-225 Install Manual

You also want an ePaper? Increase the reach of your titles
YUMPU automatically turns print PDFs into web optimized ePapers that Google loves.
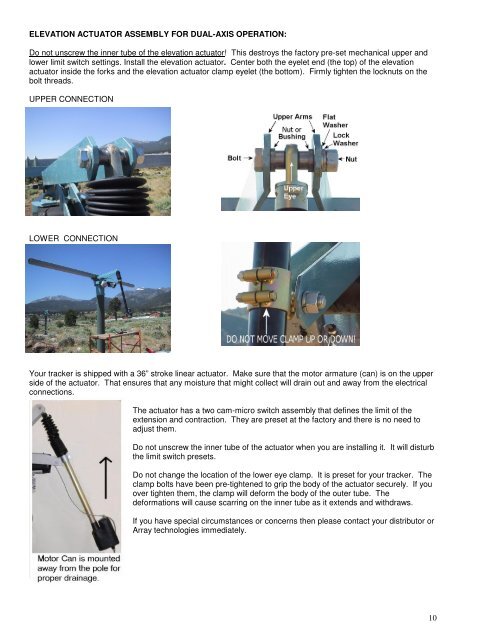
ELEVATION ACTUATOR ASSEMBLY FOR DUAL-AXIS OPERATION:<br />
Do not unscrew the inner tube of the elevation actuator! This destroys the factory pre-set mechanical upper and<br />
lower limit switch settings. <strong>Install</strong> the elevation actuator. Center both the eyelet end (the top) of the elevation<br />
actuator inside the forks and the elevation actuator clamp eyelet (the bottom). Firmly tighten the locknuts on the<br />
bolt threads.<br />
UPPER CONNECTION<br />
LOWER CONNECTION<br />
Your tracker is shipped with a 36” stroke linear actuator. Make sure that the motor armature (can) is on the upper<br />
side of the actuator. That ensures that any moisture that might collect will drain out and away from the electrical<br />
connections.<br />
The actuator has a two cam-micro switch assembly that defines the limit of the<br />
extension and contraction. They are preset at the factory and there is no need to<br />
adjust them.<br />
Do not unscrew the inner tube of the actuator when you are installing it. It will disturb<br />
the limit switch presets.<br />
Do not change the location of the lower eye clamp. It is preset for your tracker. The<br />
clamp bolts have been pre-tightened to grip the body of the actuator securely. If you<br />
over tighten them, the clamp will deform the body of the outer tube. The<br />
deformations will cause scarring on the inner tube as it extends and withdraws.<br />
If you have special circumstances or concerns then please contact your distributor or<br />
Array technologies immediately.<br />
10