AZ-225 Install Manual
AZ-225 Install Manual
AZ-225 Install Manual

Create successful ePaper yourself
Turn your PDF publications into a flip-book with our unique Google optimized e-Paper software.
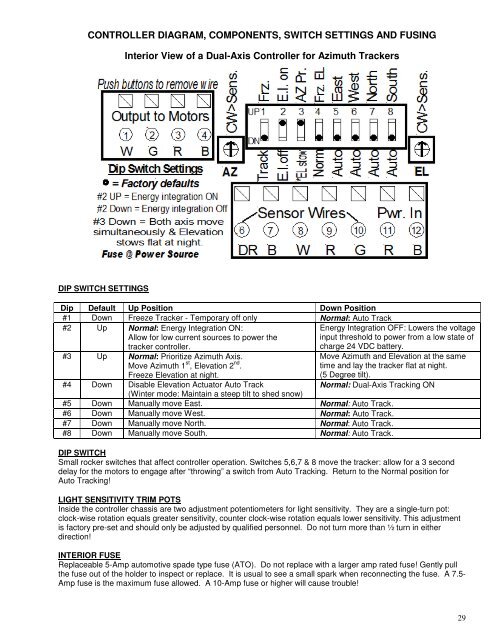
CONTROLLER DIAGRAM, COMPONENTS, SWITCH SETTINGS AND FUSING<br />
Interior View of a Dual-Axis Controller for Azimuth Trackers<br />
DIP SWITCH SETTINGS<br />
Dip Default Up Position Down Position<br />
#1 Down Freeze Tracker - Temporary off only Normal: Auto Track<br />
#2 Up Normal: Energy Integration ON:<br />
Allow for low current sources to power the<br />
tracker controller.<br />
charge 24 VDC battery.<br />
#3 Up Normal: Prioritize Azimuth Axis.<br />
Move Azimuth 1 st , Elevation 2 nd .<br />
Freeze Elevation at night.<br />
Energy Integration OFF: Lowers the voltage<br />
input threshold to power from a low state of<br />
Move Azimuth and Elevation at the same<br />
time and lay the tracker flat at night.<br />
(5 Degree tilt).<br />
#4 Down Disable Elevation Actuator Auto Track<br />
(Winter mode: Maintain a steep tilt to shed snow)<br />
#5 Down <strong>Manual</strong>ly move East. Normal: Auto Track.<br />
#6 Down <strong>Manual</strong>ly move West. Normal: Auto Track.<br />
#7 Down <strong>Manual</strong>ly move North. Normal: Auto Track.<br />
#8 Down <strong>Manual</strong>ly move South. Normal: Auto Track.<br />
Normal: Dual-Axis Tracking ON<br />
DIP SWITCH<br />
Small rocker switches that affect controller operation. Switches 5,6,7 & 8 move the tracker: allow for a 3 second<br />
delay for the motors to engage after “throwing” a switch from Auto Tracking. Return to the Normal position for<br />
Auto Tracking!<br />
LIGHT SENSITIVITY TRIM POTS<br />
Inside the controller chassis are two adjustment potentiometers for light sensitivity. They are a single-turn pot:<br />
clock-wise rotation equals greater sensitivity, counter clock-wise rotation equals lower sensitivity. This adjustment<br />
is factory pre-set and should only be adjusted by qualified personnel. Do not turn more than ½ turn in either<br />
direction!<br />
INTERIOR FUSE<br />
Replaceable 5-Amp automotive spade type fuse (ATO). Do not replace with a larger amp rated fuse! Gently pull<br />
the fuse out of the holder to inspect or replace. It is usual to see a small spark when reconnecting the fuse. A 7.5-<br />
Amp fuse is the maximum fuse allowed. A 10-Amp fuse or higher will cause trouble!<br />
29