AZ-225 Install Manual
AZ-225 Install Manual
AZ-225 Install Manual
You also want an ePaper? Increase the reach of your titles
YUMPU automatically turns print PDFs into web optimized ePapers that Google loves.
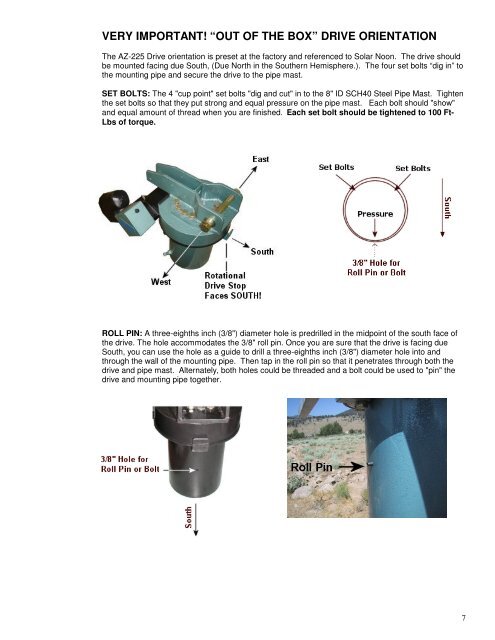
VERY IMPORTANT! “OUT OF THE BOX” DRIVE ORIENTATION<br />
The <strong>AZ</strong>-<strong>225</strong> Drive orientation is preset at the factory and referenced to Solar Noon. The drive should<br />
be mounted facing due South, (Due North in the Southern Hemisphere.). The four set bolts “dig in” to<br />
the mounting pipe and secure the drive to the pipe mast.<br />
SET BOLTS: The 4 "cup point" set bolts "dig and cut" in to the 8" ID SCH40 Steel Pipe Mast. Tighten<br />
the set bolts so that they put strong and equal pressure on the pipe mast. Each bolt should "show"<br />
and equal amount of thread when you are finished. Each set bolt should be tightened to 100 Ft-<br />
Lbs of torque.<br />
ROLL PIN: A three-eighths inch (3/8") diameter hole is predrilled in the midpoint of the south face of<br />
the drive. The hole accommodates the 3/8" roll pin. Once you are sure that the drive is facing due<br />
South, you can use the hole as a guide to drill a three-eighths inch (3/8") diameter hole into and<br />
through the wall of the mounting pipe. Then tap in the roll pin so that it penetrates through both the<br />
drive and pipe mast. Alternately, both holes could be threaded and a bolt could be used to "pin" the<br />
drive and mounting pipe together.<br />
7


