AZ-225 Install Manual
AZ-225 Install Manual
AZ-225 Install Manual

Create successful ePaper yourself
Turn your PDF publications into a flip-book with our unique Google optimized e-Paper software.
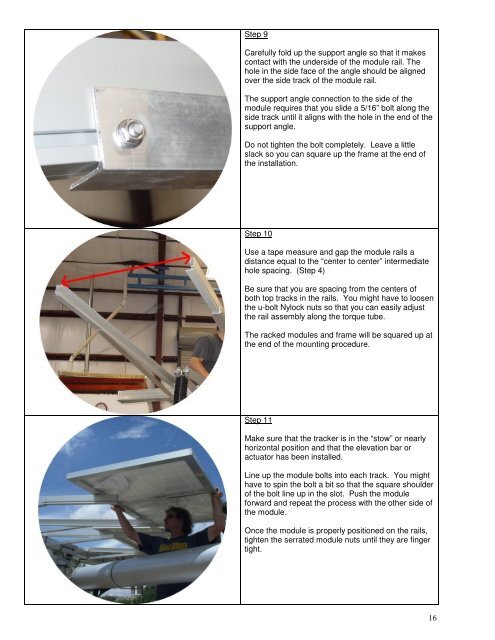
Step 9<br />
Carefully fold up the support angle so that it makes<br />
contact with the underside of the module rail. The<br />
hole in the side face of the angle should be aligned<br />
over the side track of the module rail.<br />
The support angle connection to the side of the<br />
module requires that you slide a 5/16” bolt along the<br />
side track until it aligns with the hole in the end of the<br />
support angle.<br />
Do not tighten the bolt completely. Leave a little<br />
slack so you can square up the frame at the end of<br />
the installation.<br />
Step 10<br />
Use a tape measure and gap the module rails a<br />
distance equal to the “center to center” intermediate<br />
hole spacing. (Step 4)<br />
Be sure that you are spacing from the centers of<br />
both top tracks in the rails. You might have to loosen<br />
the u-bolt Nylock nuts so that you can easily adjust<br />
the rail assembly along the torque tube.<br />
The racked modules and frame will be squared up at<br />
the end of the mounting procedure.<br />
Step 11<br />
Make sure that the tracker is in the “stow” or nearly<br />
horizontal position and that the elevation bar or<br />
actuator has been installed.<br />
Line up the module bolts into each track. You might<br />
have to spin the bolt a bit so that the square shoulder<br />
of the bolt line up in the slot. Push the module<br />
forward and repeat the process with the other side of<br />
the module.<br />
Once the module is properly positioned on the rails,<br />
tighten the serrated module nuts until they are finger<br />
tight.<br />
16