AZ-225 Install Manual
AZ-225 Install Manual
AZ-225 Install Manual

Create successful ePaper yourself
Turn your PDF publications into a flip-book with our unique Google optimized e-Paper software.
Section<br />
1<br />
<strong>Install</strong>ation of Tracker Pipe Mast and Foundation<br />
WARNING! WINDY CONDITIONS CAN EXERT EXTREME FORCES ON THE ARRAY, FOUNDATION,<br />
AND PIPE MAST OF YOUR TRACKER.<br />
1.1) Choose an optimum solar location to install the PV array for in the ground mounting. The location should be<br />
free from obstructions. Keep in mind that over a period of time, that trees, shrubs, etc. may grow enough to<br />
obscure the PV array from the sun. Consult with your dealer for proper tracker spacing and alignment<br />
regarding multiple tracker installations.<br />
1.2) Dig an appropriate sized hole for your tracker’s foundation using a shovel, auger, or backhoe. The variables<br />
that affect the design of the foundation include: tracker size, pipe mast height, soil conditions, geographical<br />
location, weather and local building codes. Employ a qualified professional to design the foundation for your<br />
tracker.<br />
1.3) A general rule of thumb is to have an equal amount of pipe underground as above the ground and a three-foot<br />
diameter reinforced concrete foundation. Please have a professional design the size and type of foundation<br />
required!<br />
1.4) Use the appropriate length of 8" ID, Schedule 40 Steel Pipe in order to leave the recommended maximum<br />
pipe mast height protruding from ground. Consult your specific Wattsun Technical Data Sheet for the<br />
appropriate mast height and pipe diameter size. Note: If the recommended pipe mast height is exceeded, it<br />
may be necessary to telescope a larger diameter pipe in the lower portion and increase the foundation size in<br />
order to withstand the increased forces exerted during windy conditions.<br />
1.5) Cut at least two pieces of re-bar or steel angle (more with 8 module or larger trackers), at lengths equal to the<br />
full diameter of the foundation. Weld re-bar onto (or drill holes and insert re-bar into) the underground portion<br />
of the pipe so that the pieces of re-bar form an ‘x’ pattern that remains parallel to the ground. When the<br />
tracker pipe mast is completely installed, the re-bar will be perpendicular to the pipe and parallel to the ground<br />
and protrudes radially outward into the concrete foundation. The re-bar acts as an "anti-rotation" device and<br />
will keep the pipe from spinning in the hole if the concrete shrinks back from the pipe.<br />
1.6) Set the pipe into the hole and pour concrete around the pipe until it completely fills the hole. Also pour<br />
concrete into the pipe to secure the re-bar inserted in the bottom portion of pipe. Make certain the pipe is<br />
vertically plumb and allow concrete to set for at least 24 hours. If you fill the entire pipe mast with concrete,<br />
leave at least one foot of hollow pipe at top for azimuth drive assembly clearance.<br />
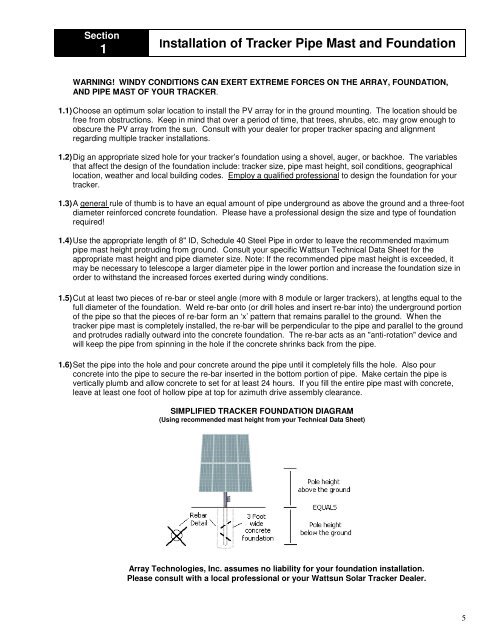
SIMPLIFIED TRACKER FOUNDATION DIAGRAM<br />
(Using recommended mast height from your Technical Data Sheet)<br />
Array Technologies, Inc. assumes no liability for your foundation installation.<br />
Please consult with a local professional or your Wattsun Solar Tracker Dealer.<br />
5