AZ-225 Install Manual
AZ-225 Install Manual
AZ-225 Install Manual

You also want an ePaper? Increase the reach of your titles
YUMPU automatically turns print PDFs into web optimized ePapers that Google loves.
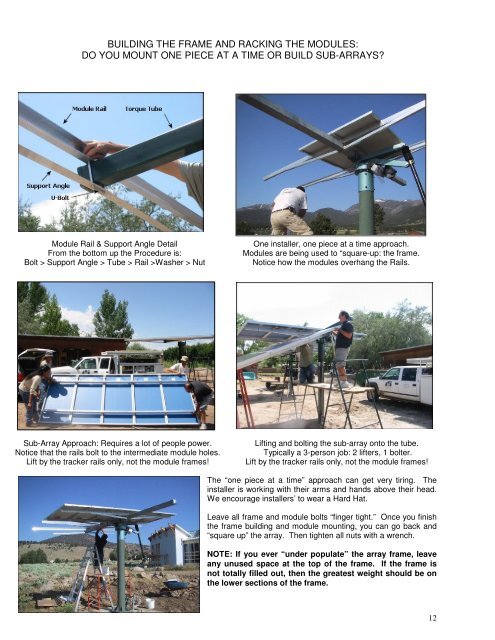
BUILDING THE FRAME AND RACKING THE MODULES:<br />
DO YOU MOUNT ONE PIECE AT A TIME OR BUILD SUB-ARRAYS?<br />
Module Rail & Support Angle Detail<br />
From the bottom up the Procedure is:<br />
Bolt > Support Angle > Tube > Rail >Washer > Nut<br />
One installer, one piece at a time approach.<br />
Modules are being used to “square-up: the frame.<br />
Notice how the modules overhang the Rails.<br />
Sub-Array Approach: Requires a lot of people power.<br />
Notice that the rails bolt to the intermediate module holes.<br />
Lift by the tracker rails only, not the module frames!<br />
Lifting and bolting the sub-array onto the tube.<br />
Typically a 3-person job: 2 lifters, 1 bolter.<br />
Lift by the tracker rails only, not the module frames!<br />
The “one piece at a time” approach can get very tiring. The<br />
installer is working with their arms and hands above their head.<br />
We encourage installers’ to wear a Hard Hat.<br />
Leave all frame and module bolts “finger tight.” Once you finish<br />
the frame building and module mounting, you can go back and<br />
“square up” the array. Then tighten all nuts with a wrench.<br />
NOTE: If you ever “under populate” the array frame, leave<br />
any unused space at the top of the frame. If the frame is<br />
not totally filled out, then the greatest weight should be on<br />
the lower sections of the frame.<br />
12