AZ-225 Install Manual
AZ-225 Install Manual
AZ-225 Install Manual

You also want an ePaper? Increase the reach of your titles
YUMPU automatically turns print PDFs into web optimized ePapers that Google loves.
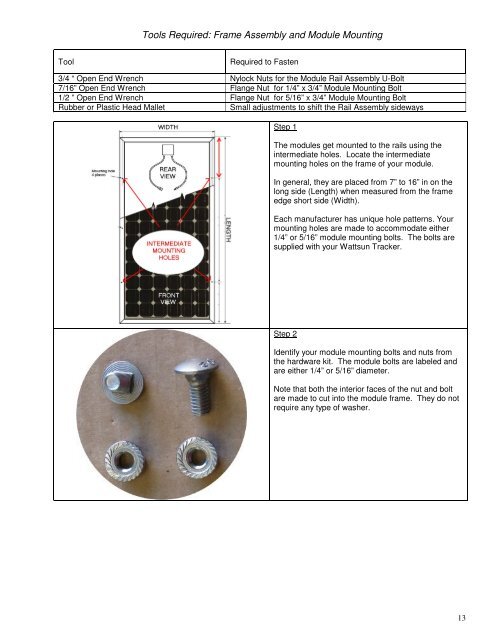
Tools Required: Frame Assembly and Module Mounting<br />
Tool<br />
Required to Fasten<br />
3/4 “ Open End Wrench Nylock Nuts for the Module Rail Assembly U-Bolt<br />
7/16” Open End Wrench Flange Nut for 1/4” x 3/4” Module Mounting Bolt<br />
1/2 ” Open End Wrench Flange Nut for 5/16” x 3/4” Module Mounting Bolt<br />
Rubber or Plastic Head Mallet<br />
Small adjustments to shift the Rail Assembly sideways<br />
Step 1<br />
The modules get mounted to the rails using the<br />
intermediate holes. Locate the intermediate<br />
mounting holes on the frame of your module.<br />
In general, they are placed from 7” to 16” in on the<br />
long side (Length) when measured from the frame<br />
edge short side (Width).<br />
Each manufacturer has unique hole patterns. Your<br />
mounting holes are made to accommodate either<br />
1/4” or 5/16” module mounting bolts. The bolts are<br />
supplied with your Wattsun Tracker.<br />
Step 2<br />
Identify your module mounting bolts and nuts from<br />
the hardware kit. The module bolts are labeled and<br />
are either 1/4” or 5/16” diameter.<br />
Note that both the interior faces of the nut and bolt<br />
are made to cut into the module frame. They do not<br />
require any type of washer.<br />
13