AZ-225 Install Manual
AZ-225 Install Manual
AZ-225 Install Manual

You also want an ePaper? Increase the reach of your titles
YUMPU automatically turns print PDFs into web optimized ePapers that Google loves.
Section<br />
4<br />
<strong>Install</strong> the Module Support Frame Torque Tube<br />
SECTION 4 NOTES: Nearly every nut and bolt will be left "finger-tight" until all the modules are mounted and<br />
the frame is "squared-up." So allow for a small amount of "play" when putting the array together. You will<br />
snug up all the bolts and nuts when all the modules are mounted and the frame is complete.<br />
<strong>Install</strong>ation Tip: The PV modules may be mounted to the rails at this time - prior to installation onto the torque<br />
tube assembly. This removes the difficulty of mounting each individual module to the rails while you working<br />
off a ladder or above your head.<br />
However, placing the heavier, assembled module sub-array onto the torque tube assembly requires at least<br />
two people. For either application, the web of the module mounting struts must be oriented toward the outer<br />
ends of the modules.<br />
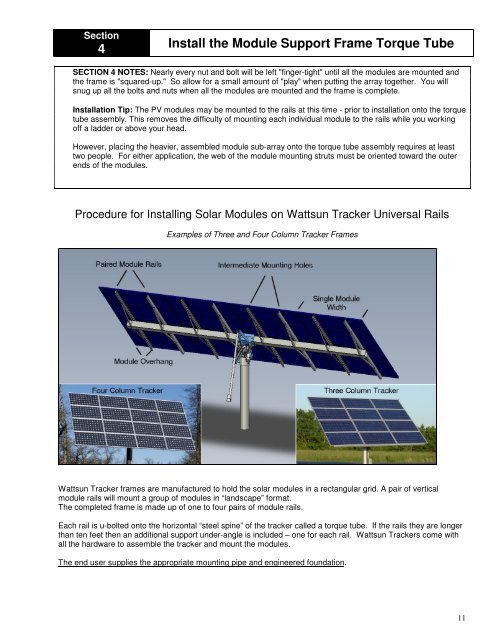
Procedure for <strong>Install</strong>ing Solar Modules on Wattsun Tracker Universal Rails<br />
Examples of Three and Four Column Tracker Frames<br />
Wattsun Tracker frames are manufactured to hold the solar modules in a rectangular grid. A pair of vertical<br />
module rails will mount a group of modules in “landscape” format.<br />
The completed frame is made up of one to four pairs of module rails.<br />
Each rail is u-bolted onto the horizontal “steel spine” of the tracker called a torque tube. If the rails they are longer<br />
than ten feet then an additional support under-angle is included – one for each rail. Wattsun Trackers come with<br />
all the hardware to assemble the tracker and mount the modules.<br />
The end user supplies the appropriate mounting pipe and engineered foundation.<br />
11