4.7 Getting started - WindSim
4.7 Getting started - WindSim
4.7 Getting started - WindSim

You also want an ePaper? Increase the reach of your titles
YUMPU automatically turns print PDFs into web optimized ePapers that Google loves.
12 <strong>WindSim</strong> AS<br />
Terrain<br />
The first step in the micro-siting of a wind farm is the generation of a 3D model in the Terrain<br />
module. This involves choosing the horizontal extension of the area to simulate and the<br />
height above ground that you want to use in your simulations. This volume (computational<br />
domain) is then discretized into a system of hexahedral cells called grid or mesh. The<br />
computational domain is therefore built on a digital terrain in *.gws format containing<br />
information about elevation and roughness.<br />
<strong>WindSim</strong> can be run by using the default settings in properties, or the user defined settings<br />
can be specified. Notice that all bold settings in the Properties panel are the ones that have<br />
been specified by the user.<br />
In the Demo version of <strong>WindSim</strong>, the maximum number of cells in vertical direction has been<br />
set to 10 while the total maximum number of cells has been limited to 5000. In the<br />
commercial version of <strong>WindSim</strong> the maximum number of cells would typically be limited by<br />
the available computer resources. Models with several million cells could be simulated on a<br />
high performance PC. The very restrictive limitation of the size of the computational model<br />
means that you cannot trust the results of simulations run with the demo version of <strong>WindSim</strong>.<br />
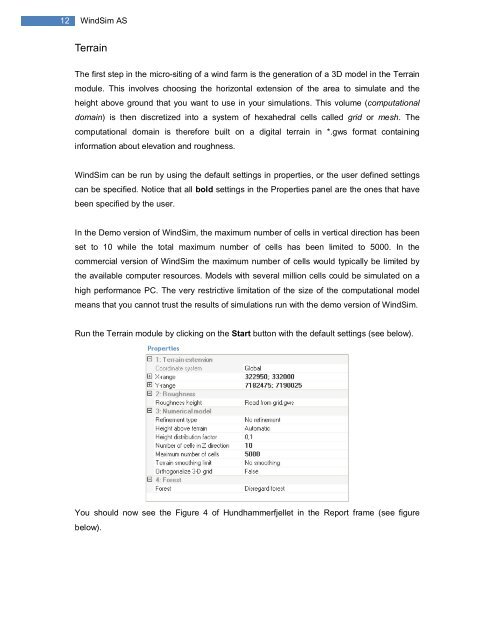
Run the Terrain module by clicking on the Start button with the default settings (see below).<br />
You should now see the Figure 4 of Hundhammerfjellet in the Report frame (see figure<br />
below).