- Page 1 and 2:
DocuPrint CM205 f/CM205 fw/CM205 bU
- Page 3 and 4:
3 Printer Management Software .....
- Page 5 and 6:
Margin Middle .....................
- Page 7 and 8:
Limiting Access to Printer Operatio
- Page 9 and 10:
Contents 8
- Page 11 and 12:
Trademarks and Document DisclaimerA
- Page 13 and 14:
Using This GuideThis section includ
- Page 15 and 16:
• Conventions1 In this guide, per
- Page 17 and 18:
• Electrical SafetyWARNINGThis pr
- Page 19 and 20:
• Machine InstallationWARNINGDo n
- Page 21 and 22:
Do not incline the product at more
- Page 23 and 24:
Do not apply excessive force to hol
- Page 25 and 26:
• Warning and Caution LabelsAlway
- Page 27 and 28:
Regulation• Radio Frequency Emiss
- Page 29 and 30:
Product FeaturesThis section descri
- Page 31 and 32:
Product Features 30
- Page 33 and 34:
Copy FunctionTypeConsoleMemory128 M
- Page 35 and 36:
Power ConsumptionDimensionsMachine
- Page 37 and 38:
Scan FunctionTypeOriginal Paper Siz
- Page 39 and 40:
Fax Function (DocuPrint CM205 f/CM2
- Page 41 and 42:
Specifications 40
- Page 43 and 44:
Main ComponentsThis section provide
- Page 45 and 46:
11 Slide Bar 12 Length Guide13 Mult
- Page 47 and 48:
• Automatic Document Feeder (ADF)
- Page 49 and 50:
18 # button(DocuPrint CM205 f/CM205
- Page 51 and 52:
Setting Initial Settings on the Ope
- Page 53 and 54:
• The Operator PanelNOTE:• The
- Page 55 and 56:
Power Saver ModeThe printer has a p
- Page 57 and 58:
Basic Operation 56
- Page 59 and 60:
Print and Scan DriversTo access all
- Page 61 and 62:
• Creating an Administrative Pass
- Page 63 and 64:
SimpleMonitor (Windows Only)You can
- Page 65 and 66:
Address Book Editor(DocuPrint CM205
- Page 67 and 68:
Express Scan ManagerThe Express Sca
- Page 69 and 70:
Printer Management Software 68
- Page 71 and 72:
Overview of Network Setup and Confi
- Page 73 and 74:
• Connecting Printer to Computer
- Page 75 and 76:
Network Connection (DocuPrint CM205
- Page 77 and 78:
• TCP/IP and IP AddressesIf your
- Page 79 and 80:
• Dynamic Methods of Setting the
- Page 81 and 82:
The Operator Panel1 Turn on the pri
- Page 83 and 84:
• Verifying the IP SettingsThe fo
- Page 85 and 86:
Installing Print Driver on Computer
- Page 87 and 88:
Disabling the Firewall Before Insta
- Page 89 and 90:
• USB Connection SetupThe followi
- Page 91 and 92:
• Configuring Wireless Settings (
- Page 93 and 94:
6 Follow the on-screen instructions
- Page 95 and 96:
• Gateway Address11 Click Next.Th
- Page 97 and 98:
16 Wait a few minutes until the pri
- Page 99 and 100:
• Displaying Configure Wireless S
- Page 101 and 102:
• Network Connection1 Select Netw
- Page 103 and 104:
• Gateway Address8 Click Next.The
- Page 105 and 106:
13 Wait a few minutes until the pri
- Page 107 and 108:
•WPS-PINNOTE:• WPS-PIN (Wi-Fi P
- Page 109 and 110:
•WPS-PBCNOTE:• WPS-PBC (Wi-Fi P
- Page 111 and 112:
• Operator Panel1 Select Operator
- Page 113 and 114:
Setting up a New Wireless Network E
- Page 115 and 116:
2 Check the IP address assigned by
- Page 117 and 118:
d Select Connect to a network.e Sel
- Page 119 and 120:
abcdeDisplay Control Panel.Select N
- Page 121 and 122:
a Display Control Panel.b Select Ne
- Page 123 and 124:
• For Windows Server 2008 and Win
- Page 125 and 126:
• For Windows Vista and Windows V
- Page 127 and 128:
• For Windows XP, Windows XP 64-b
- Page 129 and 130:
• For Windows Server 2008 and Win
- Page 131 and 132:
• Configuring Wireless Settings o
- Page 133 and 134:
• Using Ad Hoc ConnectionTo confi
- Page 135 and 136:
•WPS-PINNOTE:• WPS-PIN is a met
- Page 137 and 138:
• When Using Bonjour (DocuPrint C
- Page 139 and 140:
• When Using IP Printing (DocuPri
- Page 141 and 142:
About Print MediaThis section inclu
- Page 143 and 144:
• Automatic Document Feeder (ADF)
- Page 145 and 146:
• Print Media Storage GuidelinesP
- Page 147 and 148:
• Usable Print MediaThe types of
- Page 149 and 150:
• CapacityThe MPF can hold:• 15
- Page 151 and 152:
• Loading Print Media in the Mult
- Page 153 and 154:
7 Load print media on the MPF with
- Page 155 and 156:
Loading Envelope in the Multipurpos
- Page 157 and 158:
• To confirm the correct orientat
- Page 159 and 160:
5 Load print media on the PSI with
- Page 161 and 162:
• When Loading C5Load the envelop
- Page 163 and 164:
• Manual Duplex Printing (Windows
- Page 165 and 166:
Loading Print Media in the Multipur
- Page 167 and 168:
• Using the Output Tray Extension
- Page 169 and 170:
• Setting Paper Sizes1 Press the
- Page 171 and 172:
PrintingThis section covers how to
- Page 173 and 174:
• Canceling a Print JobThere are
- Page 175 and 176:
Selecting Options for an Individual
- Page 177 and 178:
Selecting Options for an Individual
- Page 179 and 180:
• Printing Custom Size PaperThis
- Page 181 and 182:
• Checking Status of Print JobThi
- Page 183 and 184:
• Printer SettingsThis section in
- Page 185 and 186:
• The Printer Setting UtilityThe
- Page 187 and 188:
• Adding Roles of Print ServicesW
- Page 189 and 190:
Printing Basics 188
- Page 191 and 192:
Loading Paper for CopyingThe instru
- Page 193 and 194: Making Copies From the Document Gla
- Page 195 and 196: Making Copies From the ADF (DocuPri
- Page 197 and 198: • Number of CopiesYou can specify
- Page 199 and 200: • CollatedYou can sort the copy o
- Page 201 and 202: • inch series200%StmtLgl(154%)Stm
- Page 203 and 204: • Document TypeYou can select the
- Page 205 and 206: • SharpnessYou can adjust the sha
- Page 207 and 208: • Color Balance RYou can specify
- Page 209 and 210: • Color Balance BYou can specify
- Page 211 and 212: • N-UpYou can print two original
- Page 213 and 214: • Margin Top/BottomYou can specif
- Page 215 and 216: • Margin MiddleYou can specify th
- Page 217 and 218: Copying 216
- Page 219 and 220: Scanning OverviewYou can use your p
- Page 221 and 222: • Scanning From the Operator Pane
- Page 223 and 224: 7 Select the desired properties fro
- Page 225 and 226: 5 Select the desired properties inc
- Page 227 and 228: • OverviewThe Scan to Server/Comp
- Page 229 and 230: • Confirming a Login name and Pas
- Page 231 and 232: • Specifying a Destination to Sto
- Page 233 and 234: 5 Select Allow network users to cha
- Page 235 and 236: 8 Click Permissions to create a wri
- Page 237 and 238: • For Windows Server 20031 Create
- Page 239 and 240: • For Windows Vista, Windows 7, W
- Page 241 and 242: You should now see MyShare\MyPic\Jo
- Page 243: From the CentreWare Internet Servic
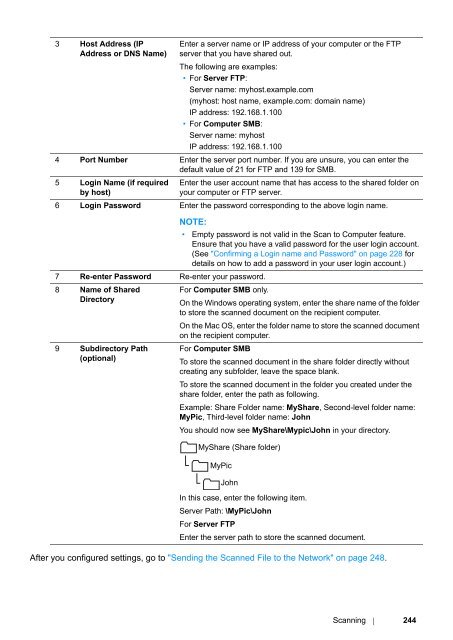
- Page 247 and 248: 12345678910To fill in the fields, e
- Page 249 and 250: • Sending the Scanned File to the
- Page 251 and 252: Sending an E-Mail With the Scanned
- Page 253 and 254: The Add Personal Address page appea
- Page 255 and 256: Adjusting Scanning OptionsThis sect
- Page 257 and 258: Setting the Scan ResolutionYou may
- Page 259 and 260: Scanning 258
- Page 261 and 262: Connecting the Telephone LineIMPORT
- Page 263 and 264: Configuring Fax Initial SettingsThi
- Page 265 and 266: • Setting the Printer IDYou may b
- Page 267 and 268: • Changing the Clock ModeYou can
- Page 269 and 270: • Loading an Original Document on
- Page 271 and 272: • ResolutionTo specify the resolu
- Page 273 and 274: • Lighten/DarkenTo adjust the con
- Page 275 and 276: • Sending a Fax Automatically1 Lo
- Page 277 and 278: • Confirming TransmissionsWhen th
- Page 279 and 280: Sending a Delayed FaxThe Delayed St
- Page 281 and 282: • For WindowsNOTE:• The followi
- Page 283 and 284: NOTE:• Enter the password in the
- Page 285 and 286: cClick Close.NOTE:• Enter the pas
- Page 287 and 288: • About Receiving ModesThere are
- Page 289 and 290: • Receiving a Fax Automatically i
- Page 291 and 292: • Receiving a Fax Automatically i
- Page 293 and 294: • Receiving Faxes Using the DRPD
- Page 295 and 296:
• Polling ReceiveYou can receive
- Page 297 and 298:
• Speed DialingYou can store up t
- Page 299 and 300:
• Sending a Fax Using a Speed Dia
- Page 301 and 302:
• Setting Group Dial1 Press the (
- Page 303 and 304:
• Sending a Fax Using Group Diali
- Page 305 and 306:
Other Ways to FaxThis section inclu
- Page 307 and 308:
• Using an Answering MachineTo th
- Page 309 and 310:
Setting SoundsThis section includes
- Page 311 and 312:
• Ringer Volume1 Press the (Syste
- Page 313 and 314:
• Changing the Fax Settings Optio
- Page 315 and 316:
OptionCompany Name Sets the name of
- Page 317 and 318:
Changing Setting OptionsThe fax men
- Page 319 and 320:
Faxing (DocuPrint CM205 f/CM205 fw
- Page 321 and 322:
Understanding the Printer MenusWhen
- Page 323 and 324:
• Meter ReadingsUse Meter Reading
- Page 325 and 326:
•EthernetPurpose:To specify the c
- Page 327 and 328:
Manual SetupEnter Network(SSID)Infr
- Page 329 and 330:
•ProtocolPurpose:To enable or dis
- Page 331 and 332:
• Line MonitorPurpose:To set the
- Page 333 and 334:
• Company NamePurpose:To set the
- Page 335 and 336:
• Discard SizePurpose:To set whet
- Page 337 and 338:
• Power Saving TimerPurpose:To sp
- Page 339 and 340:
Job Tone Off Does not emit a tone w
- Page 341 and 342:
• Adjust Fusing UnitPurpose:To sp
- Page 343 and 344:
• Initialize NVMPurpose:To initia
- Page 345 and 346:
• Service LockPurpose:To specify
- Page 347 and 348:
• Defaults SettingsUse the Defaul
- Page 349 and 350:
• Document TypePurpose:To select
- Page 351 and 352:
• Margin MiddlePurpose:To specify
- Page 353 and 354:
Darken1Darken2Makes the scanned ima
- Page 355 and 356:
• ResolutionPurpose:To specify th
- Page 357 and 358:
• Tray SettingsUse the Tray Setti
- Page 359 and 360:
• Panel LanguageNOTE:• Values m
- Page 361 and 362:
• Enabling the Panel Lock1 Press
- Page 363 and 364:
Limiting Access to Printer Operatio
- Page 365 and 366:
Resetting to Factory DefaultsAfter
- Page 367 and 368:
• Entering Characters (DocuPrint
- Page 369 and 370:
Using the Operator Panel Menus and
- Page 371 and 372:
Clearing JamsThis section includes:
- Page 373 and 374:
• Identifying the Location of Pap
- Page 375 and 376:
4 Remove the jammed document from t
- Page 377 and 378:
Troubleshooting 376
- Page 379 and 380:
• Clearing Paper Jams From the Ba
- Page 381 and 382:
• Clearing Paper Jams From the Ce
- Page 383 and 384:
8 Close the rear cover.Troubleshoot
- Page 385 and 386:
Basic Printer ProblemsSome printer
- Page 387 and 388:
Printing ProblemsProblemJob did not
- Page 389 and 390:
Print Quality ProblemsThis section
- Page 391 and 392:
• Toner Smears or Print Comes Off
- Page 393 and 394:
• The Entire Output Is BlankIf th
- Page 395 and 396:
• Pitched Color DotsIf this troub
- Page 397 and 398:
• MottleProblemThe printed result
- Page 399 and 400:
• FogProblemThe printed result is
- Page 401 and 402:
• Auger MarkProblemThe printed re
- Page 403 and 404:
• The Top Margin Is IncorrectProb
- Page 405 and 406:
• Protrudent/Bumpy PaperProblemPr
- Page 407 and 408:
Copy Quality ProblemsProblem(DocuPr
- Page 409 and 410:
• Performing Auto CorrectAuto Cor
- Page 411 and 412:
• Determining ValuesOn the color
- Page 413 and 414:
Fax Problems (DocuPrint CM205 f/CM2
- Page 415 and 416:
Scanning ProblemsProblemThe scanner
- Page 417 and 418:
Scan Driver/Printer Utility Problem
- Page 419 and 420:
Understanding Printer MessagesThe p
- Page 421 and 422:
Error CodeWhat You Can Do026-721 Pr
- Page 423 and 424:
Error CodeWhat You Can Do034-703 Pr
- Page 425 and 426:
Error CodeWhat You Can Do034-767 Pr
- Page 427 and 428:
Error CodeWhat You Can Do117-349 Tu
- Page 429 and 430:
Getting HelpThis section includes:
- Page 431 and 432:
• SimpleMonitor AlertsThe SimpleM
- Page 433 and 434:
Non-Genuine ModeWhen toner within a
- Page 435 and 436:
• The Printer Setting UtilityThe
- Page 437 and 438:
Cleaning the PrinterThis section de
- Page 439 and 440:
5 Close the document cover.Maintena
- Page 441 and 442:
• Cleaning Inside the Printer1 Tu
- Page 443 and 444:
11 Replace the other three toner ca
- Page 445 and 446:
Replacing Toner CartridgesFuji Xero
- Page 447 and 448:
• Removing the Toner Cartridges1
- Page 449 and 450:
5 Pack the removed toner cartridge
- Page 451 and 452:
• ConsumablesIMPORTANT:• Use of
- Page 453 and 454:
• Recycling Supplies• For envir
- Page 455 and 456:
Managing the PrinterThis section in
- Page 457 and 458:
• Checking Printer Status with Si
- Page 459 and 460:
Conserving SuppliesYou can change s
- Page 461 and 462:
Moving the Printer1 Turn off the pr
- Page 463 and 464:
8 Close the front cover.9 Lift the
- Page 465 and 466:
Technical SupportFuji Xerox recomme
- Page 467 and 468:
Contacting Fuji Xerox 466
- Page 469 and 470:
Dimensions 34Direct Fax 279Discard
- Page 471:
Remote Rcv Tone 313, 331Remote Rece


