You also want an ePaper? Increase the reach of your titles
YUMPU automatically turns print PDFs into web optimized ePapers that Google loves.
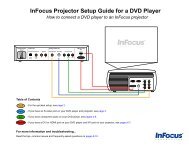
0320En– When connecting using component video cablesor a video cable to watch the picture, connect to anAV receiver or amplifier, or a TV using either analogaudio cables (7.1 channels or 2 channels), anoptical digital audio cable (page 17).– To listen to audio with the player connected to anAV receiver or amplifier with an HDMI cable,connect the TV to the AV receiver or amplifier usingan HDMI cable (page 16).•When HDMI or DIGITAL AUDIO is selected at Audio,linear PCM audio signals (2 channels) are outputfrom all terminals other than the ones selected atAudio.•When ANALOG AUDIO is selected at Audio, noaudio signals are output from the HDMI OUT orDIGITAL OUT terminals.For steps 5 to 8, the step to which you shouldproceed depends on the combination of the Videoand Audio settings.5 Select and set the HDMI High Speed Transmissionsetting for the HDMI OUT terminal.Use / to select, then press ENTER.When HDMI High Speed Transmission for the HDMIOUT terminal is set to On, use a High Speed HDMIcable. The picture and sound may not be output properlyif any other HDMI cable (for example a standard HDMIcable) or an HDMI cable with built-in equalizer is used.6 Select the output video resolution from theCOMPONENT VIDEO output terminals.Use / to select, then press ENTER.For details on the resolution settings, see Switching theoutput video resolution on page 22.7 Select the aspect ratio of your TV.Use / to select, then press ENTER.8 Select the PQLS.Use / to select, then press ENTER.Note• Only when a <strong>Pioneer</strong> AV receiver or amplifier isconnected , PQLS Screen appears.• The PQLS function works when linear PCM audiosignals are output. Therefore the linear PCM audiosignals obtained by decoding all audio signals areoutput from HDMI OUT terminal. For details, seeAbout the audio output settings on page 47.•When Use is select, the player is set to the settingsbelow.HDMI Audio Out: PCMKURO LINK: OnPQLS: Auto•For details on the PQLS function, About PQLS functionon page 15.9 Check the settings.Select Proceed, then press ENTER.10 Output test tones.Use / to select Yes, then press ENTER.11 Finish the Setup Navigator menu.Use / to select Finish, then press ENTER.To redo the settings from the start, select Go Back.Depending on the output terminal setting of step 4 or theHDMI cable being used, it may happen that no pictureand/or sound is output. If this happens, the setup returnsto step 4 if there is no operation for over 30 seconds. Oncethe setup returns to step 4, redo the settings according tothe connected devices and the HDMI cable being used.12 Checking the picture quality settings or settingthe picture quality.If a <strong>Pioneer</strong> Flat Panel TV or projector is connected to theplayer and HDMI is selected for Video in step 4, theplayer sets the picture quality automatically. Theautomatic picture quality setting screen appears. PressENTER.When the automatic picture quality setting screen doesnot appear, the manual picture quality setting screenappears. Use / to select the connected component,then press ENTER.<strong>Operating</strong> the TV withthe player’s remotecontrolWhen the manufacturer code for your brand of TV is seton the player’s remote control, the TV can be operatedusing the player’s remote control.Caution•For some models it may not be possible to operate theTV with the player’s remote control, even for TVs ofbrands listed on the manufacturer code list.•The setting may be restored to the default after thebatteries are replaced. If this happens, reset it.STANDBY/ONTV CONTROLINPUTSELECT CH VOLOPEN/CLOSEAUDIO SUBTITLE ANGLE FL DIMMERCLEARAUDIOVIDEOENTEROUTPUTRESOLUTION1 Input the 2-digit manufacturer code.Press the number buttons (0 to 9) to input the code whilepressing TV CONTROL .