You also want an ePaper? Increase the reach of your titles
YUMPU automatically turns print PDFs into web optimized ePapers that Google loves.
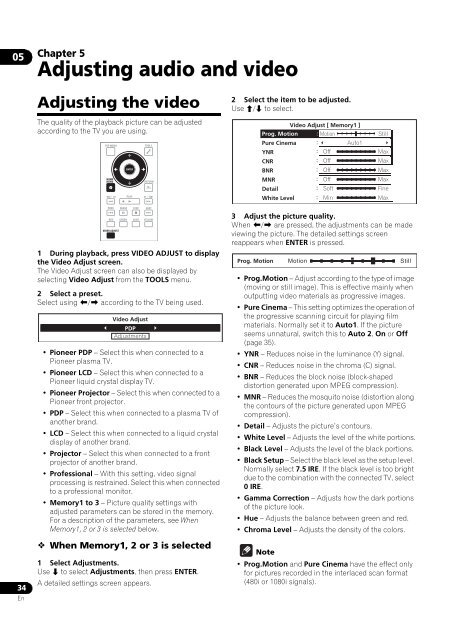
05Chapter 5Adjusting audio and videoAdjusting the videoThe quality of the playback picture can be adjustedaccording to the TV you are using.TOP MENUHOMEMENUENTERPLAYTOOLSRETURN2 Select the item to be adjusted.Use / to select.Video Adjust [ Memory1 ]Prog. Motion MotionPure CinemaAuto1YNROffCNROffBNROffMNROffDetailSoftWhite Level MinStillMaxMaxMaxMaxFineMax34EnPREV PAUSE STOP NEXTRED GREEN BLUE YELLOWVIDEO ADJUST1 During playback, press VIDEO ADJUST to displaythe Video Adjust screen.The Video Adjust screen can also be displayed byselecting Video Adjust from the TOOLS menu.2 Select a preset.Select using / according to the TV being used.Video AdjustPDPAdjustments• <strong>Pioneer</strong> PDP – Select this when connected to a<strong>Pioneer</strong> plasma TV.• <strong>Pioneer</strong> LCD – Select this when connected to a<strong>Pioneer</strong> liquid crystal display TV.• <strong>Pioneer</strong> Projector – Select this when connected to a<strong>Pioneer</strong> front projector.• PDP – Select this when connected to a plasma TV ofanother brand.• LCD – Select this when connected to a liquid crystaldisplay of another brand.• Projector – Select this when connected to a frontprojector of another brand.• Professional – With this setting, video signalprocessing is restrained. Select this when connectedto a professional monitor.• Memory1 to 3 – Picture quality settings withadjusted parameters can be stored in the memory.For a description of the parameters, see WhenMemory1, 2 or 3 is selected below. When Memory1, 2 or 3 is selected1 Select Adjustments.Use to select Adjustments, then press ENTER.A detailed settings screen appears.3 Adjust the picture quality.When / are pressed, the adjustments can be madeviewing the picture. The detailed settings screenreappears when ENTER is pressed.Prog. MotionMotionStill• Prog.Motion – Adjust according to the type of image(moving or still image). This is effective mainly whenoutputting video materials as progressive images.• Pure Cinema – This setting optimizes the operation ofthe progressive scanning circuit for playing filmmaterials. Normally set it to Auto1. If the pictureseems unnatural, switch this to Auto 2, On or Off(page 35).• YNR – Reduces noise in the luminance (Y) signal.• CNR – Reduces noise in the chroma (C) signal.• BNR – Reduces the block noise (block-shapeddistortion generated upon MPEG compression).• MNR – Reduces the mosquito noise (distortion alongthe contours of the picture generated upon MPEGcompression).• Detail – Adjusts the picture’s contours.• White Level – Adjusts the level of the white portions.• Black Level – Adjusts the level of the black portions.• Black Setup – Select the black level as the setup level.Normally select 7.5 IRE. If the black level is too brightdue to the combination with the connected TV, select0 IRE.• Gamma Correction – Adjusts how the dark portionsof the picture look.• Hue – Adjusts the balance between green and red.• Chroma Level – Adjusts the density of the colors.Note• Prog.Motion and Pure Cinema have the effect onlyfor pictures recorded in the interlaced scan format(480i or 1080i signals).


