National Gypsum Construction Guide
National Gypsum Construction Guide The entire - AECinfo.com
National Gypsum Construction Guide The entire - AECinfo.com
- No tags were found...

Create successful ePaper yourself
Turn your PDF publications into a flip-book with our unique Google optimized e-Paper software.
RECOMMENDATIONS<br />
VENEER PLASTER FOR<br />
METAL AND WOOD<br />
FRAMING<br />
1. Wood Studs or Joists.<br />
Wood members shall meet<br />
the minimum requirements<br />
of local building codes.<br />
Framing shall not exceed<br />
spacing shown in Table 1<br />
on page 46. Most partition<br />
fire ratings require that Kal-<br />
Kore be applied vertically.<br />
When such ratings are not<br />
required, horizontal<br />
application may be used to<br />
minimize joints. For<br />
ceilings, application at right<br />
angles to framing is<br />
preferred.<br />
2. Metal Studs. Align floor<br />
and ceiling tracks to ensure<br />
plumb partition. Secure<br />
track with appropriate<br />
fasteners at a maximum of<br />
24" o.c. Position studs in<br />
track on specified centers<br />
by rotating into place for a<br />
friction fit. Secure studs<br />
located adjacent to door<br />
and window frames,<br />
partition intersections and<br />
corners by self-drilling<br />
sheet metal screws through<br />
both flanges of studs and<br />
tracks or by use of steel<br />
stud clinching tool. Apply<br />
Kal-Kore vertically for most<br />
fire ratings. When ratings<br />
are not required, horizontal<br />
application may be used to<br />
minimize joints.<br />
3. Masonry Wall Furring with<br />
Screw Furring Channel.<br />
Attach furring channel<br />
vertically spaced not to<br />
exceed spacing shown in<br />
Table 1 on page 44. Fasten<br />
each channel with concrete<br />
stub nails or appropriate<br />
fasteners through channel<br />
flanges into the masonry or<br />
concrete. Fasteners shall be<br />
spaced on alternate flanges<br />
not over 24" o.c. Apply<br />
Kal-Kore vertically or<br />
horizontally in maximum<br />
lengths to minimize end<br />
joints.<br />
4. Furred Ceilings with Bar<br />
Joists. Attach regular furring<br />
channel 16" o.c. to bar<br />
joists spaced up to 4' o.c.<br />
Resilient Furring Channel<br />
(wire-tied only) shall span a<br />
maximum of 24". Wire tie<br />
Furring Channel to joists or<br />
use 1 1/2" Drywall Furring<br />
Channel Clip for 1 1/2"<br />
carrying channel. Apply<br />
Kal-Kore with paper bound<br />
edges at right angles to the<br />
furring channel.<br />
KAL-KORE AND HI-ABUSE ®<br />
KAL-KORE APPLICATION<br />
Note: Application shall<br />
conform to ASTM C 844.<br />
1. Cut and position Kal-Kore<br />
accurately. Bring all joint<br />
edges together but do not<br />
force into place. Position<br />
all end joints over framing<br />
members. To avoid ridging,<br />
minimize gaps between<br />
adjacent boards.<br />
2. Minimize the number<br />
of end joints by using<br />
maximum practical lengths<br />
with proper positioning.<br />
3. Stagger joints so that they<br />
occur on different framing<br />
members and will not be<br />
directly opposite one<br />
another on partitions.<br />
Avoid joining Kal-Kore at<br />
corners of doors, window<br />
frames, and other openings,<br />
unless control joints are<br />
created using E-Z Strip<br />
Control Joints.<br />
4. Fasten Kal-Kore to framing<br />
members with face out,<br />
using the proper type and<br />
spacing of fasteners shown<br />
under types of fasteners.<br />
5. Draw Kal-Kore tight to<br />
framing. Drive fasteners<br />
straight and dimple the<br />
surface without breaking<br />
the paper face.<br />
KAL-KORNER BEAD<br />
APPLICATION<br />
Install Kal-Korner Bead using<br />
appropriate fasteners<br />
spaced 12" apart.<br />
E-Z STRIP CONTROL JOINT<br />
APPLICATION<br />
Install E-Z Strip Control Joint<br />
at 30' max. spacing on<br />
walls and 50' max. spacing<br />
in either direction on<br />
ceilings. Apply the control<br />
joint with staples spaced 6"<br />
along each side of the<br />
flanges.<br />
TREATMENT OF KAL-KORE<br />
JOINTS<br />
Pre-treat all joints and<br />
fasteners in Kal-Kote and<br />
Uni-Kal Plaster Systems<br />
with Kal-Kote Base Plaster,<br />
Uni-Kal, X-KALibur or Sta-<br />
Smooth Joint Compound.<br />
Low humidity, high<br />
temperatures and rapidly<br />
circulating air can cause<br />
cracking of plaster and joint<br />
beading when Kal-Kore is<br />
applied to metal framing.<br />
To minimize this during<br />
these conditions, joints<br />
may be pre-treated using<br />
paper tape.<br />
Three acceptable methods of<br />
treating Kal-Kore joints are:<br />
DRYWALL PAPER TAPE<br />
TREATMENT METHOD<br />
1. Trowel Kal-Kote Base<br />
Plaster, Uni-Kal or<br />
X-KALibur over joint line<br />
filling the channel formed<br />
by the tapered edges of the<br />
Kal-Kore board in an even<br />
fashion.<br />
2. Center drywall paper tape<br />
over the joint line and<br />
embed the tape into the<br />
soft plaster using a trowel<br />
and level the joint. Tape<br />
the full length of the joint.<br />
3. Allow the treated joints to<br />
set prior to general plaster<br />
application.<br />
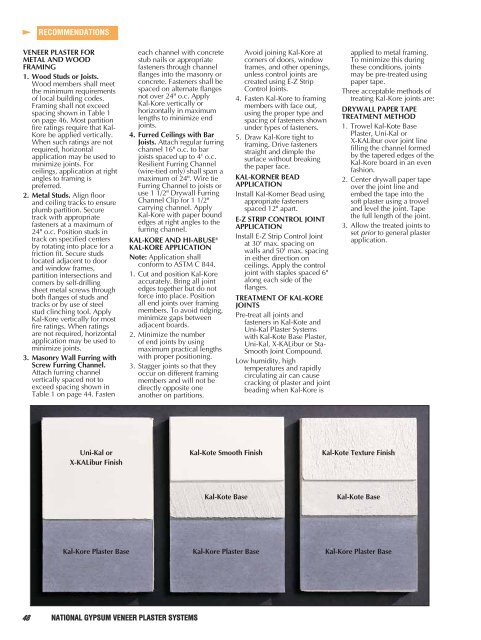
Uni-Kal or<br />
X-KALibur Finish<br />
Kal-Kote Smooth Finish<br />
Kal-Kote Texture Finish<br />
Kal-Kote Base<br />
Kal-Kote Base<br />
Kal-Kore Plaster Base<br />
Kal-Kore Plaster Base<br />
Kal-Kore Plaster Base<br />
48 NATIONAL GYPSUM VENEER PLASTER SYSTEMS