

SV8100 SL MyCalls Call Recorder Installation Manual v1.0
www.nesilguvenlik.com
www.nesilguvenlik.com

Create successful ePaper yourself
Turn your PDF publications into a flip-book with our unique Google optimized e-Paper software.
Multiple Units<br />
When using multiple units, the same concept applies to the Channel Mapping for each trunk on the<br />
PBX. The only difference is each <strong>Call</strong> Recording unit must be given a unique ID; this would usually<br />
be 0, 1, 2, or 3 as applicable. By default each unit comes with unit ID 0. The following procedure<br />
describes how to change the ID of a <strong>Call</strong> Recording unit.<br />
1. Unplug the USB leads for all <strong>Call</strong> Recording units and plug in the unit that you want to set the<br />
ID on.<br />
2. Leaving the lines connected through the TAP connector, disconnect the ‘In’ and ‘Out’<br />
connectors from the front of the call recording unit.<br />
3. Browse into the Sense installation folder and then into the ‘BIN’ sub folder. In there, double<br />
click the ‘Stop Service’ shortcut. A black window will appear and then automatically close<br />
down when the service is stopped.<br />
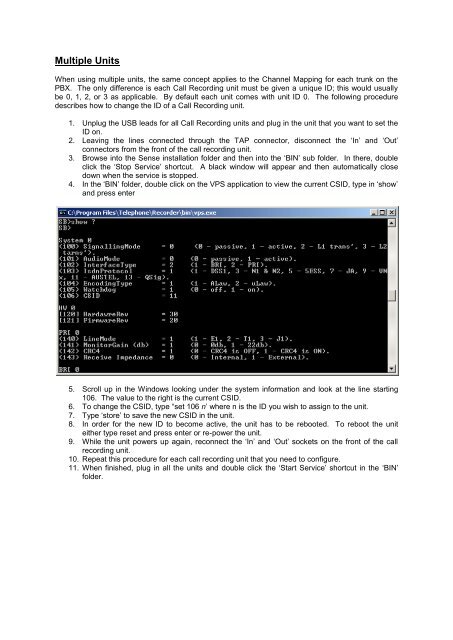
4. In the ‘BIN’ folder, double click on the VPS application to view the current CSID, type in ‘show’<br />
and press enter<br />
5. Scroll up in the Windows looking under the system information and look at the line starting<br />
106. The value to the right is the current CSID.<br />
6. To change the CSID, type “set 106 n’ where n is the ID you wish to assign to the unit.<br />
7. Type ‘store’ to save the new CSID in the unit.<br />
8. In order for the new ID to become active, the unit has to be rebooted. To reboot the unit<br />
either type reset and press enter or re-power the unit.<br />
9. While the unit powers up again, reconnect the ‘In’ and ‘Out’ sockets on the front of the call<br />
recording unit.<br />
10. Repeat this procedure for each call recording unit that you need to configure.<br />
11. When finished, plug in all the units and double click the ‘Start Service’ shortcut in the ‘BIN’<br />
folder.