
You also want an ePaper? Increase the reach of your titles
YUMPU automatically turns print PDFs into web optimized ePapers that Google loves.
Installation and Operation of Sign Cutting Plotter 2-8<br />
Jaguar II User Manual<br />
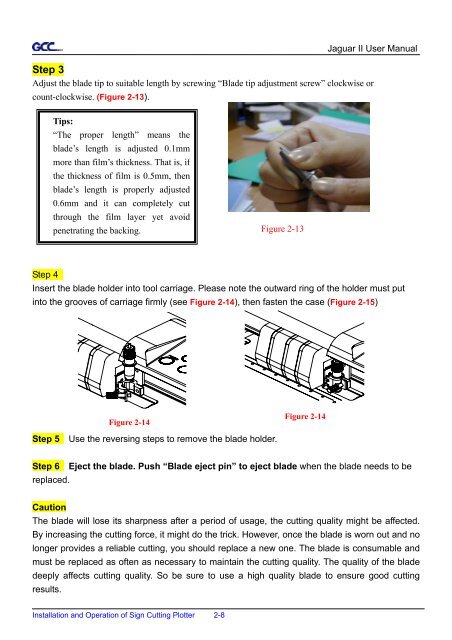
Step 3<br />
Adjust the blade tip to suitable length by screwing “Blade tip adjustment screw” clockwise or<br />
count-clockwise. (Figure 2-13).<br />
Tips:<br />
“The proper length” means the<br />
blade’s length is adjusted 0.1mm<br />
more than film’s thickness. That is, if<br />
the thickness of film is 0.5mm, then<br />
blade’s length is properly adjusted<br />
0.6mm and it can completely cut<br />
through the film layer yet avoid<br />
penetrating the backing.<br />
Step 4<br />
Insert the blade holder into tool carriage. Please note the outward ring of the holder must put<br />
into the grooves of carriage firmly (see Figure 2-14), then fasten the case (Figure 2-15)<br />
Figure 2-14<br />
Step 5 Use the reversing steps to remove the blade holder.<br />
Figure 2-13<br />
Figure 2-14<br />
Step 6 Eject the blade. Push “Blade eject pin” to eject blade when the blade needs to be<br />
replaced.<br />
Caution<br />
The blade will lose its sharpness after a period of usage, the cutting quality might be affected.<br />
By increasing the cutting force, it might do the trick. However, once the blade is worn out and no<br />
longer provides a reliable cutting, you should replace a new one. The blade is consumable and<br />
must be replaced as often as necessary to maintain the cutting quality. The quality of the blade<br />
deeply affects cutting quality. So be sure to use a high quality blade to ensure good cutting<br />
results.