
Create successful ePaper yourself
Turn your PDF publications into a flip-book with our unique Google optimized e-Paper software.
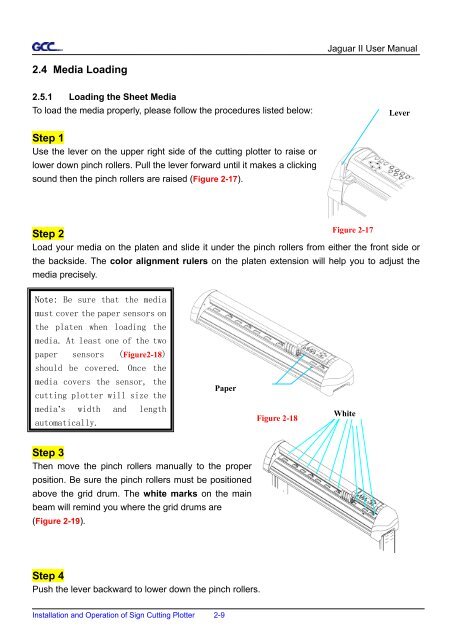
2.4 Media Loading<br />
2.5.1 Loading the Sheet Media<br />
To load the media properly, please follow the procedures listed below:<br />
Step 1<br />
Use the lever on the upper right side of the cutting plotter to raise or<br />
lower down pinch rollers. Pull the lever forward until it makes a clicking<br />
sound then the pinch rollers are raised (Figure 2-17).<br />
Installation and Operation of Sign Cutting Plotter 2-9<br />
Figure 2-19<br />
Jaguar II User Manual<br />
Step 2<br />
Load your media on the platen and slide it under the pinch rollers from either the front side or<br />
the backside. The color alignment rulers on the platen extension will help you to adjust the<br />
media precisely.<br />
Note: Be sure that the media<br />
must cover the paper sensors on<br />
the platen when loading the<br />
media. At least one of the two<br />
paper sensors (Figure2-18)<br />
should be covered. Once the<br />
media covers the sensor, the<br />
cutting plotter will size the<br />
media’s width and length<br />
automatically.<br />
Step 3<br />
Then move the pinch rollers manually to the proper<br />
position. Be sure the pinch rollers must be positioned<br />
above the grid drum. The white marks on the main<br />
beam will remind you where the grid drums are<br />
(Figure 2-19).<br />
Paper<br />
Step 4<br />
Push the lever backward to lower down the pinch rollers.<br />
Figure 2-18<br />
Figure 2-17<br />
White<br />
Lever