MiniLap
MiniLap
MiniLap

You also want an ePaper? Increase the reach of your titles
YUMPU automatically turns print PDFs into web optimized ePapers that Google loves.
3 Devices with moving parts should be evaluated for proper function<br />
prior to use. If damage is suspected, contact your local representative<br />
for replacement by the manufacturer.<br />
4 Laparoscopic procedures should be performed only by physicians<br />
possessing adequate training and familiarity with laparoscopic<br />
techniques and instruments.<br />
5 When using <strong>MiniLap</strong> Graspers, clinical judgment must be made<br />
regarding the application of the instruments. In all cases, sound<br />
surgical practice is to be followed by the user.<br />
6 When used in laparoscopy, <strong>MiniLap</strong> Graspers should only be inserted<br />
under direct laparoscopic visualization.<br />
7 <strong>MiniLap</strong> Graspers should be handled carefully to avoid inadvertent<br />
damage to the instrument tip.<br />
8 Do not use <strong>MiniLap</strong> Graspers to crush or crimp other surgical<br />
instruments.<br />
Potential Adverse Effects<br />
•<br />
•<br />
•<br />
2<br />
Perforation or internal bleeding<br />
Infection, which can lead to failure of the procedure<br />
Neurovascular injuries due to surgical trauma<br />
Sterilization<br />
•<br />
•<br />
•<br />
<strong>MiniLap</strong> Graspers are provided sterile (gamma radiation).<br />
They are intended for single use only and should be discarded after use.<br />
Do not resterilize.<br />
No other sterilization technique has been validated to ensure the<br />
sterility or functional integrity of the device.<br />
Storage<br />
•<br />
•<br />
•<br />
Store at room temperature.<br />
Avoid prolonged exposure to elevated temperatures.<br />
Do not expose to temperatures above 120°F (49°C).<br />
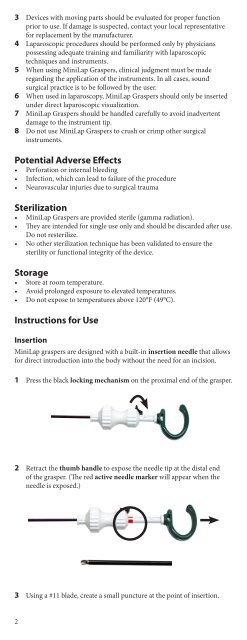
Instructions for Use<br />
Insertion<br />
<strong>MiniLap</strong> graspers are designed with a built-in insertion needle that allows<br />
for direct introduction into the body without the need for an incision.<br />
1 Press the black locking mechanism on the proximal end of the grasper.<br />
2 Retract the thumb handle to expose the needle tip at the distal end<br />
of the grasper. (The red active needle marker will appear when the<br />
needle is exposed.)<br />
3<br />
Using a #11 blade, create a small puncture at the point of insertion.