

Using the FONIX 7000 to Verify Coupler and Real-Ear Performance ...
Using the FONIX 7000 to Verify Coupler and Real-Ear Performance ...
Using the FONIX 7000 to Verify Coupler and Real-Ear Performance ...

Create successful ePaper yourself
Turn your PDF publications into a flip-book with our unique Google optimized e-Paper software.
<strong>Coupler</strong> Measurements 24<br />
6. Use [F5] <strong>to</strong> select DIG SPEECH as <strong>the</strong> signal source. This serves <strong>to</strong> provide a<br />
reference point for <strong>the</strong> measures that follow.<br />
7. Use <strong>the</strong> up <strong>and</strong> down arrows <strong>to</strong> select an amplitude approximating normal<br />
speech, such as 60 dB SPL.<br />
8. Press [START] <strong>to</strong> begin <strong>the</strong> measurement.<br />
9. When <strong>the</strong> curve has stabilized press [STOP].<br />
10. Press [F2] <strong>to</strong> select <strong>the</strong> second curve (CRV 2).<br />
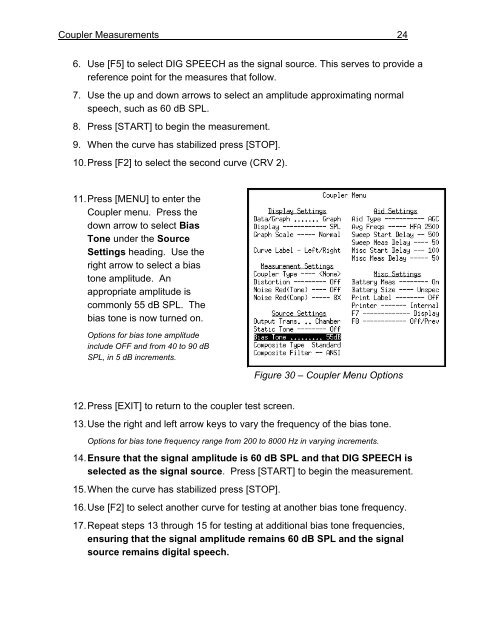
11. Press [MENU] <strong>to</strong> enter <strong>the</strong><br />
<strong>Coupler</strong> menu. Press <strong>the</strong><br />
down arrow <strong>to</strong> select Bias<br />
Tone under <strong>the</strong> Source<br />
Settings heading. Use <strong>the</strong><br />
right arrow <strong>to</strong> select a bias<br />
<strong>to</strong>ne amplitude. An<br />
appropriate amplitude is<br />
commonly 55 dB SPL. The<br />
bias <strong>to</strong>ne is now turned on.<br />
Options for bias <strong>to</strong>ne amplitude<br />
include OFF <strong>and</strong> from 40 <strong>to</strong> 90 dB<br />
SPL, in 5 dB increments.<br />
12. Press [EXIT] <strong>to</strong> return <strong>to</strong> <strong>the</strong> coupler test screen.<br />
13. Use <strong>the</strong> right <strong>and</strong> left arrow keys <strong>to</strong> vary <strong>the</strong> frequency of <strong>the</strong> bias <strong>to</strong>ne.<br />
Options for bias <strong>to</strong>ne frequency range from 200 <strong>to</strong> 8000 Hz in varying increments.<br />
14. Ensure that <strong>the</strong> signal amplitude is 60 dB SPL <strong>and</strong> that DIG SPEECH is<br />
selected as <strong>the</strong> signal source. Press [START] <strong>to</strong> begin <strong>the</strong> measurement.<br />
15. When <strong>the</strong> curve has stabilized press [STOP].<br />
Figure 30 – <strong>Coupler</strong> Menu Options<br />
16. Use [F2] <strong>to</strong> select ano<strong>the</strong>r curve for testing at ano<strong>the</strong>r bias <strong>to</strong>ne frequency.<br />
17. Repeat steps 13 through 15 for testing at additional bias <strong>to</strong>ne frequencies,<br />
ensuring that <strong>the</strong> signal amplitude remains 60 dB SPL <strong>and</strong> <strong>the</strong> signal<br />
source remains digital speech.


