

Using the FONIX 7000 to Verify Coupler and Real-Ear Performance ...
Using the FONIX 7000 to Verify Coupler and Real-Ear Performance ...
Using the FONIX 7000 to Verify Coupler and Real-Ear Performance ...

Create successful ePaper yourself
Turn your PDF publications into a flip-book with our unique Google optimized e-Paper software.
<strong>Real</strong> <strong>Ear</strong> Measurements 30<br />
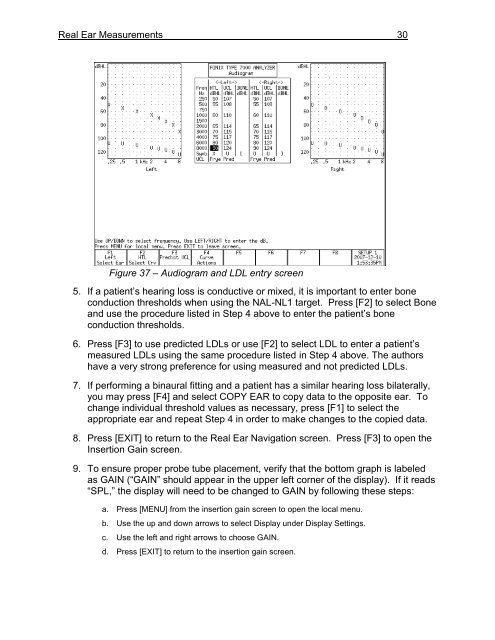
Figure 37 – Audiogram <strong>and</strong> LDL entry screen<br />
5. If a patient’s hearing loss is conductive or mixed, it is important <strong>to</strong> enter bone<br />
conduction thresholds when using <strong>the</strong> NAL-NL1 target. Press [F2] <strong>to</strong> select Bone<br />
<strong>and</strong> use <strong>the</strong> procedure listed in Step 4 above <strong>to</strong> enter <strong>the</strong> patient’s bone<br />
conduction thresholds.<br />
6. Press [F3] <strong>to</strong> use predicted LDLs or use [F2] <strong>to</strong> select LDL <strong>to</strong> enter a patient’s<br />
measured LDLs using <strong>the</strong> same procedure listed in Step 4 above. The authors<br />
have a very strong preference for using measured <strong>and</strong> not predicted LDLs.<br />
7. If performing a binaural fitting <strong>and</strong> a patient has a similar hearing loss bilaterally,<br />
you may press [F4] <strong>and</strong> select COPY EAR <strong>to</strong> copy data <strong>to</strong> <strong>the</strong> opposite ear. To<br />
change individual threshold values as necessary, press [F1] <strong>to</strong> select <strong>the</strong><br />
appropriate ear <strong>and</strong> repeat Step 4 in order <strong>to</strong> make changes <strong>to</strong> <strong>the</strong> copied data.<br />
8. Press [EXIT] <strong>to</strong> return <strong>to</strong> <strong>the</strong> <strong>Real</strong> <strong>Ear</strong> Navigation screen. Press [F3] <strong>to</strong> open <strong>the</strong><br />
Insertion Gain screen.<br />
9. To ensure proper probe tube placement, verify that <strong>the</strong> bot<strong>to</strong>m graph is labeled<br />
as GAIN (“GAIN” should appear in <strong>the</strong> upper left corner of <strong>the</strong> display). If it reads<br />
“SPL,” <strong>the</strong> display will need <strong>to</strong> be changed <strong>to</strong> GAIN by following <strong>the</strong>se steps:<br />
a. Press [MENU] from <strong>the</strong> insertion gain screen <strong>to</strong> open <strong>the</strong> local menu.<br />
b. Use <strong>the</strong> up <strong>and</strong> down arrows <strong>to</strong> select Display under Display Settings.<br />
c. Use <strong>the</strong> left <strong>and</strong> right arrows <strong>to</strong> choose GAIN.<br />
d. Press [EXIT] <strong>to</strong> return <strong>to</strong> <strong>the</strong> insertion gain screen.


