

Using the FONIX 7000 to Verify Coupler and Real-Ear Performance ...
Using the FONIX 7000 to Verify Coupler and Real-Ear Performance ...
Using the FONIX 7000 to Verify Coupler and Real-Ear Performance ...

You also want an ePaper? Increase the reach of your titles
YUMPU automatically turns print PDFs into web optimized ePapers that Google loves.
<strong>Real</strong> <strong>Ear</strong> Measurements 44<br />
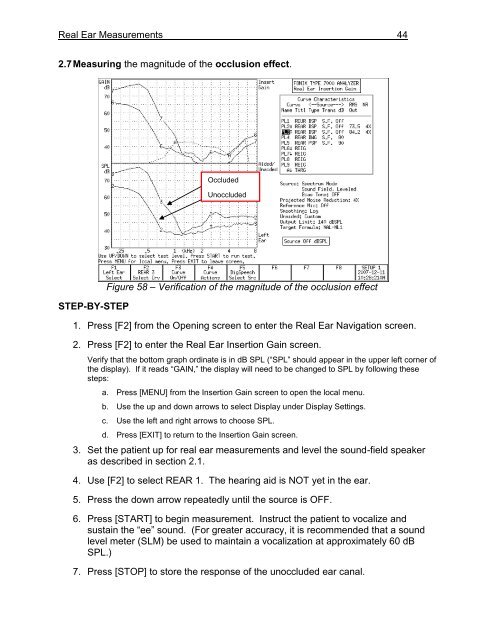
2.7 Measuring <strong>the</strong> magnitude of <strong>the</strong> occlusion effect.<br />
STEP-BY-STEP<br />
Occluded<br />
Unoccluded<br />
Figure 58 – Verification of <strong>the</strong> magnitude of <strong>the</strong> occlusion effect<br />
1. Press [F2] from <strong>the</strong> Opening screen <strong>to</strong> enter <strong>the</strong> <strong>Real</strong> <strong>Ear</strong> Navigation screen.<br />
2. Press [F2] <strong>to</strong> enter <strong>the</strong> <strong>Real</strong> <strong>Ear</strong> Insertion Gain screen.<br />
<strong>Verify</strong> that <strong>the</strong> bot<strong>to</strong>m graph ordinate is in dB SPL (“SPL” should appear in <strong>the</strong> upper left corner of<br />
<strong>the</strong> display). If it reads “GAIN,” <strong>the</strong> display will need <strong>to</strong> be changed <strong>to</strong> SPL by following <strong>the</strong>se<br />
steps:<br />
a. Press [MENU] from <strong>the</strong> Insertion Gain screen <strong>to</strong> open <strong>the</strong> local menu.<br />
b. Use <strong>the</strong> up <strong>and</strong> down arrows <strong>to</strong> select Display under Display Settings.<br />
c. Use <strong>the</strong> left <strong>and</strong> right arrows <strong>to</strong> choose SPL.<br />
d. Press [EXIT] <strong>to</strong> return <strong>to</strong> <strong>the</strong> Insertion Gain screen.<br />
3. Set <strong>the</strong> patient up for real ear measurements <strong>and</strong> level <strong>the</strong> sound-field speaker<br />
as described in section 2.1.<br />
4. Use [F2] <strong>to</strong> select REAR 1. The hearing aid is NOT yet in <strong>the</strong> ear.<br />
5. Press <strong>the</strong> down arrow repeatedly until <strong>the</strong> source is OFF.<br />
6. Press [START] <strong>to</strong> begin measurement. Instruct <strong>the</strong> patient <strong>to</strong> vocalize <strong>and</strong><br />
sustain <strong>the</strong> “ee” sound. (For greater accuracy, it is recommended that a sound<br />
level meter (SLM) be used <strong>to</strong> maintain a vocalization at approximately 60 dB<br />
SPL.)<br />
7. Press [STOP] <strong>to</strong> s<strong>to</strong>re <strong>the</strong> response of <strong>the</strong> unoccluded ear canal.


