Using the FONIX 7000 to Verify Coupler and Real-Ear Performance ...
Using the FONIX 7000 to Verify Coupler and Real-Ear Performance ...
Using the FONIX 7000 to Verify Coupler and Real-Ear Performance ...
You also want an ePaper? Increase the reach of your titles
YUMPU automatically turns print PDFs into web optimized ePapers that Google loves.
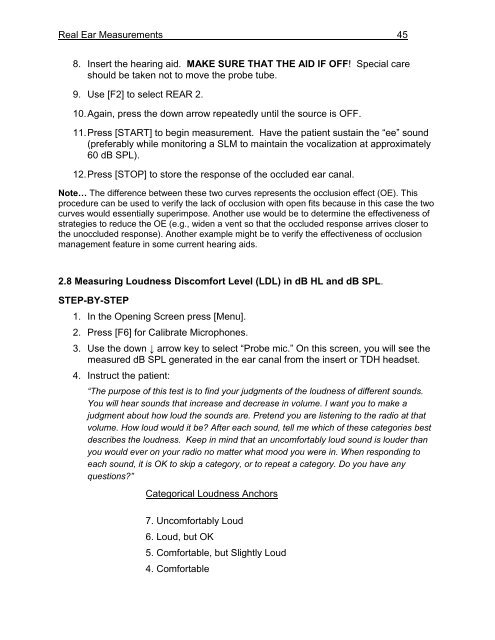
<strong>Real</strong> <strong>Ear</strong> Measurements 45<br />
8. Insert <strong>the</strong> hearing aid. MAKE SURE THAT THE AID IF OFF! Special care<br />
should be taken not <strong>to</strong> move <strong>the</strong> probe tube.<br />
9. Use [F2] <strong>to</strong> select REAR 2.<br />
10. Again, press <strong>the</strong> down arrow repeatedly until <strong>the</strong> source is OFF.<br />
11. Press [START] <strong>to</strong> begin measurement. Have <strong>the</strong> patient sustain <strong>the</strong> “ee” sound<br />
(preferably while moni<strong>to</strong>ring a SLM <strong>to</strong> maintain <strong>the</strong> vocalization at approximately<br />
60 dB SPL).<br />
12. Press [STOP] <strong>to</strong> s<strong>to</strong>re <strong>the</strong> response of <strong>the</strong> occluded ear canal.<br />
Note… The difference between <strong>the</strong>se two curves represents <strong>the</strong> occlusion effect (OE). This<br />
procedure can be used <strong>to</strong> verify <strong>the</strong> lack of occlusion with open fits because in this case <strong>the</strong> two<br />
curves would essentially superimpose. Ano<strong>the</strong>r use would be <strong>to</strong> determine <strong>the</strong> effectiveness of<br />
strategies <strong>to</strong> reduce <strong>the</strong> OE (e.g., widen a vent so that <strong>the</strong> occluded response arrives closer <strong>to</strong><br />
<strong>the</strong> unoccluded response). Ano<strong>the</strong>r example might be <strong>to</strong> verify <strong>the</strong> effectiveness of occlusion<br />
management feature in some current hearing aids.<br />
2.8 Measuring Loudness Discomfort Level (LDL) in dB HL <strong>and</strong> dB SPL.<br />
STEP-BY-STEP<br />
1. In <strong>the</strong> Opening Screen press [Menu].<br />
2. Press [F6] for Calibrate Microphones.<br />
3. Use <strong>the</strong> down ↓ arrow key <strong>to</strong> select “Probe mic.” On this screen, you will see <strong>the</strong><br />
measured dB SPL generated in <strong>the</strong> ear canal from <strong>the</strong> insert or TDH headset.<br />
4. Instruct <strong>the</strong> patient:<br />
“The purpose of this test is <strong>to</strong> find your judgments of <strong>the</strong> loudness of different sounds.<br />
You will hear sounds that increase <strong>and</strong> decrease in volume. I want you <strong>to</strong> make a<br />
judgment about how loud <strong>the</strong> sounds are. Pretend you are listening <strong>to</strong> <strong>the</strong> radio at that<br />
volume. How loud would it be? After each sound, tell me which of <strong>the</strong>se categories best<br />
describes <strong>the</strong> loudness. Keep in mind that an uncomfortably loud sound is louder than<br />
you would ever on your radio no matter what mood you were in. When responding <strong>to</strong><br />
each sound, it is OK <strong>to</strong> skip a category, or <strong>to</strong> repeat a category. Do you have any<br />
questions?”<br />
Categorical Loudness Anchors<br />
7. Uncomfortably Loud<br />
6. Loud, but OK<br />
5. Comfortable, but Slightly Loud<br />
4. Comfortable


