

Using the FONIX 7000 to Verify Coupler and Real-Ear Performance ...
Using the FONIX 7000 to Verify Coupler and Real-Ear Performance ...
Using the FONIX 7000 to Verify Coupler and Real-Ear Performance ...

Create successful ePaper yourself
Turn your PDF publications into a flip-book with our unique Google optimized e-Paper software.
<strong>Real</strong> <strong>Ear</strong> Measurements 31<br />
10. Configure <strong>the</strong> patient for real ear measurements.<br />
a. Mark <strong>the</strong> probe tube ei<strong>the</strong>r 5 mm from <strong>the</strong> canal opening of <strong>the</strong> earmold/cus<strong>to</strong>m shell or<br />
at 30 mm from <strong>the</strong> tip of <strong>the</strong> probe tube.<br />
b. Place <strong>the</strong> reference <strong>and</strong> probe microphone unit on <strong>the</strong> test ear as illustrated in Figure 32.<br />
c. After performing o<strong>to</strong>scopic inspection, insert <strong>the</strong> probe tube with <strong>the</strong> mark at <strong>the</strong><br />
intertragal notch. It is recommended that tape be used <strong>to</strong> secure <strong>the</strong> probe tube.<br />
d. Place <strong>the</strong> sound-field speaker at a distance of approximately 12 inches from <strong>the</strong> client’s<br />
head at 0° azimuth (directly in front of <strong>the</strong> patient) from <strong>the</strong> test ear. The height of <strong>the</strong><br />
sound-field speaker should be even with <strong>the</strong> test ear. Be sure “0 °” has been entered in <strong>the</strong><br />
real ear audiogram menu!<br />
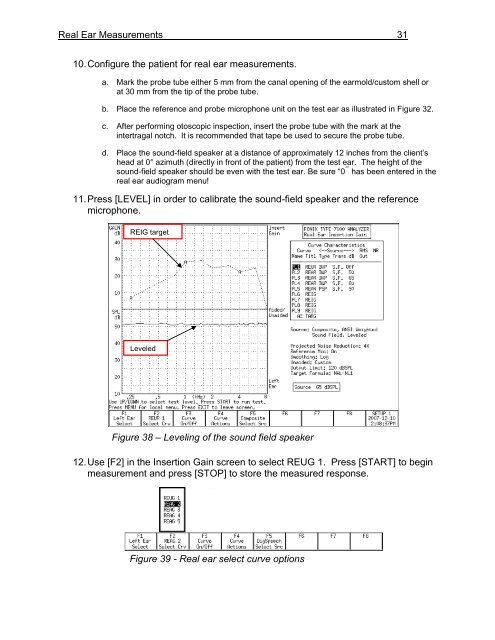
11. Press [LEVEL] in order <strong>to</strong> calibrate <strong>the</strong> sound-field speaker <strong>and</strong> <strong>the</strong> reference<br />
microphone.<br />
REIG target<br />
Leveled<br />
Figure 38 – Leveling of <strong>the</strong> sound field speaker<br />
12. Use [F2] in <strong>the</strong> Insertion Gain screen <strong>to</strong> select REUG 1. Press [START] <strong>to</strong> begin<br />
measurement <strong>and</strong> press [STOP] <strong>to</strong> s<strong>to</strong>re <strong>the</strong> measured response.<br />
Figure 39 - <strong>Real</strong> ear select curve options


