

Using the FONIX 7000 to Verify Coupler and Real-Ear Performance ...
Using the FONIX 7000 to Verify Coupler and Real-Ear Performance ...
Using the FONIX 7000 to Verify Coupler and Real-Ear Performance ...

Create successful ePaper yourself
Turn your PDF publications into a flip-book with our unique Google optimized e-Paper software.
<strong>Real</strong> <strong>Ear</strong> Measurements 34<br />
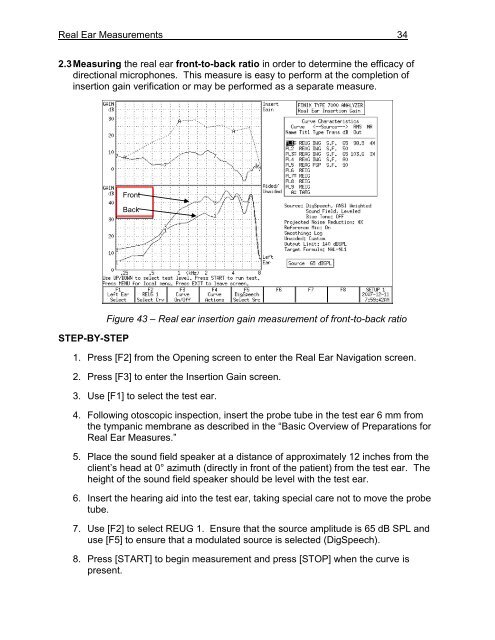
2.3 Measuring <strong>the</strong> real ear front-<strong>to</strong>-back ratio in order <strong>to</strong> determine <strong>the</strong> efficacy of<br />
directional microphones. This measure is easy <strong>to</strong> perform at <strong>the</strong> completion of<br />
insertion gain verification or may be performed as a separate measure.<br />
STEP-BY-STEP<br />
Front<br />
Back<br />
Back<br />
Figure 43 – <strong>Real</strong> ear insertion gain measurement of front-<strong>to</strong>-back ratio<br />
1. Press [F2] from <strong>the</strong> Opening screen <strong>to</strong> enter <strong>the</strong> <strong>Real</strong> <strong>Ear</strong> Navigation screen.<br />
2. Press [F3] <strong>to</strong> enter <strong>the</strong> Insertion Gain screen.<br />
3. Use [F1] <strong>to</strong> select <strong>the</strong> test ear.<br />
4. Following o<strong>to</strong>scopic inspection, insert <strong>the</strong> probe tube in <strong>the</strong> test ear 6 mm from<br />
<strong>the</strong> tympanic membrane as described in <strong>the</strong> “Basic Overview of Preparations for<br />
<strong>Real</strong> <strong>Ear</strong> Measures.”<br />
5. Place <strong>the</strong> sound field speaker at a distance of approximately 12 inches from <strong>the</strong><br />
client’s head at 0° azimuth (directly in front of <strong>the</strong> patient) from <strong>the</strong> test ear. The<br />
height of <strong>the</strong> sound field speaker should be level with <strong>the</strong> test ear.<br />
6. Insert <strong>the</strong> hearing aid in<strong>to</strong> <strong>the</strong> test ear, taking special care not <strong>to</strong> move <strong>the</strong> probe<br />
tube.<br />
7. Use [F2] <strong>to</strong> select REUG 1. Ensure that <strong>the</strong> source amplitude is 65 dB SPL <strong>and</strong><br />
use [F5] <strong>to</strong> ensure that a modulated source is selected (DigSpeech).<br />
8. Press [START] <strong>to</strong> begin measurement <strong>and</strong> press [STOP] when <strong>the</strong> curve is<br />
present.


