Edwards IH Instruction Manual - Ideal Vacuum Products
Edwards IH Instruction Manual - Ideal Vacuum Products
Edwards IH Instruction Manual - Ideal Vacuum Products
Create successful ePaper yourself
Turn your PDF publications into a flip-book with our unique Google optimized e-Paper software.
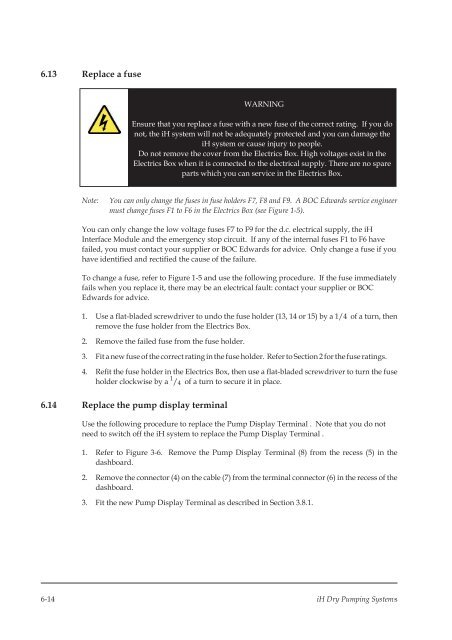
6.13 Replace a fuse<br />
WARNING<br />
Ensure that you replace a fuse with a new fuse of the correct rating. If you do<br />
not, the iH system will not be adequately protected and you can damage the<br />
iH system or cause injury to people.<br />
Do not remove the cover from the Electrics Box. High voltages exist in the<br />
Electrics Box when it is connected to the electrical supply. There are no spare<br />
parts which you can service in the Electrics Box.<br />
Note:<br />
You can only change the fuses in fuse holders F7, F8 and F9. A BOC <strong>Edwards</strong> service engineer<br />
must change fuses F1 to F6 in the Electrics Box (see Figure 1-5).<br />
You can only change the low voltage fuses F7 to F9 for the d.c. electrical supply, the iH<br />
Interface Module and the emergency stop circuit. If any of the internal fuses F1 to F6 have<br />
failed, you must contact your supplier or BOC <strong>Edwards</strong> for advice. Only change a fuse if you<br />
have identified and rectified the cause of the failure.<br />
To change a fuse, refer to Figure 1-5 and use the following procedure. If the fuse immediately<br />
fails when you replace it, there may be an electrical fault: contact your supplier or BOC<br />
<strong>Edwards</strong> for advice.<br />
1. Use a flat-bladed screwdriver to undo the fuse holder (13, 14 or 15) by a 1/4 of a turn, then<br />
remove the fuse holder from the Electrics Box.<br />
2. Remove the failed fuse from the fuse holder.<br />
3. Fit a new fuse of the correct ratingin the fuse holder. Refer to Section 2 for the fuse ratings.<br />
4. Refit the fuse holder in the Electrics Box, then use a flat-bladed screwdriver to turn the fuse<br />
holder clockwise by a 1 / 4 of a turn to secure it in place.<br />
6.14 Replace the pump display terminal<br />
Use the following procedure to replace the Pump Display Terminal . Note that you do not<br />
need to switch off the iH system to replace the Pump Display Terminal .<br />
1. Refer to Figure 3-6. Remove the Pump Display Terminal (8) from the recess (5) in the<br />
dashboard.<br />
2. Remove the connector (4) on the cable (7) from the terminal connector (6) in the recess of the<br />
dashboard.<br />
3. Fit the new Pump Display Terminal as described in Section 3.8.1.<br />
6-14 iH Dry Pumping Systems


