

INSTALLATION MANUAL - Smarthome
INSTALLATION MANUAL - Smarthome
INSTALLATION MANUAL - Smarthome

Create successful ePaper yourself
Turn your PDF publications into a flip-book with our unique Google optimized e-Paper software.
123456789012345678901234567890<br />
123456789012345678901234567890<br />
123456789012345678901234567890<br />
123456789012345678901234567890<br />
123456789012345678901234567890<br />
123456789012345678901234567890<br />
123456789012345678901234567890<br />
123456789012345678901234567890<br />
123456789012345678901234567890<br />
123456789012345678901234567890<br />
123456789012345678901234567890<br />
123456789012345678901234567890<br />
123456789012345678901234567890<br />
123456789012345678901234567890<br />
123456789012345678901234567890<br />
123456789012345678901234567890<br />
123456789012345678901234567890<br />
123456789012345678901234567890<br />
123456789012345678901234567890<br />
123456789012345678901234567890<br />
123456789012345678901234567890<br />
123456789012345678901234567890<br />
123456789012345678901234567890<br />
123456789012345678901234567890<br />
123456789012345678901234567890<br />
123456789012345678901234567890<br />
123456789012345678901234567890<br />
123456789012345678901234567890<br />
123456789012345678901234567890<br />
123456789012345678901234567890<br />
123456789012345678901234567890<br />
123456789012345678901234567890<br />
123456789012345678901234567890<br />
123456789012345678901234567890<br />
123456789012345678901234567890<br />
123456789012345678901234567890<br />
123456789012345678901234567890<br />
123456789012345678901234567890<br />
123456789012345678901234567890<br />
123456789012345678901234567890<br />
123456789012345678901234567890<br />
123456789012345678901234567890<br />
123456789012345678901234567890<br />
123456789012345678901234567890<br />
123456789012345678901234567890<br />
123456789012345678901234567890<br />
123456789012345678901234567890<br />
123456789012345678901234567890<br />
123456789012345678901234567890<br />
123456789012345678901234567890<br />
123456789012345678901234567890<br />
123456789012345678901234567890<br />
123456789012345678901234567890<br />
123456789012345678901234567890<br />
123456789012345678901234567890<br />
123456789012345678901234567890<br />
123456789012345678901234567890<br />
123456789012345678901234567890<br />
123456789012345678901234567890<br />
123456789012345678901234567890<br />
123456789012345678901234567890<br />
123456789012345678901234567890<br />
123456789012345678901234567890<br />
123456789012345678901234567890<br />
123456789012345678901234567890<br />
123456789012345678901234567890<br />
123456789012345678901234567890<br />
123456789012345678901234567890<br />
123456789012345678901234567890<br />
123456789012345678901234567890<br />
123456789012345678901234567890<br />
123456789012345678901234567890<br />
123456789012345678901234567890<br />
123456789012345678901234567890<br />
123456789012345678901234567890<br />
123456789012345678901234567890<br />
123456789012345678901234567890<br />
123456789012345678901234567890<br />
123456789012345678901234567890<br />
123456789012345678901234567890<br />
123456789012345678901234567890<br />
123456789012345678901234567890<br />
123456789012345678901234567890<br />
123456789012345678901234567890<br />
123456789012345678901234567890<br />
123456789012345678901234567890<br />
123456789012345678901234567890<br />
123456789012345678901234567890<br />
123456789012345678901234567890<br />
123456789012345678901234567890<br />
123456789012345678901234567890<br />
123456789012345678901234567890<br />
123456789012345678901234567890<br />
123456789012345678901234567890<br />
123456789012345678901234567890<br />
123456789012345678901234567890<br />
123456789012345678901234567890<br />
123456789012345678901234567890<br />
123456789012345678901234567890<br />
123456789012345678901234567890<br />
123456789012345678901234567890<br />
123456789012345678901234567890<br />
123456789012345678901234567890<br />
123456789012345678901234567890<br />
123456789012345678901234567890<br />
123456789012345678901234567890<br />
123456789012345678901234567890<br />
123456789012345678901234567890<br />
123456789012345678901234567890<br />
123456789012345678901234567890<br />
123456789012345678901234567890<br />
123456789012345678901234567890<br />
READY TO ARM<br />
9:00AM 08/01/03<br />
123456789012345678901234567890<br />
123456789012345678901234567890<br />
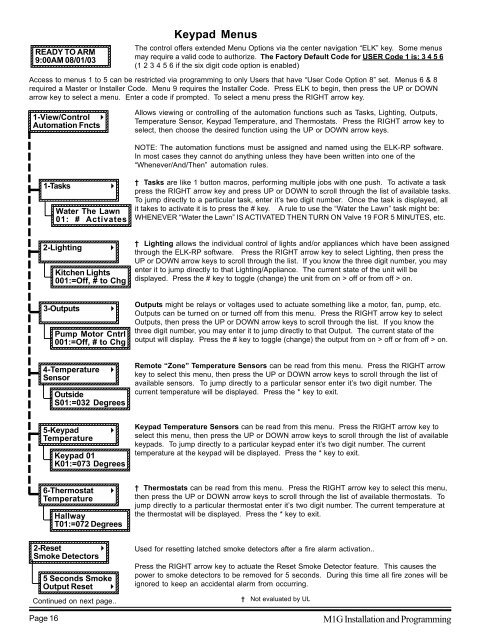
Keypad Menus<br />
The control offers extended Menu Options via the center navigation “ELK” key. Some menus<br />
may require a valid code to authorize. The Factory Default Code for USER Code 1 is: 3 4 5 6<br />
(1 2 3 4 5 6 if the six digit code option is enabled)<br />
Access to menus 1 to 5 can be restricted via programming to only Users that have “User Code Option 8” set. Menus 6 & 8<br />
required a Master or Installer Code. Menu 9 requires the Installer Code. Press ELK to begin, then press the UP or DOWN<br />
arrow key to select a menu. Enter a code if prompted. To select a menu press the RIGHT arrow key.<br />
1-View/Control r<br />
Automation Fncts<br />
123456789012345678901234567890<br />
123456789012345678901234567890<br />
Allows viewing or controlling of the automation functions such as Tasks, Lighting, Outputs,<br />
Temperature Sensor, Keypad Temperature, and Thermostats. Press the RIGHT arrow key to<br />
select, then choose the desired function using the UP or DOWN arrow keys.<br />
1-Tasks<br />
123456789012345678901234567890<br />
Water The Lawn<br />
01: # Activates<br />
123456789012345678901234567890<br />
123456789012345678901234567890<br />
123456789012345678901234567890<br />
r<br />
NOTE: The automation functions must be assigned and named using the ELK-RP software.<br />
In most cases they cannot do anything unless they have been written into one of the<br />
“Whenever/And/Then” automation rules.<br />
† Tasks are like 1 button macros, performing multiple jobs with one push. To activate a task<br />
press the RIGHT arrow key and press UP or DOWN to scroll through the list of available tasks.<br />
To jump directly to a particular task, enter it’s two digit number. Once the task is displayed, all<br />
it takes to activate it is to press the # key. A rule to use the “Water the Lawn” task might be:<br />
WHENEVER “Water the Lawn” IS ACTIVATED THEN TURN ON Valve 19 FOR 5 MINUTES, etc.<br />
2-Lighting<br />
123456789012345678901234567890<br />
123456789012345678901234567890<br />
Kitchen Lights<br />
001:=Off, # to Chg<br />
123456789012345678901234567890<br />
123456789012345678901234567890<br />
r<br />
† Lighting allows the individual control of lights and/or appliances which have been assigned<br />
through the ELK-RP software. Press the RIGHT arrow key to select Lighting, then press the<br />
UP or DOWN arrow keys to scroll through the list. If you know the three digit number, you may<br />
enter it to jump directly to that Lighting/Appliance. The current state of the unit will be<br />
displayed. Press the # key to toggle (change) the unit from on > off or from off > on.<br />
3-Outputs r<br />
123456789012345678901234567890<br />
Pump Motor Cntrl<br />
001:=Off, # to Chg<br />
123456789012345678901234567890<br />
123456789012345678901234567890<br />
123456789012345678901234567890<br />
Outputs might be relays or voltages used to actuate something like a motor, fan, pump, etc.<br />
Outputs can be turned on or turned off from this menu. Press the RIGHT arrow key to select<br />
Outputs, then press the UP or DOWN arrow keys to scroll through the list. If you know the<br />
three digit number, you may enter it to jump directly to that Output. The current state of the<br />
output will display. Press the # key to toggle (change) the output from on > off or from off > on.<br />
4-Temperature r<br />
Sensor<br />
123456789012345678901234567890<br />
123456789012345678901234567890<br />
Outside<br />
S01:=032 Degrees<br />
123456789012345678901234567890<br />
Remote “Zone” Temperature Sensors can be read from this menu. Press the RIGHT arrow<br />
key to select this menu, then press the UP or DOWN arrow keys to scroll through the list of<br />
available sensors. To jump directly to a particular sensor enter it’s two digit number. The<br />
current temperature will be displayed. Press the * key to exit.<br />
5-Keypad r<br />
Temperature<br />
123456789012345678901234567890<br />
Keypad 01<br />
K01:=073 Degrees<br />
123456789012345678901234567890<br />
123456789012345678901234567890<br />
123456789012345678901234567890<br />
Keypad Temperature Sensors can be read from this menu. Press the RIGHT arrow key to<br />
select this menu, then press the UP or DOWN arrow keys to scroll through the list of available<br />
keypads. To jump directly to a particular keypad enter it’s two digit number. The current<br />
temperature at the keypad will be displayed. Press the * key to exit.<br />
6-Thermostat r<br />
Temperature<br />
123456789012345678901234567890<br />
123456789012345678901234567890<br />
123456789012345678901234567890<br />
Hallway<br />
T01:=072 Degrees<br />
123456789012345678901234567890<br />
123456789012345678901234567890<br />
123456789012345678901234567890<br />
† Thermostats can be read from this menu. Press the RIGHT arrow key to select this menu,<br />
then press the UP or DOWN arrow keys to scroll through the list of available thermostats. To<br />
jump directly to a particular thermostat enter it’s two digit number. The current temperature at<br />
the thermostat will be displayed. Press the * key to exit.<br />
2-Reset r<br />
Smoke Detectors<br />
123456789012345678901234567890<br />
123456789012345678901234567890<br />
123456789012345678901234567890<br />
5 Seconds Smoke<br />
Output Reset r<br />
123456789012345678901234567890<br />
123456789012345678901234567890<br />
123456789012345678901234567890<br />
Continued on next page..<br />
Page 16<br />
Used for resetting latched smoke detectors after a fire alarm activation..<br />
Press the RIGHT arrow key to actuate the Reset Smoke Detector feature. This causes the<br />
power to smoke detectors to be removed for 5 seconds. During this time all fire zones will be<br />
ignored to keep an accidental alarm from occurring.<br />
† Not evaluated by UL<br />
M1G Installation and Programming


