

INSTALLATION MANUAL - Smarthome
INSTALLATION MANUAL - Smarthome
INSTALLATION MANUAL - Smarthome

Create successful ePaper yourself
Turn your PDF publications into a flip-book with our unique Google optimized e-Paper software.
12345678901234567890123456789012123<br />
12345678901234567890123456789012123<br />
12345678901234567890123456789012123<br />
12345678901234567890123456789012123<br />
12345678901234567890123456789012123<br />
12345678901234567890123456789012123<br />
12345678901234567890123456789012123<br />
12345678901234567890123456789012123<br />
123456789012345678901234567890121234<br />
123456789012345678901234567890121234<br />
123456789012345678901234567890121234<br />
123456789012345678901234567890121234<br />
123456789012345678901234567890121234<br />
123456789012345678901234567890121234<br />
123456789012345678901234567890121234<br />
123456789012345678901234567890121234<br />
123456789012345678901234567890121234<br />
123456789012345678901234567890121234<br />
123456789012345678901234567890121234<br />
123456789012345678901234567890121234<br />
123456789012345678901234567890121234<br />
123456789012345678901234567890121234<br />
123456789012345678901234567890121234<br />
123456789012345678901234567890121234<br />
123456789012345678901234567890121234<br />
123456789012345678901234567890121234<br />
123456789012345678901234567890121234<br />
123456789012345678901234567890121234<br />
123456789012345678901234567890121234<br />
123456789012345678901234567890121234<br />
123456789012345678901234567890121234<br />
123456789012345678901234567890121234<br />
123456789012345678901234567890121234<br />
123456789012345678901234567890121234<br />
123456789012345678901234567890121234<br />
123456789012345678901234567890121234<br />
123456789012345678901234567890121234<br />
123456789012345678901234567890121234<br />
123456789012345678901234567890121234<br />
123456789012345678901234567890121234<br />
123456789012345678901234567890121234<br />
123456789012345678901234567890121234<br />
123456789012345678901234567890121234<br />
123456789012345678901234567890121234<br />
123456789012345678901234567890121234<br />
123456789012345678901234567890121234<br />
123456789012345678901234567890121234<br />
123456789012345678901234567890121234<br />
123456789012345678901234567890121234<br />
123456789012345678901234567890121234<br />
123456789012345678901234567890121234<br />
123456789012345678901234567890121234<br />
123456789012345678901234567890121234<br />
123456789012345678901234567890121234<br />
123456789012345678901234567890121234<br />
123456789012345678901234567890121234<br />
123456789012345678901234567890121234<br />
123456789012345678901234567890121234<br />
123456789012345678901234567890121234<br />
123456789012345678901234567890121234<br />
123456789012345678901234567890121234<br />
123456789012345678901234567890121234<br />
123456789012345678901234567890121234<br />
123456789012345678901234567890121234<br />
123456789012345678901234567890121234<br />
123456789012345678901234567890121234<br />
123456789012345678901234567890121234<br />
123456789012345678901234567890121234<br />
123456789012345678901234567890121234<br />
123456789012345678901234567890121234<br />
123456789012345678901234567890121234<br />
123456789012345678901234567890121234<br />
123456789012345678901234567890121234<br />
123456789012345678901234567890121234<br />
123456789012345678901234567890121234<br />
123456789012345678901234567890121234<br />
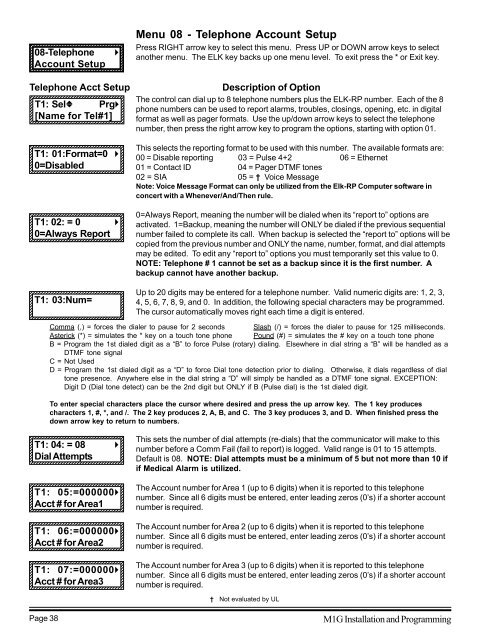
08-Telephone<br />
Account Setup<br />
12345678901234567890123456789012123<br />
12345678901234567890123456789012123<br />
r<br />
Menu 08 - Telephone Account Setup<br />
Press RIGHT arrow key to select this menu. Press UP or DOWN arrow keys to select<br />
another menu. The ELK key backs up one menu level. To exit press the * or Exit key.<br />
12345678901234567890123456789012123<br />
Telephone Acct Setup<br />
T1: Selb Prgr<br />
[Name for Tel#1]<br />
123456789012345678901234567890121234<br />
123456789012345678901234567890121234<br />
123456789012345678901234567890121234<br />
123456789012345678901234567890121234<br />
123456789012345678901234567890121234<br />
Description of Option<br />
The control can dial up to 8 telephone numbers plus the ELK-RP number. Each of the 8<br />
phone numbers can be used to report alarms, troubles, closings, opening, etc. in digital<br />
format as well as pager formats. Use the up/down arrow keys to select the telephone<br />
number, then press the right arrow key to program the options, starting with option 01.<br />
T1: 01:Format=0 r<br />
0=Disabled<br />
123456789012345678901234567890121234<br />
123456789012345678901234567890121234<br />
123456789012345678901234567890121234<br />
123456789012345678901234567890121234<br />
This selects the reporting format to be used with this number. The available formats are:<br />
00 = Disable reporting 03 = Pulse 4+2 06 = Ethernet<br />
01 = Contact ID 04 = Pager DTMF tones<br />
02 = SIA 05 = † Voice Message<br />
Note: Voice Message Format can only be utilized from the Elk-RP Computer software in<br />
concert with a Whenever/And/Then rule.<br />
T1: 02: = 0 r<br />
0=Always Report<br />
123456789012345678901234567890121234<br />
123456789012345678901234567890121234<br />
0=Always Report, meaning the number will be dialed when its “report to” options are<br />
activated. 1=Backup, meaning the number will ONLY be dialed if the previous sequential<br />
number failed to complete its call. When backup is selected the “report to” options will be<br />
copied from the previous number and ONLY the name, number, format, and dial attempts<br />
may be edited. To edit any “report to” options you must temporarily set this value to 0.<br />
NOTE: Telephone # 1 cannot be set as a backup since it is the first number. A<br />
backup cannot have another backup.<br />
T1: 03:Num=<br />
123456789012345678901234567890121234<br />
123456789012345678901234567890121234<br />
Up to 20 digits may be entered for a telephone number. Valid numeric digits are: 1, 2, 3,<br />
4, 5, 6, 7, 8, 9, and 0. In addition, the following special characters may be programmed.<br />
The cursor automatically moves right each time a digit is entered.<br />
123456789012345678901234567890121234<br />
Comma (,) = forces the dialer to pause for 2 seconds Slash (/) = forces the dialer to pause for 125 milliseconds.<br />
Asterick (*) = simulates the * key on a touch tone phone Pound (#) = simulates the # key on a touch tone phone<br />
B = Program the 1st dialed digit as a “B” to force Pulse (rotary) dialing. Elsewhere in dial string a “B” will be handled as a<br />
DTMF tone signal<br />
C = Not Used<br />
D = Program the 1st dialed digit as a “D” to force Dial tone detection prior to dialing. Otherwise, it dials regardless of dial<br />
tone presence. Anywhere else in the dial string a “D” will simply be handled as a DTMF tone signal. EXCEPTION:<br />
Digit D (Dial tone detect) can be the 2nd digit but ONLY if B (Pulse dial) is the 1st dialed digit.<br />
To enter special characters place the cursor where desired and press the up arrow key. The 1 key produces<br />
characters 1, #, *, and /. The 2 key produces 2, A, B, and C. The 3 key produces 3, and D. When finished press the<br />
down arrow key to return to numbers.<br />
T1: 04: = 08 r<br />
Dial Attempts<br />
123456789012345678901234567890121234<br />
123456789012345678901234567890121234<br />
This sets the number of dial attempts (re-dials) that the communicator will make to this<br />
number before a Comm Fail (fail to report) is logged. Valid range is 01 to 15 attempts.<br />
Default is 08. NOTE: Dial attempts must be a minimum of 5 but not more than 10 if<br />
if Medical Alarm is utilized.<br />
T1: 05:=000000r<br />
Acct # for Area1<br />
123456789012345678901234567890121234<br />
123456789012345678901234567890121234<br />
123456789012345678901234567890121234<br />
The Account number for Area 1 (up to 6 digits) when it is reported to this telephone<br />
number. Since all 6 digits must be entered, enter leading zeros (0’s) if a shorter account<br />
number is required.<br />
T1: 06:=000000r<br />
Acct # for Area2<br />
123456789012345678901234567890121234<br />
123456789012345678901234567890121234<br />
123456789012345678901234567890121234<br />
123456789012345678901234567890121234<br />
The Account number for Area 2 (up to 6 digits) when it is reported to this telephone<br />
number. Since all 6 digits must be entered, enter leading zeros (0’s) if a shorter account<br />
number is required.<br />
T1: 07:=000000r<br />
Acct # for Area3<br />
123456789012345678901234567890121234<br />
The Account number for Area 3 (up to 6 digits) when it is reported to this telephone<br />
number. Since all 6 digits must be entered, enter leading zeros (0’s) if a shorter account<br />
number is required.<br />
† Not evaluated by UL<br />
Page 38<br />
M1G Installation and Programming


