

INSTALLATION MANUAL - Smarthome
INSTALLATION MANUAL - Smarthome
INSTALLATION MANUAL - Smarthome

You also want an ePaper? Increase the reach of your titles
YUMPU automatically turns print PDFs into web optimized ePapers that Google loves.
4.1.2 Check for Conflicts<br />
During the connect and disconnect process RP performs an automatic check of the data stored in the control and compares it<br />
the database. If there are any conflicts (differences), a pop-up resolution window display them and allows corrections to be<br />
made. ELK regards “Check for Conflicts” to be an especially important feature. It can point out any changes that have<br />
occurred such as a user having added or changed a code. The resolution window allows you to receive the control’s data into<br />
the database (accept the local version) or send the RP data to the control (accept the database version). NOTE: Checking for<br />
conflicts adds considerable time to the connect/disconnect process, especially on dial-up connections. For this reason,<br />
the automatic check for conflicts may be disabled from the SETUP menu. A manual Check for Conflicts can be selected<br />
from the Send/Rcv icon.<br />
4.1.3 Sending and Receiving Data<br />
RP allows many options and groups of options to be sent or received individually, which greatly reduces the on-line connect<br />
time if there are only a few items to be changed. However, a full send or receive occurs very quickly, thanks to the M1’s built-in<br />
V.22 bis “True” Modem. RP features easy to use menus & toolbar icons and makes extensive use of the right mouse button<br />
to perform operations. Try right clicking on any item or icon to see the available options.<br />
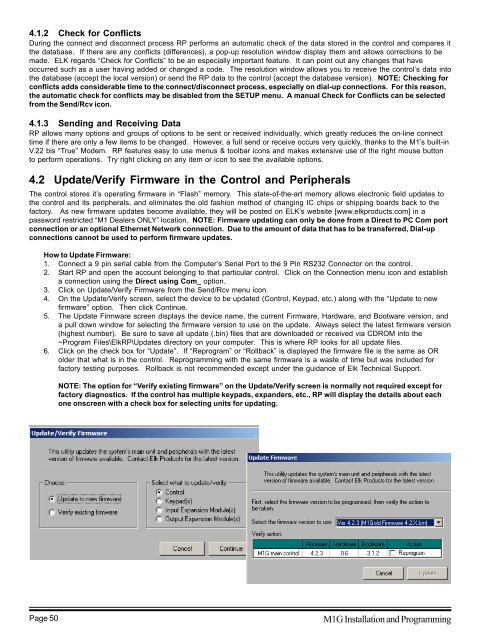
4.2 Update/Verify Firmware in the Control and Peripherals<br />
The control stores it’s operating firmware in “Flash” memory. This state-of-the-art memory allows electronic field updates to<br />
the control and its peripherals, and eliminates the old fashion method of changing IC chips or shipping boards back to the<br />
factory. As new firmware updates become available, they will be posted on ELK’s website [www.elkproducts.com] in a<br />
password restricted “M1 Dealers ONLY” location. NOTE: Firmware updating can only be done from a Direct to PC Com port<br />
connection or an optional Ethernet Network connection. Due to the amount of data that has to be transferred, Dial-up<br />
connections cannot be used to perform firmware updates.<br />
How to Update Firmware:<br />
1. Connect a 9 pin serial cable from the Computer’s Serial Port to the 9 Pin RS232 Connector on the control.<br />
2. Start RP and open the account belonging to that particular control. Click on the Connection menu icon and establish<br />
a connection using the Direct using Com_ option.<br />
3. Click on Update/Verify Firmware from the Send/Rcv menu icon.<br />
4. On the Update/Verify screen, select the device to be updated (Control, Keypad, etc.) along with the “Update to new<br />
firmware” option. Then click Continue.<br />
5. The Update Firmware screen displays the device name, the current Firmware, Hardware, and Bootware version, and<br />
a pull down window for selecting the firmware version to use on the update. Always select the latest firmware version<br />
(highest number). Be sure to save all update (.bin) files that are downloaded or received via CDROM into the<br />
~Program Files\ElkRP\Updates directory on your computer. This is where RP looks for all update files.<br />
6. Click on the check box for “Update”. If “Reprogram” or “Rollback” is displayed the firmware file is the same as OR<br />
older that what is in the control. Reprogramming with the same firmware is a waste of time but was included for<br />
factory testing purposes. Rollback is not recommended except under the guidance of Elk Technical Support.<br />
NOTE: The option for “Verify existing firmware” on the Update/Verify screen is normally not required except for<br />
factory diagnostics. If the control has multiple keypads, expanders, etc., RP will display the details about each<br />
one onscreen with a check box for selecting units for updating.<br />
Page 50<br />
M1G Installation and Programming


