

INSTALLATION MANUAL - Smarthome
INSTALLATION MANUAL - Smarthome
INSTALLATION MANUAL - Smarthome

Create successful ePaper yourself
Turn your PDF publications into a flip-book with our unique Google optimized e-Paper software.
1234567890123456789012345678<br />
1234567890123456789012345678<br />
1234567890123456789012345678<br />
1234567890123456789012345678<br />
1234567890123456789012345678<br />
1234567890123456789012345678<br />
1234567890123456789012345678<br />
1234567890123456789012345678<br />
1234567890123456789012345678<br />
1234567890123456789012345678<br />
1234567890123456789012345678<br />
1234567890123456789012345678<br />
1234567890123456789012345678<br />
1234567890123456789012345678<br />
1234567890123456789012345678<br />
1234567890123456789012345678<br />
123456789012345678901234567890<br />
123456789012345678901234567890<br />
123456789012345678901234567890<br />
123456789012345678901234567890<br />
123456789012345678901234567890<br />
123456789012345678901234567890<br />
123456789012345678901234567890<br />
123456789012345678901234567890<br />
123456789012345678901234567890<br />
123456789012345678901234567890<br />
123456789012345678901234567890<br />
123456789012345678901234567890<br />
123456789012345678901234567890<br />
123456789012345678901234567890<br />
123456789012345678901234567890<br />
123456789012345678901234567890<br />
12345678901234567890123456789<br />
12345678901234567890123456789<br />
12345678901234567890123456789<br />
12345678901234567890123456789<br />
12345678901234567890123456789<br />
12345678901234567890123456789<br />
12345678901234567890123456789<br />
12345678901234567890123456789<br />
12345678901234567890123456789012<br />
12345678901234567890123456789012<br />
12345678901234567890123456789012<br />
12345678901234567890123456789012<br />
12345678901234567890123456789012<br />
12345678901234567890123456789012<br />
12345678901234567890123456789012<br />
12345678901234567890123456789012<br />
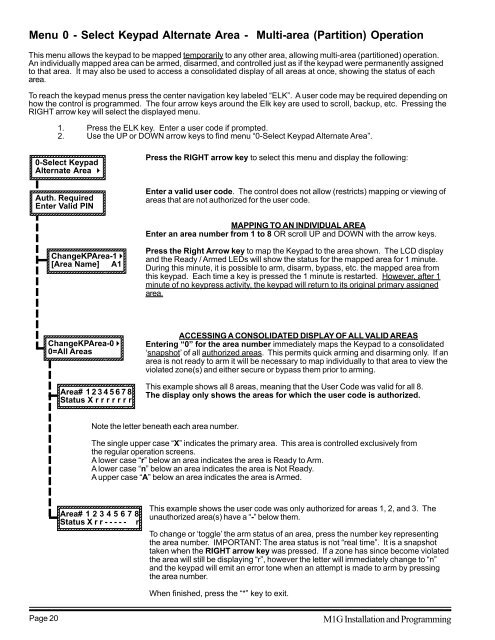
Menu 0 - Select Keypad Alternate Area - Multi-area (Partition) Operation<br />
This menu allows the keypad to be mapped temporarily to any other area, allowing multi-area (partitioned) operation.<br />
An individually mapped area can be armed, disarmed, and controlled just as if the keypad were permanently assigned<br />
to that area. It may also be used to access a consolidated display of all areas at once, showing the status of each<br />
area.<br />
To reach the keypad menus press the center navigation key labeled “ELK”. A user code may be required depending on<br />
how the control is programmed. The four arrow keys around the Elk key are used to scroll, backup, etc. Pressing the<br />
RIGHT arrow key will select the displayed menu.<br />
1. Press the ELK key. Enter a user code if prompted.<br />
2. Use the UP or DOWN arrow keys to find menu “0-Select Keypad Alternate Area”.<br />
0-Select Keypad<br />
Alternate Area r<br />
1234567890123456789012345678<br />
1234567890123456789012345678<br />
Press the RIGHT arrow key to select this menu and display the following:<br />
Auth. Required<br />
Enter Valid PIN<br />
1234567890123456789012345678<br />
1234567890123456789012345678<br />
Enter a valid user code. The control does not allow (restricts) mapping or viewing of<br />
areas that are not authorized for the user code.<br />
MAPPING TO AN INDIVIDUAL AREA<br />
Enter an area number from 1 to 8 OR scroll UP and DOWN with the arrow keys.<br />
ChangeKPArea-1 r<br />
[Area Name] A1<br />
123456789012345678901234567890<br />
123456789012345678901234567890<br />
Press the Right Arrow key to map the Keypad to the area shown. The LCD display<br />
and the Ready / Armed LEDs will show the status for the mapped area for 1 minute.<br />
During this minute, it is possible to arm, disarm, bypass, etc. the mapped area from<br />
this keypad. Each time a key is pressed the 1 minute is restarted. However, after 1<br />
minute of no keypress activity, the keypad will return to its original primary assigned<br />
area.<br />
ChangeKPArea-0 r<br />
0=All Areas<br />
123456789012345678901234567890<br />
123456789012345678901234567890<br />
Area# 12345678<br />
Status X r r r r r r r<br />
12345678901234567890123456789<br />
12345678901234567890123456789<br />
ACCESSING A CONSOLIDATED DISPLAY OF ALL VALID AREAS<br />
Entering “0” for the area number immediately maps the Keypad to a consolidated<br />
‘snapshot’ of all authorized areas. This permits quick arming and disarming only. If an<br />
area is not ready to arm it will be necessary to map individually to that area to view the<br />
violated zone(s) and either secure or bypass them prior to arming.<br />
This example shows all 8 areas, meaning that the User Code was valid for all 8.<br />
The display only shows the areas for which the user code is authorized.<br />
Note the letter beneath each area number.<br />
The single upper case “X” indicates the primary area. This area is controlled exclusively from<br />
the regular operation screens.<br />
A lower case “r” below an area indicates the area is Ready to Arm.<br />
A lower case “n” below an area indicates the area is Not Ready.<br />
A upper case “A” below an area indicates the area is Armed.<br />
Area# 12345678<br />
Status X r r - - - - - r<br />
12345678901234567890123456789012<br />
12345678901234567890123456789012<br />
This example shows the user code was only authorized for areas 1, 2, and 3. The<br />
unauthorized area(s) have a “-” below them.<br />
To change or ‘toggle’ the arm status of an area, press the number key representing<br />
the area number. IMPORTANT: The area status is not “real time”. It is a snapshot<br />
taken when the RIGHT arrow key was pressed. If a zone has since become violated<br />
the area will still be displaying “r”, however the letter will immediately change to “n”<br />
and the keypad will emit an error tone when an attempt is made to arm by pressing<br />
the area number.<br />
When finished, press the “*” key to exit.<br />
Page 20<br />
M1G Installation and Programming


