

INSTALLATION MANUAL - Smarthome
INSTALLATION MANUAL - Smarthome
INSTALLATION MANUAL - Smarthome

Create successful ePaper yourself
Turn your PDF publications into a flip-book with our unique Google optimized e-Paper software.
12345678901234567890123456789012123<br />
12345678901234567890123456789012123<br />
12345678901234567890123456789012123<br />
12345678901234567890123456789012123<br />
12345678901234567890123456789012123<br />
12345678901234567890123456789012123<br />
12345678901234567890123456789012123<br />
12345678901234567890123456789012123<br />
12345678901234567890123456789012123<br />
12345678901234567890123456789012123<br />
12345678901234567890123456789012123<br />
12345678901234567890123456789012123<br />
12345678901234567890123456789012123<br />
12345678901234567890123456789012123<br />
12345678901234567890123456789012123<br />
12345678901234567890123456789012123<br />
12345678901234567890123456789012123<br />
12345678901234567890123456789012123<br />
12345678901234567890123456789012123<br />
12345678901234567890123456789012123<br />
12345678901234567890123456789012123<br />
12345678901234567890123456789012123<br />
12345678901234567890123456789012123<br />
12345678901234567890123456789012123<br />
12345678901234567890123456789012123<br />
12345678901234567890123456789012123<br />
12345678901234567890123456789012123<br />
12345678901234567890123456789012123<br />
12345678901234567890123456789012123<br />
12345678901234567890123456789012123<br />
12345678901234567890123456789012123<br />
12345678901234567890123456789012123<br />
12345678901234567890123456789012123<br />
12345678901234567890123456789012123<br />
12345678901234567890123456789012123<br />
12345678901234567890123456789012123<br />
12345678901234567890123456789012123<br />
12345678901234567890123456789012123<br />
12345678901234567890123456789012123<br />
12345678901234567890123456789012123<br />
12345678901234567890123456789012123<br />
12345678901234567890123456789012123<br />
12345678901234567890123456789012123<br />
12345678901234567890123456789012123<br />
12345678901234567890123456789012123<br />
12345678901234567890123456789012123<br />
12345678901234567890123456789012123<br />
12345678901234567890123456789012123<br />
12345678901234567890123456789012123<br />
12345678901234567890123456789012123<br />
12345678901234567890123456789012123<br />
12345678901234567890123456789012123<br />
12345678901234567890123456789012123<br />
12345678901234567890123456789012123<br />
12345678901234567890123456789012123<br />
12345678901234567890123456789012123<br />
12345678901234567890123456789012123<br />
12345678901234567890123456789012123<br />
12345678901234567890123456789012123<br />
12345678901234567890123456789012123<br />
12345678901234567890123456789012123<br />
12345678901234567890123456789012123<br />
12345678901234567890123456789012123<br />
12345678901234567890123456789012123<br />
12345678901234567890123456789012123<br />
12345678901234567890123456789012123<br />
12345678901234567890123456789012123<br />
12345678901234567890123456789012123<br />
12345678901234567890123456789012123<br />
12345678901234567890123456789012123<br />
12345678901234567890123456789012123<br />
12345678901234567890123456789012123<br />
12345678901234567890123456789012123<br />
12345678901234567890123456789012123<br />
12345678901234567890123456789012123<br />
12345678901234567890123456789012123<br />
12345678901234567890123456789012123<br />
12345678901234567890123456789012123<br />
12345678901234567890123456789012123<br />
12345678901234567890123456789012123<br />
12345678901234567890123456789012123<br />
12345678901234567890123456789012123<br />
12345678901234567890123456789012123<br />
12345678901234567890123456789012123<br />
12345678901234567890123456789012123<br />
12345678901234567890123456789012123<br />
12345678901234567890123456789012123<br />
12345678901234567890123456789012123<br />
12345678901234567890123456789012123<br />
12345678901234567890123456789012123<br />
12345678901234567890123456789012123<br />
12345678901234567890123456789012123<br />
12345678901234567890123456789012123<br />
12345678901234567890123456789012123<br />
12345678901234567890123456789012123<br />
12345678901234567890123456789012123<br />
12345678901234567890123456789012123<br />
12345678901234567890123456789012123<br />
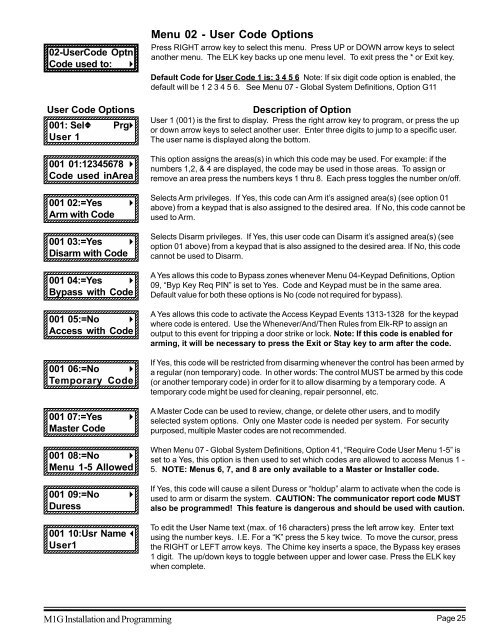
02-UserCode Optn<br />
Code used to: r<br />
12345678901234567890123456789012123<br />
12345678901234567890123456789012123<br />
12345678901234567890123456789012123<br />
Menu 02 - User Code Options<br />
Press RIGHT arrow key to select this menu. Press UP or DOWN arrow keys to select<br />
another menu. The ELK key backs up one menu level. To exit press the * or Exit key.<br />
Default Code for User Code 1 is: 3 4 5 6 Note: If six digit code option is enabled, the<br />
default will be 1 2 3 4 5 6. See Menu 07 - Global System Definitions, Option G11<br />
User Code Options<br />
001: Selb Prgr<br />
User 1<br />
12345678901234567890123456789012123<br />
12345678901234567890123456789012123<br />
12345678901234567890123456789012123<br />
Description of Option<br />
User 1 (001) is the first to display. Press the right arrow key to program, or press the up<br />
or down arrow keys to select another user. Enter three digits to jump to a specific user.<br />
The user name is displayed along the bottom.<br />
001 01:12345678 r<br />
Code used inArea<br />
12345678901234567890123456789012123<br />
12345678901234567890123456789012123<br />
12345678901234567890123456789012123<br />
12345678901234567890123456789012123<br />
12345678901234567890123456789012123<br />
This option assigns the areas(s) in which this code may be used. For example: if the<br />
numbers 1,2, & 4 are displayed, the code may be used in those areas. To assign or<br />
remove an area press the numbers keys 1 thru 8. Each press toggles the number on/off.<br />
001 02:=Yes r<br />
Arm with Code<br />
12345678901234567890123456789012123<br />
12345678901234567890123456789012123<br />
Selects Arm privileges. If Yes, this code can Arm it’s assigned area(s) (see option 01<br />
above) from a keypad that is also assigned to the desired area. If No, this code cannot be<br />
used to Arm.<br />
001 03:=Yes r<br />
Disarm with Code<br />
12345678901234567890123456789012123<br />
Selects Disarm privileges. If Yes, this user code can Disarm it’s assigned area(s) (see<br />
option 01 above) from a keypad that is also assigned to the desired area. If No, this code<br />
cannot be used to Disarm.<br />
001 04:=Yes r<br />
Bypass with Code<br />
12345678901234567890123456789012123<br />
12345678901234567890123456789012123<br />
12345678901234567890123456789012123<br />
A Yes allows this code to Bypass zones whenever Menu 04-Keypad Definitions, Option<br />
09, “Byp Key Req PIN” is set to Yes. Code and Keypad must be in the same area.<br />
Default value for both these options is No (code not required for bypass).<br />
001 05:=No r<br />
Access with Code<br />
12345678901234567890123456789012123<br />
12345678901234567890123456789012123<br />
12345678901234567890123456789012123<br />
12345678901234567890123456789012123<br />
A Yes allows this code to activate the Access Keypad Events 1313-1328 for the keypad<br />
where code is entered. Use the Whenever/And/Then Rules from Elk-RP to assign an<br />
output to this event for tripping a door strike or lock. Note: If this code is enabled for<br />
arming, it will be necessary to press the Exit or Stay key to arm after the code.<br />
001 06:=No r<br />
Temporary Code<br />
12345678901234567890123456789012123<br />
001 07:=Yes r<br />
Master Code<br />
12345678901234567890123456789012123<br />
12345678901234567890123456789012123<br />
12345678901234567890123456789012123<br />
12345678901234567890123456789012123<br />
12345678901234567890123456789012123<br />
001 08:=No r<br />
Menu 1-5 Allowed<br />
12345678901234567890123456789012123<br />
12345678901234567890123456789012123<br />
If Yes, this code will be restricted from disarming whenever the control has been armed by<br />
a regular (non temporary) code. In other words: The control MUST be armed by this code<br />
(or another temporary code) in order for it to allow disarming by a temporary code. A<br />
temporary code might be used for cleaning, repair personnel, etc.<br />
A Master Code can be used to review, change, or delete other users, and to modify<br />
selected system options. Only one Master code is needed per system. For security<br />
purposed, multiple Master codes are not recommended.<br />
When Menu 07 - Global System Definitions, Option 41, “Require Code User Menu 1-5” is<br />
set to a Yes, this option is then used to set which codes are allowed to access Menus 1 -<br />
5. NOTE: Menus 6, 7, and 8 are only available to a Master or Installer code.<br />
001 09:=No r<br />
Duress<br />
12345678901234567890123456789012123<br />
12345678901234567890123456789012123<br />
12345678901234567890123456789012123<br />
If Yes, this code will cause a silent Duress or “holdup” alarm to activate when the code is<br />
used to arm or disarm the system. CAUTION: The communicator report code MUST<br />
also be programmed! This feature is dangerous and should be used with caution.<br />
001 10:Usr Name l<br />
User1<br />
12345678901234567890123456789012123<br />
12345678901234567890123456789012123<br />
12345678901234567890123456789012123<br />
12345678901234567890123456789012123<br />
12345678901234567890123456789012123<br />
To edit the User Name text (max. of 16 characters) press the left arrow key. Enter text<br />
using the number keys. I.E. For a “K” press the 5 key twice. To move the cursor, press<br />
the RIGHT or LEFT arrow keys. The Chime key inserts a space, the Bypass key erases<br />
1 digit. The up/down keys to toggle between upper and lower case. Press the ELK key<br />
when complete.<br />
M1G Installation and Programming Page 25


