Internet Payment Gateway User Guide First Data Virtual Terminal
Internet Payment Gateway User Guide First Data Virtual Terminal
Internet Payment Gateway User Guide First Data Virtual Terminal

Create successful ePaper yourself
Turn your PDF publications into a flip-book with our unique Google optimized e-Paper software.
2. Click on the Orders link in the Side Menu Box or the main content area. The View Orders<br />
screen appears.<br />
3. Display Orders: select an option. You can view orders sorted by time period, by credit card<br />
number and time, by <strong>User</strong> ID and time, or by order number.<br />
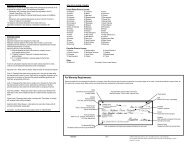
4. Specify Time Period: select any of the named time periods or enter a specific range of<br />
dates you wish to view.<br />
5. Options: click on a box if you want the report to show only unshipped orders or to show<br />
only approved orders. By default, the Only Show Unshipped Orders box is unchecked and<br />
the Only Show Approved Orders box is checked, so the report will show approved orders<br />
only (both shipped and unshipped). If the Only Show Unshipped Orders box is checked, the<br />
report will show all unshipped orders. If both boxes are unchecked, the report will display all<br />
orders (both shipped and unshipped), including declined and recurring transactions with<br />
future start dates. If both boxes are checked, the report will show only all approved,<br />
unshipped orders.<br />
6. Display Preference: this option allows you to choose how many orders will appear on each<br />
page of the report. Choose a number from the dropdown list.<br />
7. Select Hierarchy: choose whether you wish to view all stores below you in the hierarchy or<br />
a subset by choosing an option in the dropdown menu. (This option only appears if you are<br />
logged in as a multi-store administrator.)<br />
8. Click on the Submit Query button to view the report. If you want to re-enter the information,<br />
click on the Reset button to clear the information.<br />
The Orders Received report shows the following information about each order.<br />
• Select—click on the associated Select checkbox to select one or more orders.<br />
• Shipped—shows Y if the order has been shipped, or N if the order has not yet been<br />
marked as shipped.<br />
• Retail—shows Y if the order was a retail order, or N if the order was not retail.<br />
• Order #—the number associated with this order. Click on the order number to view<br />
order details.<br />
• <strong>User</strong> ID—if there is a user ID number associated with the order, it will be listed in this<br />
column. The number is also a link to view all the orders placed by a particular<br />
customer.<br />
• Date—the date that the order was placed. Shows the most recent order first. The time<br />
period you selected for the report will be shown under the report title.<br />
• Name—the name of the person who placed the order. Click on the name to send<br />
email to this customer.<br />
• Amount—shows the amount and currency of the order. The total amount of the<br />
orders listed on the page and the total amount of all orders in this report is also<br />
shown at the bottom of the page, along with the total tax and shipping charges<br />
collected.<br />
3.2.1 Confirming Shipment, Crediting Orders, or Rejecting Orders<br />
You can confirm shipment, credit the entire amount of the order(s), or reject order(s) by IP<br />
address or credit card number. To perform any of these three tasks, follow the steps below:<br />
1. <strong>First</strong> select order(s) by clicking on the associated checkbox(es) in the left-most column.<br />
2. Click on the Work with Selected Orders button. The Selected Order Menu screen appears.<br />
3. Select an action by clicking on the appropriate radio button. If you select Reject Order, you<br />
must also check on a checkbox to choose whether you wish to reject this order by IP address<br />
or by credit card number. When you reject an order by IP address, all future orders from this<br />
IP address will be declined. When you reject an order by credit card number, all future orders<br />
using this credit card number will be declined.<br />
4. Click on the Submit Query button to complete the task. A screen listing the results will<br />
appear.<br />
firstdata.com 17