Thinkpad T500 and W500 Hardware Maintenance Manual - Lenovo
Thinkpad T500 and W500 Hardware Maintenance Manual - Lenovo
Thinkpad T500 and W500 Hardware Maintenance Manual - Lenovo

You also want an ePaper? Increase the reach of your titles
YUMPU automatically turns print PDFs into web optimized ePapers that Google loves.
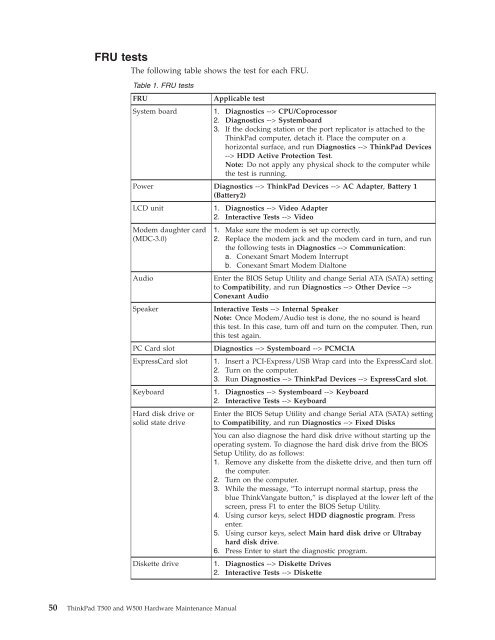
FRU tests<br />
The following table shows the test for each FRU.<br />
Table 1. FRU tests<br />
FRU Applicable test<br />
System board 1. Diagnostics --> CPU/Coprocessor<br />
2. Diagnostics --> Systemboard<br />
3. If the docking station or the port replicator is attached to the<br />
ThinkPad computer, detach it. Place the computer on a<br />
horizontal surface, <strong>and</strong> run Diagnostics --> ThinkPad Devices<br />
--> HDD Active Protection Test.<br />
Note: Do not apply any physical shock to the computer while<br />
the test is running.<br />
Power Diagnostics --> ThinkPad Devices --> AC Adapter, Battery 1<br />
(Battery2)<br />
LCD unit 1. Diagnostics --> Video Adapter<br />
2. Interactive Tests --> Video<br />
Modem daughter card 1. Make sure the modem is set up correctly.<br />
(MDC-3.0)<br />
2. Replace the modem jack <strong>and</strong> the modem card in turn, <strong>and</strong> run<br />
the following tests in Diagnostics --> Communication:<br />
a. Conexant Smart Modem Interrupt<br />
b. Conexant Smart Modem Dialtone<br />
Audio Enter the BIOS Setup Utility <strong>and</strong> change Serial ATA (SATA) setting<br />
to Compatibility, <strong>and</strong> run Diagnostics --> Other Device --><br />
Conexant Audio<br />
Speaker Interactive Tests --> Internal Speaker<br />
Note: Once Modem/Audio test is done, the no sound is heard<br />
this test. In this case, turn off <strong>and</strong> turn on the computer. Then, run<br />
this test again.<br />
PC Card slot Diagnostics --> Systemboard --> PCMCIA<br />
ExpressCard slot 1. Insert a PCI-Express/USB Wrap card into the ExpressCard slot.<br />
2. Turn on the computer.<br />
3. Run Diagnostics --> ThinkPad Devices --> ExpressCard slot.<br />
Keyboard 1. Diagnostics --> Systemboard --> Keyboard<br />
2. Interactive Tests --> Keyboard<br />
Hard disk drive or<br />
solid state drive<br />
Enter the BIOS Setup Utility <strong>and</strong> change Serial ATA (SATA) setting<br />
to Compatibility, <strong>and</strong> run Diagnostics --> Fixed Disks<br />
You can also diagnose the hard disk drive without starting up the<br />
operating system. To diagnose the hard disk drive from the BIOS<br />
Setup Utility, do as follows:<br />
1. Remove any diskette from the diskette drive, <strong>and</strong> then turn off<br />
the computer.<br />
2. Turn on the computer.<br />
3. While the message, “To interrupt normal startup, press the<br />
blue ThinkVangate button,” is displayed at the lower left of the<br />
screen, press F1 to enter the BIOS Setup Utility.<br />
4. Using cursor keys, select HDD diagnostic program. Press<br />
enter.<br />
5. Using cursor keys, select Main hard disk drive or Ultrabay<br />
hard disk drive.<br />
6. Press Enter to start the diagnostic program.<br />
Diskette drive 1. Diagnostics --> Diskette Drives<br />
2. Interactive Tests --> Diskette<br />
50 ThinkPad <strong>T500</strong> <strong>and</strong> <strong>W500</strong> <strong>Hardware</strong> <strong>Maintenance</strong> <strong>Manual</strong>